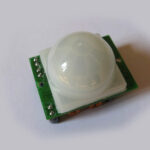
 A great little sensor you can add to your Raspberry Pi projects is a PIR module. These 5V “Passive Infra Red” sensors are available for a few pounds from eBay. They can be powered from 5V and output 3V so can be connected directly to pins on the Pi’s GPIO header without any other components.
The module sets a single output pin high whenever it detects movement within its field of view. It holds this pin High (3.3V) for a minimum period of time. If continuous movement is detected the output pin will stay High. When the time has elapsed and no more movement is detected the output pin returns Low (0V).
I am currently using one in an alarm system and it works great for such a small and cheap device.
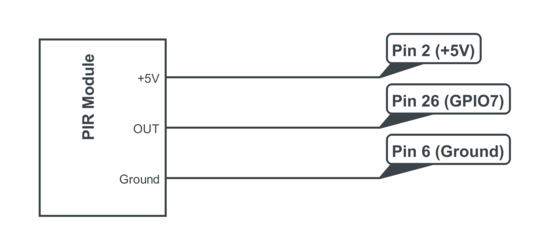
PIR Connections
Here is a diagram showing the pin-out on the PIR module and how I connected it to my Raspberry Pi :
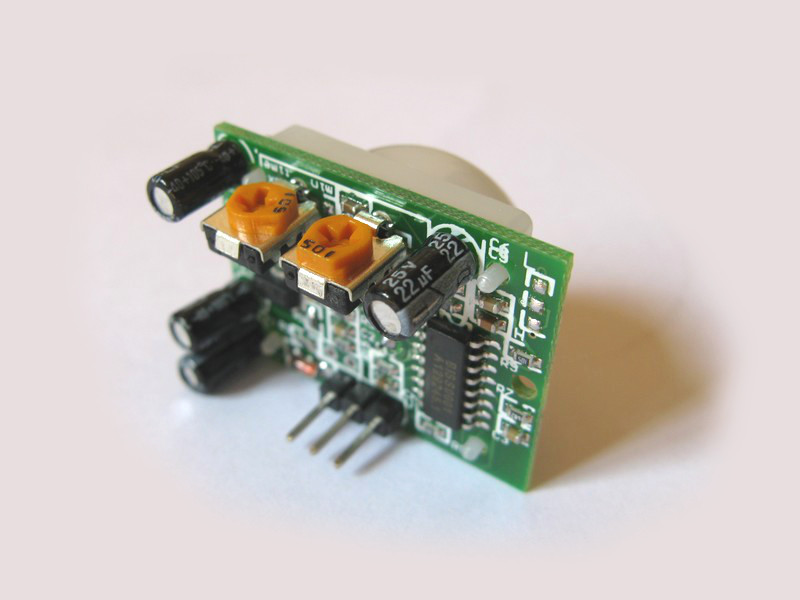
The device has two variable resistors that you can adjust to tweak the performance of the module.
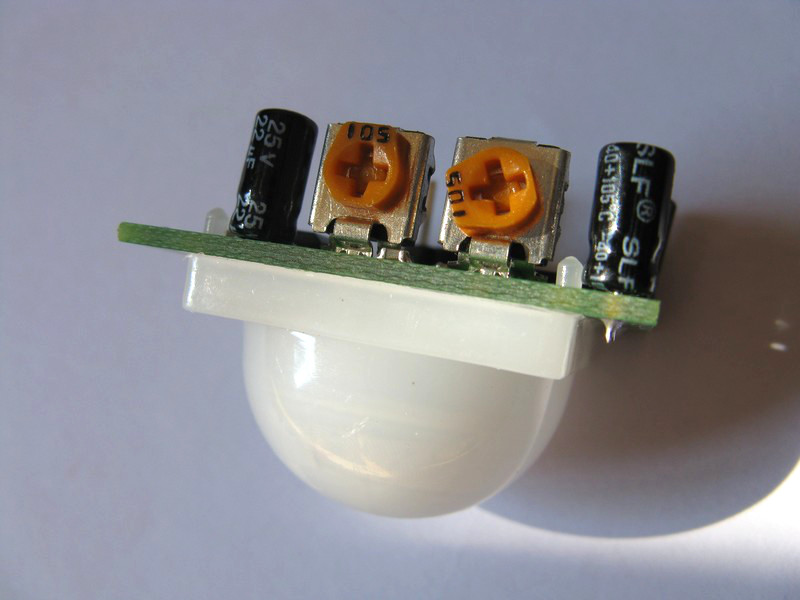
The first one (left-hand side on the photo) determines the sensitivity of the device. The default setting is usually 50%.
The second control (right-hand side on the photo and usually marked “time” on the PCB) allows you to adjust the amount of time the output pin stays at 3V (high) when it is triggered by movement. This can be set from a few seconds to 200 seconds. The default setting is usually a few seconds.
You can find on eBay vary in specification but they are all very similar.
Python Example Script
If you connect your module as shown in the diagram above the following Python script will allow you to get started. Cut and paste the script below into a text file and transfer to the Pi or download the script directly using this link.
#!/usr/bin/python
#+-+-+-+-+-+-+-+-+-+-+-+-+-+-+-+-+-+-+-+-+-+
#|R|a|s|p|b|e|r|r|y|P|i|-|S|p|y|.|c|o|.|u|k|
#+-+-+-+-+-+-+-+-+-+-+-+-+-+-+-+-+-+-+-+-+-+
#
# pir_1.py
# Detect movement using a PIR module
#
# Author : Matt Hawkins
# Date   : 21/01/2013

# Import required Python libraries
import RPi.GPIO as GPIO
import time

# Use BCM GPIO references
# instead of physical pin numbers
GPIO.setmode(GPIO.BCM)

# Define GPIO to use on Pi
GPIO_PIR = 7

print "PIR Module Test (CTRL-C to exit)"

# Set pin as input
GPIO.setup(GPIO_PIR,GPIO.IN)      # Echo

Current_State  = 0
Previous_State = 0

try:

  print "Waiting for PIR to settle ..."

  # Loop until PIR output is 0
  while GPIO.input(GPIO_PIR)==1:
    Current_State  = 0

  print "  Ready"

  # Loop until users quits with CTRL-C
  while True :

    # Read PIR state
    Current_State = GPIO.input(GPIO_PIR)

    if Current_State==1 and Previous_State==0:
      # PIR is triggered
      print "  Motion detected!"
      # Record previous state
      Previous_State=1
    elif Current_State==0 and Previous_State==1:
      # PIR has returned to ready state
      print "  Ready"
      Previous_State=0

    # Wait for 10 milliseconds
    time.sleep(0.01)

except KeyboardInterrupt:
  print "  Quit"
  # Reset GPIO settings
  GPIO.cleanup()
This script can also be downloaded onto your Pi directly using this command line :
wget https://www.raspberrypi-spy.co.uk/archive/python/pir_1.py
This can then be run using :
sudo python pir_1.py
When run the script waits for the output pin to go Low. It then prints a message to the screen every time the output state changes. This is either when movement is detected (output changes to High) or the device sees no movement (outout changes to Low).
Try changing the reset time by turning the “time” resistor clockwise by a few degrees. Run the script again, trigger the device and then wait to see how long it takes to go back to the ready state.
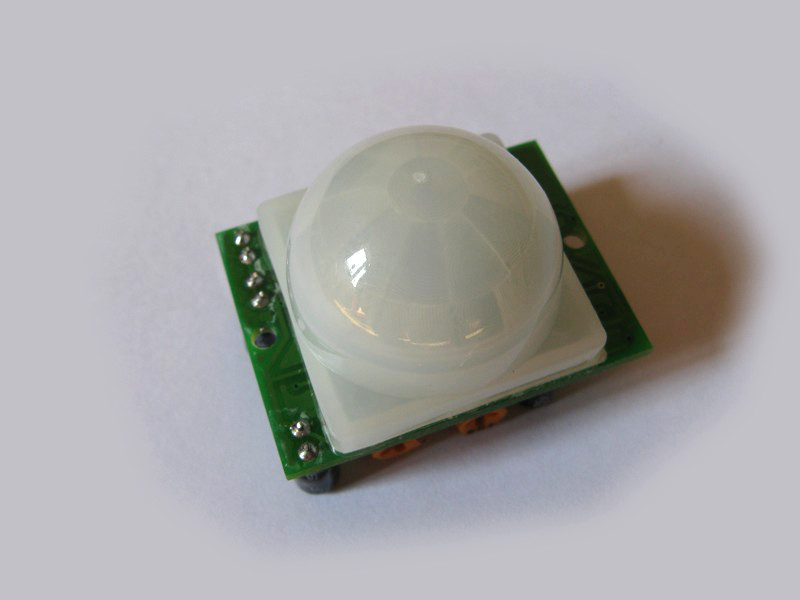
Photos
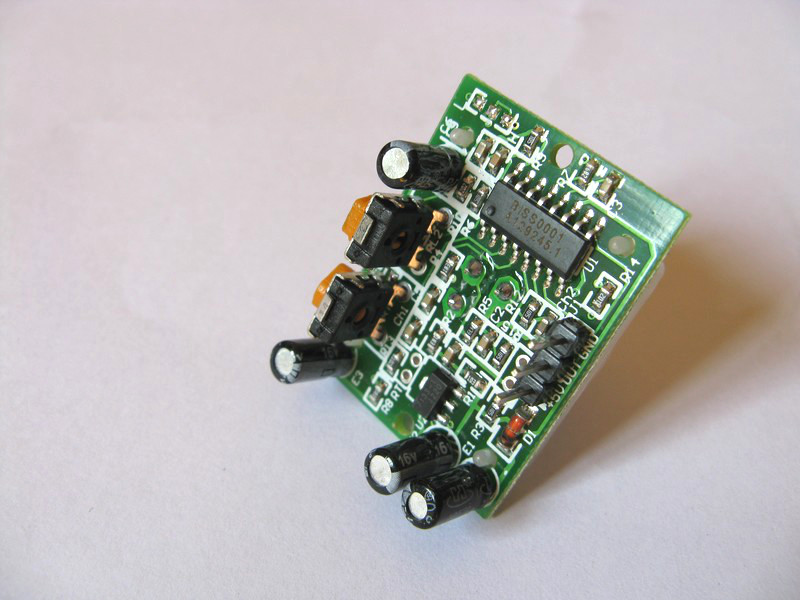
Here some more detailed photos of the PIR pins and two trimming controls :

Calibration
In Cheap PIR Sensors and the Raspberry Pi – Part 2 I show you how to calibrate your sensor to fine tune its performance.
Applications
The applications of this circuit include :
- Security systems
- Automatic photographs
- Robot sensors
Related Articles
Here are some of my other articles you might find interesting if you enjoyed this one :
40 Comments
Hi Matt.
Great information as usual.
I don’t suppose you have a link to the eBay lot you purchased from, do you? Or a part number? I have one of these cheap sensors but without the trimmers and the pin-outs do vary a bit!
—
Mike
The last two I got from eBay were from a seller called “abeyerr”. If you search for “PIR Motion Sensor Detector Module” you should see a load that look like the ones in my photos with the two trimmers on them.
I got one locally and also added this URL to my wish list.
http://www.aliexpress.com/item/Free-Ship-10PCS-LOT-HCSR501-HC-SR501-NEW-Adjust-Infrared-IR-PIR-Motion-Sensor-Detector-Module/519751367.html
Thanks Matt. Making a new breakout board to start testing one. To be added to the outdoor camera I am working on.
—
Peter
You can also buy a simplified version (no sensitivity or timing adjustment pot) from http://www.seeedstudio.com. I got mine from their website to use it with an Arduino but I have never hooked it up with the Raspberry Pi.
Just a quick question about the diagram. It says to connect the module to the Pi via pin 2 and 6 for power.
Isn’t Pin 2 for power “input” to the Pi? I read in another article on here that this Pin was used to power the Pi from batteries. So now I wonder how this Pin 2 can output 5V as well as take in 5V.
Can anybody explain?
If you don’t have a supply connected in the “usual” manner by the mini USB port you COULD supply the Raspberry by via it’s GPIO port on Pin 2.
Should you already have the Pi powered up in the normal way, then +5V is presented to the GPIO pin which can then be used to supply other devices. Not to sure what sort of power you can draw from it though, guessing it won’t be all that much.
Hope that helps
Hi!
That was an incredible post and thank to the post you explain how to install RPI GPIO package which helped too. I think a very good post.
By itself the PIR and the script aren’t very useful but as soon as I run this script with a webcam and an automatic email sender script, this will be my next surveillance system 😉
So thanks to you and thanks for taking your time, it really helps.
Hi,
Thanks for this, it is very useful. I would like to suggest an improvement, if you put at the end of the loop but still within the loop a ‘time.sleep(0.01)’ (you will also need to import time). It will pause the software for just 10ms each loop allowing the processor to do other things. if you look at CPU stats, before doing this, python will take up all available processor power now it only take about 2%.
Many thanks
HI,
thanks a lot for your post!
very simple and basic, so I guess that even I understood it this time 😉
My problem is, that it doesnt matter if the PIR is assembled or not, the screen alternates between the two messages “ready” and “motion detected”.
I tried to vary the potis, but without any success.
Has someone a explanation for me?
Hi there,
I’m using this script to trigger the pi camera and have it in rc.local in order to run on startup, however, ctrl-c doesn’t exit the script and I’m stuck before the login screen permanently!
Any ideas about what’s caused this?
Cheers!
Will
You can add a & sign to the end of your command in rc.local to make it run in the background. This will allow you to get to the login screen and use your Pi whilst it runs.
Before:
sudo python ~/pir.py
After:
sudo python ~/pir.py &
Pingback: Ultrasonic Distance Measurement Using Python – Part 2 | Raspberry Pi Spy
Thanks a lot. Works perfectly. I have created a script based on the showed here, that use Pushover.net service to send push notifications to other devices and apps.
The script has an .ini file to locate the script and configure it.
Im using screen to run on the background.
The Github repo is here:
https://github.com/espunny/raspberrypi-Alarm
to install:
git clone https://github.com/espunny/raspberrypi-Alarm.git
Corrections and suggestions are welcome.
Great little demonstrator. Instructions spot on worked first time. Now working on using Netio to set and unset it from outside the house, send picture via email from my PI Cam when triggered and then looking at hooking another PIR sensor up to a xbee module so I can have wireless remote sensors around the house. (I think that bit may be a bit more difficult!)
Thanks
Thanks for the script, it helped me a lot.
But why do say that pin 6 is ground? I think that should be pin 7. It took me (an absolute beginner) a while to notice that it was wrong wired.
On the Pi GPIO header Pin 6 is ground. Pin 7 is GPIO4. Take a look at the GPIO diagram on my Simple Guide to the RPi GPIO Header and Pins.
Ah ok, sorry. I didn’t know that you are counting row-wise and not column-wise. Thanks!
Thanks for this excellent tutorial.
Do you have any knowledge about sizes and ranges this PIR sensor can detect?
Looking for something to detect ‘fox sized’ animals in a 10meters range at night.
Would that be possible?
At the weekend we are deploying a wildlife camera in our garden using one of those sensors. I will try and get a better idea of range and post an update.
Hi Matt,
Don’t want to put you under pressure – if you have any news regarding your test it would be nice if you can let me know.
Cheers
pir sensor is nice – anyway for you too I would recommend to use the motion-software that registers movements in front of the cam and can be set quite precise regarding amount of changed pixels, quality and “frames to record” before movement starts.
@a2moosh: for the darkness I’m looking for some infrared led’s that could help raspberry’s PiNoir camera to help taking good pictures.
Wasn’t successful yet, even with infrared led’s from the wildlife camera the raspberry picture quality is, well, ‘improvable’. Do you have anything there that works? Any suggestions? Any particuler devices? Cheers.
Pingback: Raspberry Pi Project : Motion Sensor Fortune Teller by Richard Julian
Thx Matt, I’ve used your script as a base for my worksite-surveillance script.
I’m constructing a house & have 2 raspberry pi’s hanging around.
It takes pictures at certain intervals and/or when motion is sensed
https://github.com/TrueOsiris/pirsnap
I’m looking forward to the first new story where a Raspberry Pi camera catches a burglar. Anything I can do to help that happen is great 🙂 I really must put more time into my security system which was the whole idea of me getting a Pi before I created this site!
I’ve had two instances of clandestine dog pooping with no scooping since I got mine going. A gentle reminder to the owner that picking up after the dog would be much appreciated (bolstered with a finger point to the sensor and webcam in my front window) did the trick!
Hey Matt,
Thanx for your work, I am using this script to make my first steps on working with sensors!
yeaaahh! Thanks a lot. Took me 5 minutes and works perfectly! 🙂
Pingback: Détecteur de mouvement (PIR) du Raspberry Pi à la ZiBASE – Part 1/3 | Onlinux
Pingback: Animalcam version 1 | garysshed.co.uk
Hi Matt,
If I understand this correctly, one could connect several PIR sensors to one RPi by just using different GPIO pins.
However, do you have any idea/experience about the cables that can be used and their length in particular? Could I have the RPi in a central location and run the PIRs from anywhere in the house?
Thanks for this great article!
Matthias
I think it would be a case of trying it with different cable lengths. I run two magnetic switches with 10 metres of telephone cable in my garage security system onto the GPIO and they work fine. Some people claim it shouldn’t work but it works just fine!
This is one of the best tutorials I found to help connect this PIR to the raspberry pi and the script seems solid with only one current problem. I’m getting “Waiting for PIR to settle …” and it just sits here.
Anyone have an idea what is wrong?
amazing… googled the PIR model I had and although it physically looks like 90% of the other modules out there. This one had the ground and power reversed. It works!!!!
Pingback: Sensor de presencia en Raspberry Pi | Internet de las Cosas
I have instructions on enclosing the PIR sensor for outdoor use. I also have Python code there for running multiple sensors on the Raspberry Pi
Pingback: Animalcam version 2 | garysshed.co.uk
Nice Programm.
Is there a possibility to safe the motion detection into a file? I want to know when the detector detect a motion.
Can the programm also be autostarted?
I would be possible to add a line to a text file with the time the motion was detected. Read up on the Python “open” command.
Be careful! Some of these IR devices have the VCC swapped with GND vrs the diagram here.
To be sure take off the plastic lens deal and look at the silkscreened labeling underneath.