The default images provided for the Raspberry Pi are usually 2GB and this results in wasted space on larger SD cards.
When the image is written to your card three partitions are created. A boot partition, a Linux system partition and a swap file partition. They are sized to fit on a 2GB SD card and the additional space on larger cards is unallocated and unusable.
This procedure explains how you can allocate that spare space and use the full capacity of your SD card. This involves moving the swap partition to the end of the card and then increasing the size of the Linux system partition that sits in the middle.
UPDATE : This process is unnecessary if you are using the latest version of Raspbian. Simpy run “sudo raspi-config” and use the “Expand filesystem” option.
To start will you need an SD card with the image written to it. Check this card works in your Raspberry Pi. If it doesn’t work at this point there is no point continuing!
In the example I will be using the Debian image on a 8GB SD card and to perform the partition resize I will use a GParted Linux Live disc. A “Live” disc allows you to boot into a operating system on the disc without messing with your usual installed operating system. This is great for tasks such as this as it allows Windows users (me!) to run a Linux application on a temporary basis.
Step 1 – Prepare a GParted live disc
- Download the latest stable GParted disc image from : http://gparted.sourceforge.net/download.php
- Burn the ISO to a blank CD or DVD. Make sure your burning application is writing the ISO file to the disc as an Image not simply as a normal file. If in doubt use the free Imgburn to write the image to the disc.
Step 2 – Boot from the disc
In order to boot from a disc your computer must be configured to boot from it’s optical drive before the hard drive. You may need to edit your BIOS settings to change the boot order of your devices.
- Insert the disc into your computer and reboot.
- Select “GParted Live (Default settings) from the menu.
- Select “Don’t touch keymap” from the menu.
- Select the nationality of your keyboard by typing the appropriate number.
- Select ‘0’ from the mode option menu and press Enter.
GParted will now load.
Step 3 – Select your SD card
The GParted window will show the details of the default device. We need to change this to the SD card you inserted earlier. You can select it using the drop-down list in the top-right of the GParted window.
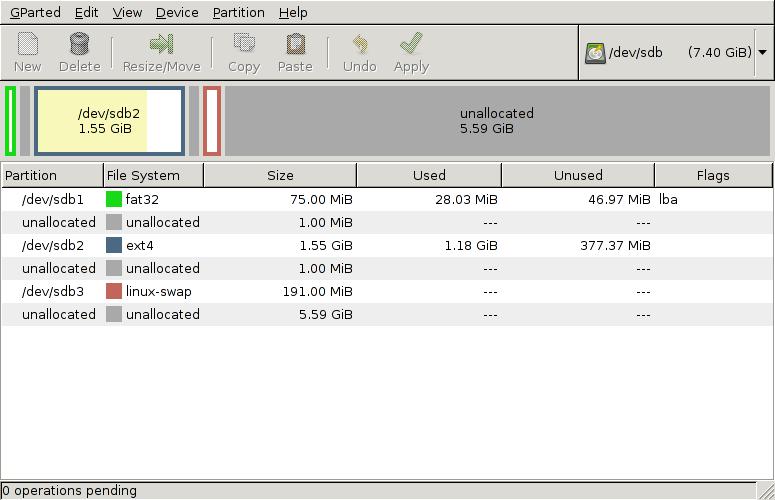
Here is an example where I have select my 8GB SD card from the list.
You can see the 75MB boot partition, the 1.55GB system partition and the 191MB swap partition.
Step 4 – Move the swap partition
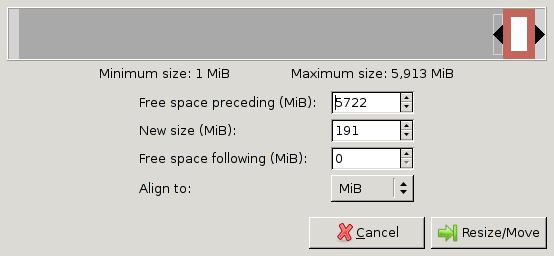
We will move the swap partition to the end of the SD card.
- Select the linux-swap partition.
- Click the “Resize/Move” button.
- Position the cursor in the centre of the white box.
- Drag it to the far right.
The size stays the same but there is now no space after it. Click cancel if you make a mistake and try again.
- Click “Resize/Move” to finish.
Step 5 – Resize the system partition
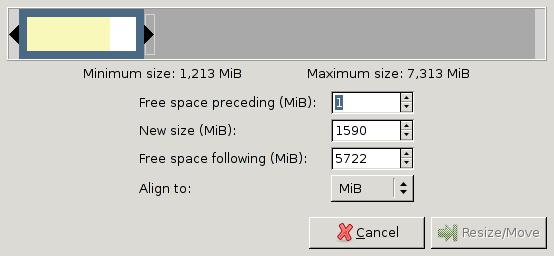
Now we can increase the size of the system partition.
- Select the system partition (labelled “ext4”).
- Click the “Resize/Move” button.
- Position the cursor over the arrow on the right-hand side of the white box.
- Drag the arrow to the far right to increase its size.
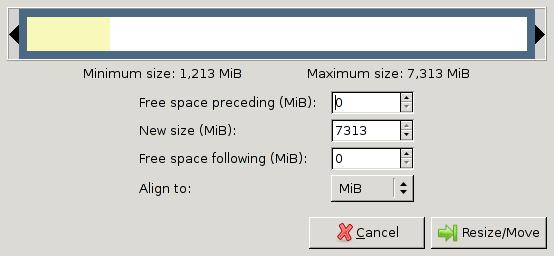
The “New Size” should increase and the “Free space following” should reduce to zero.
You may get the odd 1MB either side of the partition but on an 8GB card these bits of padding aren’t worth worrying about.
- Click the “Resize/Move” button to finish.
Step 6 – Apply the changes
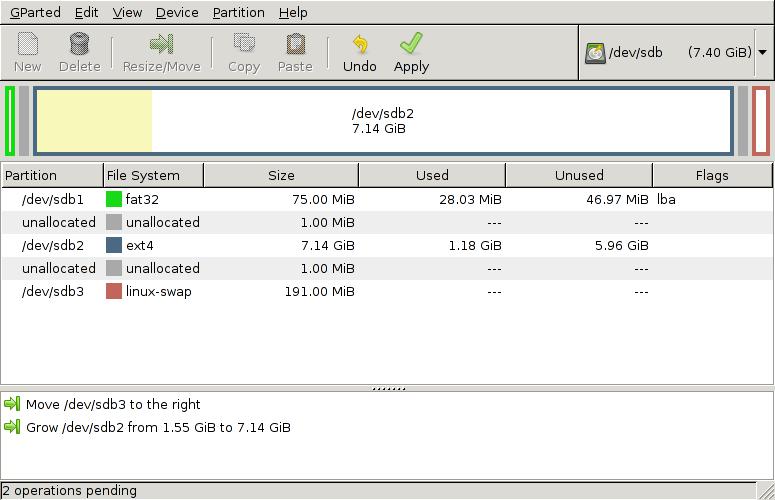
The application has now inserted our two operations into the pending operations list.
There is a “Move” and a “Grow” operation. It is worth doing a quick sanity check at this point. Make sure you are moving the linux-swap partition and the increase in size of the system partition matches your expectations.
- Click the “Apply” button to make the changes.
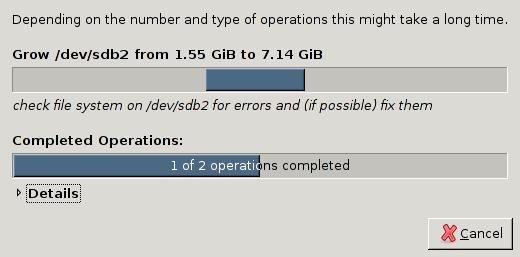
- Wait for the operations to complete.
The two warnings are usually related to a feature not being available within the system so they can be ignored.
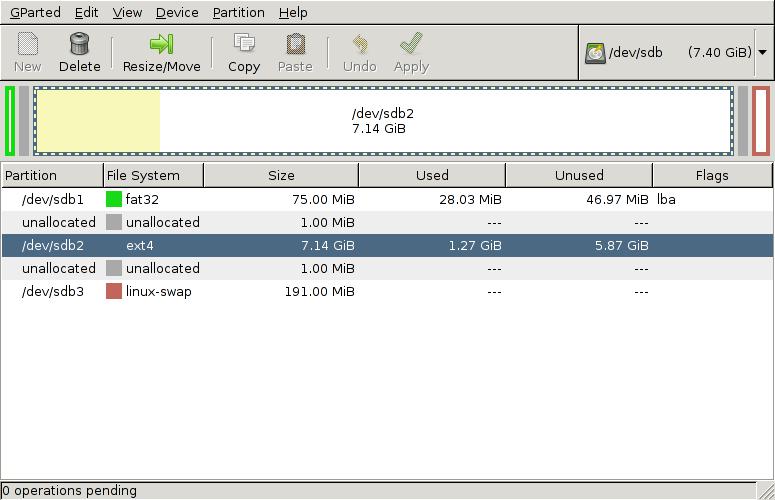
The final state of the SD card can be seen below. The boot and swap partitions are the same size as before but the system partition is now much bigger. There is an extra 5.87GB available which corresponds to the extra 6GB due to the bigger 8GB SD card.
Step 7 – Reboot!
- Double click the red “Exit” button in top left corner of the desktop
- Select “Restart” and click “OK”
- Remove the disc when prompted
- Remove the SD card
- Press Enter
Your computer will reboot as usual into your normal operating system.
Step 8 – Test SD card
You can now insert the SD card into your Raspberry Pi and test that it boots correctly.
You should now have lots of extra space available.



6 Comments
An alternative — and often easier method — is to create a new ext3/ext4/(filesystem of your choice) partition using the unallocated space and “mount” that under a new/existing directory e.g. /home or /opt
Thanks for the suggestion. I think this would be the preferred method if you wanted to store data/photos etc and keep it all separate from your operating system partitions. I’m sure I’ll give this a try at some point once I start using the Pi to do something practical.
Thanks for that. I have made the same operation with the SD card, 4G to 8G. Great !
Hi,
it really really works for my 8gb sd card. I kept running my raspberian..
There is no such info on raspberry pi’s forum.. All info listed there is rubbush.. Very stupid. THANKS MATT…!
Matt….Great tutorial. I’ve used this process several times. It just works!!!
However, now I may have gotten myself into a bind. I recently created a copy of my 8GB SD card using the process detailed here(http://www.simonthepiman.com/2-9-how_to_backup_your_sdcard_using_windows.php) and then copied it onto a 32 GB SD. Pi booted just fine.
Now I used your process to expand it out to the full 32 GB. It worked and the Pi booted just fine.
Now the problem, I’ve made lots of changes to my system and now want to create a backup SD card in case I corrupt this one. I don’t have another 32GB SD card. How can I “downsize” the OS folder so I can then create a copy which will fit on my 16GB SD card?
Thanks in advance for any ideas…..RDK
I have the same Problem as RDK
Has anyone the same problem and solved this ?
best regards
fireskyer