
Following on from my Ultrasonic Distance Measurement Using Python – Part 1 article I decided to make my Python script a little bit more sophisticated.
In this example the script takes three measurements and calculates the average. This is displayed and one second later it takes another average. This allows the script to be used to constantly measure distances and print them to the command line.
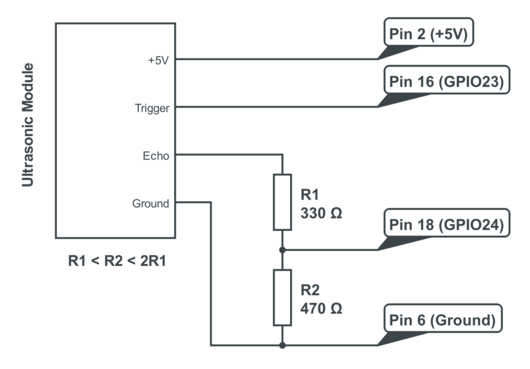
The Ultrasonic module is connected as before to the Raspberry Pi using a small piece of breadboard and some jumper cables.
The Trigger accepts a 3.3V output from the Pi but the Echo pin must be converted to 3.3V from 5V before it reaches the GPIO input.
Python Script
Here is the modified script :
#!/usr/bin/python
#+-+-+-+-+-+-+-+-+-+-+-+-+-+-+-+-+-+-+-+-+-+
#|R|a|s|p|b|e|r|r|y|P|i|-|S|p|y|.|c|o|.|u|k|
#+-+-+-+-+-+-+-+-+-+-+-+-+-+-+-+-+-+-+-+-+-+
#
# ultrasonic_2.py
# Measure distance using an ultrasonic module
# in a loop.
#
# Author : Matt Hawkins
# Date   : 28/01/2013

# -----------------------
# Import required Python libraries
# -----------------------
import time
import RPi.GPIO as GPIO

# -----------------------
# Define some functions
# -----------------------

def measure():
  # This function measures a distance
  GPIO.output(GPIO_TRIGGER, True)
  time.sleep(0.00001)
  GPIO.output(GPIO_TRIGGER, False)
  start = time.time()

  while GPIO.input(GPIO_ECHO)==0:
    start = time.time()

  while GPIO.input(GPIO_ECHO)==1:
    stop = time.time()

  elapsed = stop-start
  distance = (elapsed * 34300)/2

  return distance

def measure_average():
  # This function takes 3 measurements and
  # returns the average.
  distance1=measure()
  time.sleep(0.1)
  distance2=measure()
  time.sleep(0.1)
  distance3=measure()
  distance = distance1 + distance2 + distance3
  distance = distance / 3
  return distance

# -----------------------
# Main Script
# -----------------------

# Use BCM GPIO references
# instead of physical pin numbers
GPIO.setmode(GPIO.BCM)

# Define GPIO to use on Pi
GPIO_TRIGGER = 23
GPIO_ECHO    = 24

print "Ultrasonic Measurement"

# Set pins as output and input
GPIO.setup(GPIO_TRIGGER,GPIO.OUT)  # Trigger
GPIO.setup(GPIO_ECHO,GPIO.IN)      # Echo

# Set trigger to False (Low)
GPIO.output(GPIO_TRIGGER, False)

# Wrap main content in a try block so we can
# catch the user pressing CTRL-C and run the
# GPIO cleanup function. This will also prevent
# the user seeing lots of unnecessary error
# messages.
try:

  while True:

    distance = measure_average()
    print "Distance : %.1f" % distance
    time.sleep(1)

except KeyboardInterrupt:
  # User pressed CTRL-C
  # Reset GPIO settings
  GPIO.cleanup()
This script can also be downloaded onto your Pi directly using this command line :
wget https://bitbucket.org/MattHawkinsUK/rpispy-misc/raw/master/python/ultrasonic_2.py
This can then be run using :
sudo python ultrasonic_2.py
This will give you a command line that looks something like this :
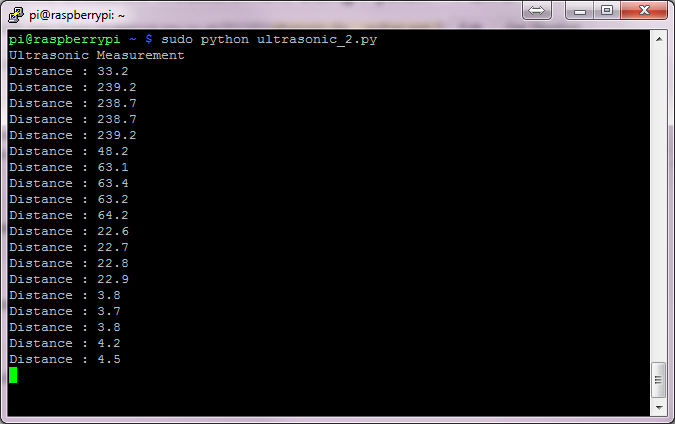
Obviously your measurements will depend on what you point your sensor at!
Related Articles
Here are some of my other articles you might find interesting if you enjoyed this one :
23 Comments
Great post as always, Matt.
Awesome!!!
This could be very useful in a quadrocopter to stabilise the hovering height.
How much does the non-realtime nature of the OS affect the readings?
What is the maximum distance this could measure?
Thanks
Hi
My Dad is blind and I’m looking into a project to make some kind of wearable device (hat, glasses, armband, kneepad etc) which detects upcoming obstructions and feeds back via audio or vibration to alert him. He keeps banging his head on things because his stick is usually sweeping low. This looks like a good start for the distance detector part. Would this be the right approach? Do you know of any projects which have done the whole thing? I haven’t bought a Pi yet, just done 15 minutes surfing.
I have seen one using a different type of sensor (http://jeremyblythe.blogspot.co.uk/2012/09/raspberry-pi-distance-measuring-sensor.html) – which would you consider more appropriate for my application?
Thanks for any help – as a noob I want to start off in the right direction.
Chris (Ex-developer, now pre-sales)
My experience with this sensor is that the code gives differing results depending on the current CPU load on the Pi. See post 50 at the above website. I ended up doing 3 samples each time and keeping the lowest result. The minimum time between good readings is about 2 seconds — not useful. Too bad there doesn’t seem to be a way to “sleep” until the ECHO pin causes an interrupt. This kind of device would probably work better with an Arduino where ump-teen Linux background processes would not be a problem.
all i get everytime i execute the python is
ultrasonic_2.py:70: RuntimeWarning: This channel is already in use, continuing anyway. Use GPIO.setwarnings(False) to disable warnings.
GPIO.setup(GPIO_TRIGGER,GPIO.OUT) # Trigger
any help would mean a lot. thanks
That is just a warning issued by the RPi.GPIO library. It just means you are configuring a GPIO output that has previously been configured. Probably in a previous run of the script. It can be ignored. Or you can stick GPIO.setwarnings(FALSE) at the start of the script to disable it.
Pingback: Ultrasonic Distance Measurement Using Python – Part 1 | Raspberry Pi Spy
Thanks for the very helpful article.
I had need of something like this to report the water level in my porch plant watering system. However; all I had available were the Parallax PING))) 28015 units which are 3-pin; combining the Trigger and Echo into a single channel. I found that a pair of simple functions to switch the GPIO pin between .IN and .OUT was about all that was necessary to adapt your code.
I also found that the 28015 seems perfectly happy in my implementation running directly off the Pi’s 3.3v rail — eliminating the need for a voltage divider. I doubt that this set-up would be very reliable for a dynamic environment, but for a once/day check of my reservoir level in gallons, it seems to suffice. I do use a sort of “circular buffer” to smooth the readings because my set-up allows for the luxury of time.
Cheers!
Even if you have the 4-pin Ultrasonic unit with separate ‘trigger’ and ‘measure’ pins, it is possible to combine these so that only a single GPIO pin is used on the Pi. Just adds a couple of resistors to ‘pull down’ the trigger pin and between the 2 pins, as well as make the voltage divider, and then switch the GPIO pin between output and input as needed
Here’s a link to the source discussion for this:
http://letsmakerobots.com/node/36885
to reduce the error you can use:
def measure_average():

distances=[]

elements = 20

distances= range(0,elements)
for i in range(0,elements):
distances[i]= measure()
time.sleep(0.1)
d = sum(distances) /len(distances)
return d
Fantastic Post!
Can I ask how can I program the RPi to run a Python script when the Ultrasonic senses a certain distance?
For example, start a certain script (sample.py) when the Ultrasonic sensor detects the object is 10cm.
We have a LV Maxsonar EZ4 ultrasonic sensor
http://maxbotix.com/documents/LV-MaxSonar-EZ_Datasheet.pdf
here, trying to use the pwm mode to measure water level. However, instead of having the trigger and echo pins, this particular sensor only has one PW pin. I was wondering how could we modify your code to make our sensor interface with a Raspberry Pi.
Cool but is very slow, am trying to find examples of doing the same in C or C++
I’m considering a garage parking guide which switches on a yellow light on approach (ie: within x metres of the stopping point) then a red light at the stop point. My idea is to have two sensors feeding to the pi mounted on the side wall of the garage at the trigger points. I’m wondering if the script can be modified to take readings from two sensors, checking to see if an object is within range then giving appropriate trigger signals,
KD
Works fine for me. Thanks!
/Mike
Script works well for me, but does anyone have an answer to Paolo’s question? How would you call another script (or function), once the ultrasonic gives a particular distance (e.g., 10cm as Paolo mentioned)? Thanks.
Thanks for the very helpful article.
can i ask how do i get the value of the received frequency using this HC-SR04. i want to make a speed measuring device using hc-sr04 sensor by using doppler effect. thanks
sorry for my bad english
These sensors don’t report the frequency, just the timing of the pulse. So I’m not sure if you can use an HC-SR04 module for measuring speed.
Hi,
Every time i run the command “sudo python ultrasonic_2.py” i just get this:
“Ultrasonic Measurement
Speed of sound is 331.12 m/s at 20 deg
ultrasonic_2.py:79: RuntimeWarning: This channel is already in use, continuing anyway. Use GPIO.setwarnings(False) to disable warnings.
GPIO.setup(GPIO_TRIGGER,GPIO.OUT) # Trigger”
If any one could help it would be amazing thanks,
Andy
Add this line:
GPIO.setwarnings(False)
after the GPIO.setmode line.
It just tells the GPIO library to ignore the previous configuration and just continue.
Doing a busy loop waiting for GPIO pin to change is a huge waste of CPU.
You can use GPIO.wait_for_edge() instead.