Facebook Twitter Instagram Pinterest YouTube
    Trending
    • Add Kodi to RetroPie Menu
    • Disable Auto-login in Raspberry Pi OS
    • Raspberry Pi Cloud Storage with MEGA
    • RetroPie Temperature Monitor from Menu
    • Pi Pico Pinout and Power Pins
    • Install Arduino IDE on Raspberry Pi
    • Raspberry Pi 400 SSD Upgrade
    • Raspberry Pi Temperature Monitoring
    Facebook Twitter Instagram Pinterest YouTube RSS
    Raspberry Pi SpyRaspberry Pi Spy
    • Home
    • Categories
      • General
      • Hardware
      • Programming
      • Python
      • Software
      • Tutorials & Help
    • BerryClip
      • BerryClip Instructions
      • BerryClip Plus Instructions
      • Videos & Reviews
    • Buy
      • Buy Pi
      • Buy Pi Accessories
      • Buy Books
    • Tools
      • Ultimate Raspberry Pi Alexa Skill
      • Pi Power Estimator App
      • Pi-Lite 14×9 LED Matrix Sprite Editor
      • RPiREF Pin-out Reference App
      • Simple Ohm’s Law Calculator
      • Web Sites & Links
    • Tutorials & Help
        Featured
        November 9, 20200

        Raspberry Pi Temperature Monitoring

        Recent
        May 6, 2022

        Add Kodi to RetroPie Menu

        February 26, 2022

        Disable Auto-login in Raspberry Pi OS

        February 2, 2022

        Raspberry Pi Cloud Storage with MEGA

      1. Contact Us
      2. Site Map
      Raspberry Pi SpyRaspberry Pi Spy
      You are at:Home»Hardware»BerryClip»Berryclip 6 LED Board Testing in C

      Berryclip 6 LED Board Testing in C

      2
      By Graham on April 5, 2013 BerryClip, Software

      BerryClip 6 LED Board
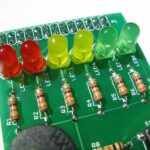
This post is for the lucky owners of the BerryClip 6 LED add on board and is the first of a series of posts to get you started with an alternative to Python.

      This article covers using C, but there will be future posts for using the BerryClip directly from Scratch and also using the node.js javascript language.

      The easiest way to do this in C, is to use the  very popular wiringPi C library developed by Gordon Henderson, aka drogon.

      The code is available from BitBucket or by cutting and pasting the text below into a file called test1.c :

      
      #include <wiringPi.h>
      #include <stdlib.h>
      
      int leds[6] = { 7, 0, 3, 12, 13, 14 };
      int BUZZER = 10;
      int BUTTON = 11;
      void all_leds_off();
      void init_pins();
      
      int main (void) {
        //Check we have wiringPi
        if (wiringPiSetup () == -1 ) exit (1);
        init_pins();
        all_leds_off();
        for (;;) {
          if (digitalRead (BUTTON) == 1 ) {
            for (int i = 0; i < 6; i++) {
              digitalWrite (BUZZER,1);
              digitalWrite (leds[i],1);
              delay (50);
              digitalWrite (BUZZER,0);
              delay (450);
            }
            delay (1000);
            all_leds_off();
          }
          delay(50);
        }
        exit(0);
      }
      
      void init_pins() {
        //set leds as outputs...
        for (int i = 0; i < 6; i++) {
          pinMode(leds[i], OUTPUT);
        }
        // set buzzer as output...
        pinMode(BUZZER, OUTPUT);
      
        // set button as an input...
        pinMode(BUTTON, INPUT);
      }
      
      void all_leds_off() {
        for (int i = 0; i < 6; i++) {
          digitalWrite (leds[i],0);
        }
      }


      You will need wiringPi, so please pop over to Gordon’s site to learn how to install wiringPi.

      You may notice the pin numbers used in the above example are different to those used in the Python examples.  This is due to wiringPi having it’s own pin numbering system. See Gordon’s pin page for clarification.

      To compile test1.c please create a file called Makefile in the same directory as test1.c with the following contents:

      DEBUG = -O3
      CC    = gcc
      INCLUDE = -I/usr/local/include
      CFLAGS = $(DEBUG) -Wall -std=c99 $(INCLUDE) -Winline -pipe
      
      LDFLAGS = -L/usr/local/lib
      LIBS = -lwiringPi
      
      OBJ = test1.o
      
      BINS = test1
      
      test1: test1.o
              @echo [link]$(CC) -o $@ test1.o $(LDFLAGS) $(LIBS)
      
      .c.o:
              @echo [CC] $<
              @$(CC) -c $(CFLAGS) $< -o $@
      
      clean:
              rm -f $(OBJ) *~ test1
      

      In the same directory type

      make

      To run the program, type

      sudo ./test1

      Enjoy C, or watch for my next post – if I get a language request in the comments, then I’ll be happy to get the Berry Clip to learn another language in a subsequent post.

      Share. Facebook Twitter Pinterest LinkedIn Tumblr Email
      Previous ArticleBristol Mini Maker Faire 2013
      Next Article Raspberry Pi AA Battery Shoot-out

      Related Posts

      Disable Auto-login in Raspberry Pi OS

      Raspberry Pi Cloud Storage with MEGA

      Raspberry Pi 400 SSD Upgrade

      2 Comments

      1. Leo Leibovici on April 5, 2013 6:25 pm

        The #include statements look a bit strange!

        Leo

        Reply
        • Matt on April 7, 2013 10:03 pm

          Should be corrected now!

          Reply

      Leave A Reply Cancel Reply

      This site uses Akismet to reduce spam. Learn how your comment data is processed.

      Recent Posts
      May 6, 2022

      Add Kodi to RetroPie Menu

      February 26, 2022

      Disable Auto-login in Raspberry Pi OS

      February 2, 2022

      Raspberry Pi Cloud Storage with MEGA

      January 7, 2022

      RetroPie Temperature Monitor from Menu

      January 24, 2021

      Pi Pico Pinout and Power Pins

      Categories
      • 1-wire
      • 3D Printing
      • Add-ons
      • BBC Micro:bit
      • BerryClip
      • Books
      • Camera Module
      • Cases
      • Events
      • General
      • Hardware
      • I2C
      • Infographics
      • Interfaces
      • Minecraft
      • Model A+
      • Model B+
      • News
      • Pi Models
      • Pi Zero
      • Power
      • Programming
      • Python
      • Raspberry Pi OS
      • Raspbian
      • RetroGaming
      • Robotics
      • Sensors
      • Software
      • SPI
      • Tutorials & Help
      Tags
      3D Printing Arduino audio battery berryclip Birthday bluetooth cambridge camera CamJam DigiMakers display games GPIO I2C interface Kickstarter LCD LED Linux media Minecraft Model A Model B motionEyeOS PCB photography photos Pi-Lite portable power python Raspberry Jam Raspberry Pi Bootcamp raspbian Retrogaming retroPie screen SD card security sensor SPI temperature ultrasonic video
      Raspberry PI Related
      • Adafruit Blog
      • Average Maker
      • Official RaspBerry Pi Site
      • Raspberry Pi Pod
      • RasPi.tv
      • RaspTut
      • Stuff About Code
      Tech Resources
      • MattsBits – Pi Resources
      • Microbit Spy
      • Technology Spy
      Archives
      About

      Unofficial site devoted to the Raspberry Pi credit card sized computer offering tutorials, guides, resources,scripts and downloads. We hope to help everyone get the most out of their Pi by providing clear, simple articles on configuring, programming and operating it.

      Popular Posts
      September 19, 2014

      Top 5 Reasons The Raspberry Pi Sucks

      July 27, 2012

      16×2 LCD Module Control Using Python

      October 20, 2013

      Analogue Sensors On The Raspberry Pi Using An MCP3008

      Recent Posts
      May 6, 2022

      Add Kodi to RetroPie Menu

      February 26, 2022

      Disable Auto-login in Raspberry Pi OS

      February 2, 2022

      Raspberry Pi Cloud Storage with MEGA

      Facebook Twitter Instagram Pinterest YouTube RSS

      Entries RSS | Comments RSS

      This site is not associated with the official Raspberrypi.org site or the Raspberry Pi Foundation. Raspberry Pi is a trademark of the Raspberry Pi Foundation.

      Copyright © 2022 - All Rights Reserved - Matt Hawkins

      Type above and press Enter to search. Press Esc to cancel.