It’s easy taking photos using the Pi camera module using the excellent raspistill command line utility or the PiCamera Python library. I wanted to experiment with the different settings available for EX (Exposure) and AWB (Auto White Balance) and see how they performed in different environments.
 Trying different settings manually seemed like a lot of work so I decided to write some scripts that would take a sequence of photos using all available options. I could then quickly review the photos and see which ones looked best in a particular environment.
The scripts could be used whenever I needed to quickly check if tweaking the options was worth considering.
Option 1 : Python script using Raspistill
Raspistill is the command line utility included with Raspbian that gives you an easy way to control the Pi camera. An example command which uses the EX and AWB options is shown below :
raspistill -o myphoto.jpg -ex night -awb shade
These ex and awb options can be set to the following values :
-ex

off,auto,night,nightpreview,backlight,spotlight,sports
snow,beach,verylong,fixedfps,antishake,fireworks

-awb

off,auto,sun,cloud,shade,tungsten,fluorescent,
incandescent,flash,horizon
Here is a link to the script that uses raspistill to take the sequence of images : pi_camera_options1.py
You can download directly to your Pi using :
wget https://bitbucket.org/MattHawkinsUK/rpispy-misc/raw/master/camera/pi_camera_options1.py
It can be run using :
python pi_camera_options1.py
or :
python3 pi_camera_options1.py
The total number of photos required to try out all of the combinations will be over 100. I didn’t want quite this number of photos so only a selection of options are defined in the “list_ex” and “list_awb” lists. You and add other values if required.
Option 2 : Python script using PiCamera library
Rather than use the command line you can also take photos using the excellent PiCamera Python library. Here is a link to the script that uses PiCamera to take the sequence of images : pi_camera_options2.py
You can download directly to your Pi using :
wget https://bitbucket.org/MattHawkinsUK/rpispy-misc/raw/master/camera/pi_camera_options2.py
It can be run using :
python pi_camera_options2.py
or :
python3 pi_camera_options2.py
As with the raspistill script you can edit this example and add additional values to the “list_ex” and “list_awb” lists.
PiCamera uses the older set of AWB values. This means it uses “sunlight” and “cloudy” while Raspistill uses “sun” and “cloudy”.
The PiCamera version has the advantage that it embeds text in the photo so it is clear what settings were used to create it.
Results
The images created by either script will be saved in the same directory as the script so you may want to run them in a sub-directory to keep your test files together.
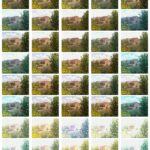
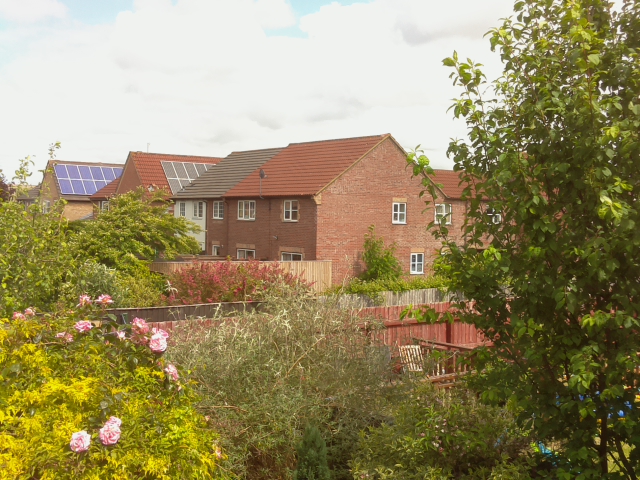
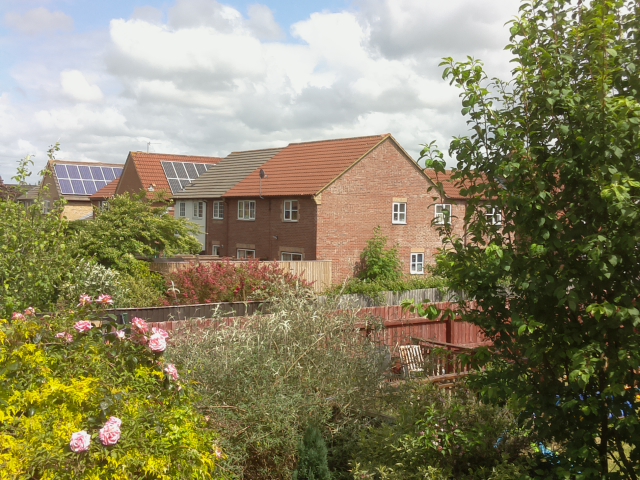
My tests were run by taking photos out my study window. I used the free image utility XnView to create a “Contact Sheet” with a set of the photos :
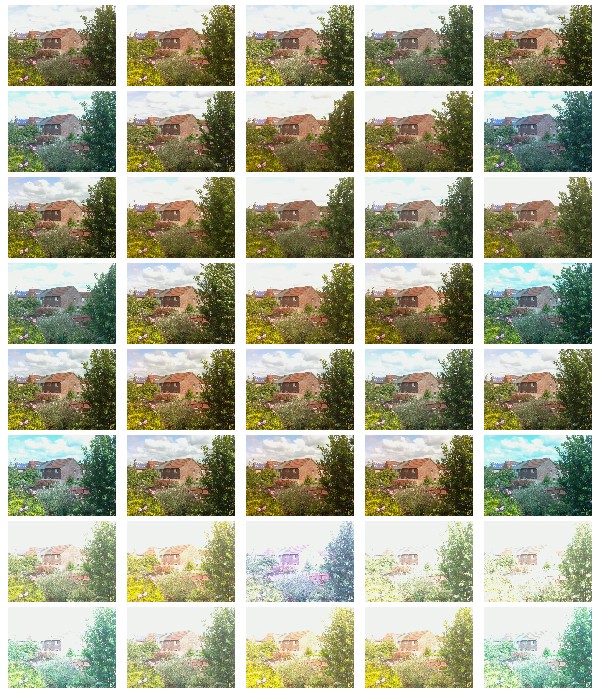
As you can see there is big difference between the images. In this case one of the better images is the Automatic setting (top left) but the clouds are slightly clearer where EX was “auto” and AWB was “horizon”. I suspect “horizon” is better for images where the top half of the scene is brighter than the lower half.
Funnily enough the “cloud” setting (below left) didn’t do as good a job on the clouds compared to the “horizon” setting (below right).
In this example the default settings were great. These scripts will prove more useful when you are dealing with a more challenging scene, perhaps with lower light levels, nature photography or stop motion animation.
13 Comments
Can see this being incredibly useful, thanks!
How to do this using c language?Please post me..
Learn Python. It’s easy 🙂
If you know C language then learn Python is REALLY easy.
Hi Giskard,
i want code in c language because it can be used in my camera application..please post me in c language…
Amazing and useful!
I am glad google brought me to your website. This is one of the most informative website on ‘practical’ implementation – no beat around the bush. Keep updating 😉
@Arun: Don’t be lazy learn python. I am versed in C,C++, C#, Python is next in my list and already learnt much in just 2 days time.
If you still want, google “python to c# converter”..
Regards..
Hi this is a great blog! I have just purchased the PI and keen to learn Python! What is the best way for a novice to learn?
Hi, Thanks a lot for your Python script. I have been running it with the Pi Cam against the sun going down to view what setting fits best and tonight I’ll have it running with the Pi cam against the moon 😉
One small thing I found a little confusing: unremarking the “other” awb and ex settings still left me with only 6 images. Might be clear to other people but if you unremark settings you have to remark the other settings because the script uses the last values for awb and ex which it reads from the script.
Now, I have 130 images 😉
Thanks a lot !!
One other suggestion: I am a big fan of the tool feh which I run on both Ubuntu and the Pi. After installing the latest version you can sort the images in a directory by making date. So no more worries about filenames and wrong sorting.
I prefer to use it with this command line
feh -d -F -Smtime
this way it displays the filename in the topleft corner, show the images fullscreen and sorted by creation time / date. Browsing through all the images goes with arrow right (and left)
Regards,
Ben
Thanks for the great script! I made a few changes based on the newest RaspiStill binary.
https://github.com/ntalekt/RaspiStill_Camera_Options
Thanks for the script. It gives a good overlook of the settings and options. One thing you could add is making the photo contact sheet with the Python Imaging Library instead of XnView. This way, the script will be all in one. Maybe even add a text overlay to each image with the settings. Just a thought, but thanks for the post.
would it possible to put these pics in a grid with the various options being written above the columns and beside the rows. That way it would be easy to identify which pic was which…. on another note, i’m trying to figure out how to store the returned image from raspistill in a variable so i can quickly find the colour of one pixel you seem like the fellow that may be able to steer me in the right direction. Thanks for a clear and concise bit of coding it really helps beginners like myself….
Hey,
In the python script you’ve provided you have invoked the commands into the terminal right? Is it possible to implement exposure mode changes using only python. Also can these exposure modes be used while recording videos?
For example:
with picamera.PiCamera() as camera:
camera.EXPOSURE_MODES=sports
When I wrote this article the Picamera python library didn’t exist so I used the command line utilities provide by the Raspberry Pi Foundation. Probably best to check the Picamera documentation as thay contains all library features with examples.