There are a lot of Raspberry Pi camera projects out there that capture photos. Obviously. I’ve found a nice PHP script that lets you view these photos directly from the Pi via a web browser. The script is called “Single File PHP Gallery” and it’s free.
Single File PHP Gallery is a web gallery in one single PHP file created by Kenny Svalgaard. All you have to do is copy the script to any directory containing images to make a gallery. This makes it perfect for quickly adding some fantastic functionality to your Pi camera projects with a minimum of effort. Why spend days writing your own image presentation system when you can do it it 5 minutes?
 Sub directories are treated as sub galleries and the script can generate thumbnails for images and directories automatically.
Single File PHP Gallery does not require any configuration or programming skills to use. You just drop the file into your photo directory and you are ready to go. The only requirements are that your Pi is running a web-server and your photos are in a directory visible to that server.
 Don’t worry. That’s easy to setup if you haven’t already and it will be explained below.
Features :
- Free for private non commercial use
- Uses no database
- Automatically creates thumbnails
- Displays EXIF information
- Option to add watermarks
- Supports JPG, JPEG, PNG and GIF
- Unlimited numbers of sub galleries
Step 1 – Install Lighttpd Web Server
First you need an active web server running on your Pi. You can use any PHP enabled server but I use Lighttpd and instructions for setting this up can be found in my Install a Raspberry Pi Web Sever article. Make sure you get the test page working before continuing.
Once you’ve completed this step the /var/www/html directory will be able to serve PHP files.
Step 2 – Install PHP GD Library
The script makes use of the PHP GD image processing library. To install this you can use the command :
sudo apt-get update
sudo apt-get -y install php5-gd
To ensure this is visible to the script reboot using :
sudo reboot
Step 3 – Create Photos Directory
Let’s make a directory for some photos :
sudo mkdir /var/www/html/photos
and then make sure it is owned and writable by the www-data user :
sudo chmod 775 /var/www/html/photos
sudo chown www-data:www-data /var/www/html/photos
Step 4 – Add Single File PHP Gallery Script
Next we need to download the Single File PHP Gallery script and make sure it is placed in our photo directory. Let’s make sure we are in the home directory :
cd ~
and then grab the script from the project web site :
wget http://sye.dk/sfpg/Single_File_PHP_Gallery_4.6.1.zip
Note: You may need to adjust the file name of the zip file to pick up the latest version. Visit http://sye.dk/sfpg/ to check what the latest version number is.
Now we need to extract the contents of this archive into the directory that will contain our photos or sub-directories containing photos :
sudo unzip Single_File_PHP_Gallery_4.6.1.zip -d /var/www/html/photos
You should see the following output :
Archive: Single_File_PHP_Gallery_4.6.1.zip
inflating: /var/www/html/photos/index.php
inflating: /var/www/html/photos/readme.txt
Step 5 – Update Security Phrase
In order to avoid an error message the script requires a security phrase. You can update the script using :
sudo nano /var/www/html/photos/index.php
Where it says :
define('SECURITY_PHRASE', '');enter a phrase. It can be anything you like. For example :
define('SECURITY_PHRASE', 'hanshotfirst');Use [CTRL-X] followed by [Y] and [ENTER] to save and exit.
Step 6 – Add Some Photos
You can either use the Pi camera to save files to the /var/www/html/photos/ directory or you can cheat and copy some photos in manually just to test your setup. I copied a set of existing photos into the directory using FTP so I could get some example screenshots.
Or download a screenshot from this site using :
wget http://bit.ly/rpispyimage001 -O example.jpg
Step 7 – View The Gallery
In order to test your gallery you need to know the IP address your Pi has on your network. To do this run this command :
sudo ip addr show
You will see a block of information similar to this :
1: lo: <LOOPBACK,UP,LOWER_UP>
 link/loopback 00:00:00:00:00:00 brd 00:00:00:00:00:00
 inet 127.0.0.1/8 scope host lo
2: eth0: <BROADCAST,MULTICAST,UP,LOWER_UP>
 link/ether b1:11:ab:42:24:2c brd ff:ff:ff:ff:ff:ff
 inet 192.168.0.45/24 brd 192.168.0.255 scope global eth0
The IP address in this example is 192.168.0.45. Take this IP address and enter it into the address bar of a web browser on another device. You should see the index.php page that is sitting in /var/www/.
Now enter the IP address but this time add /photos/ to the end :
192.168.0.45/photos/
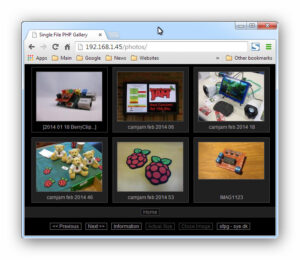
If everything has worked you should see the photo gallery.

Clicking into a folder will show the photos within that folder :
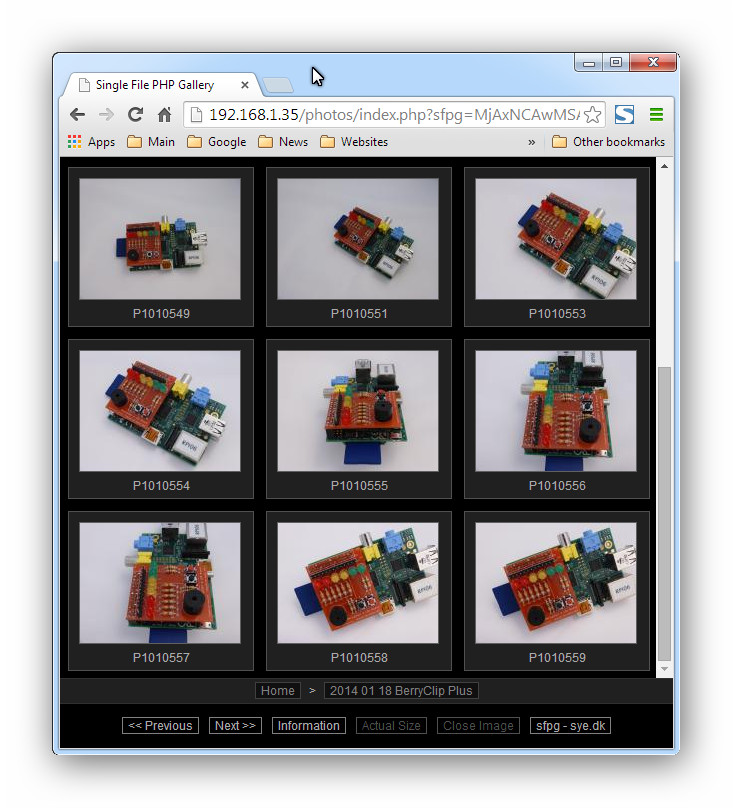
Clicking an individual photo will show you a larger version :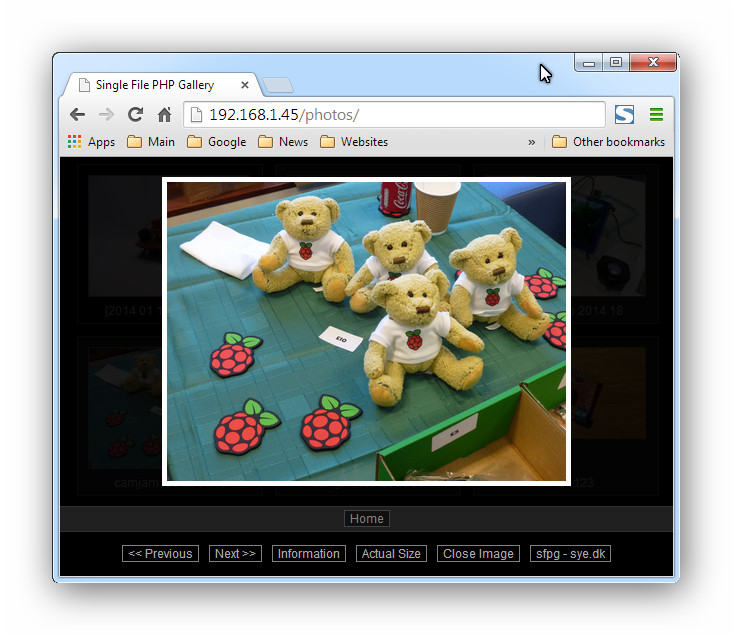
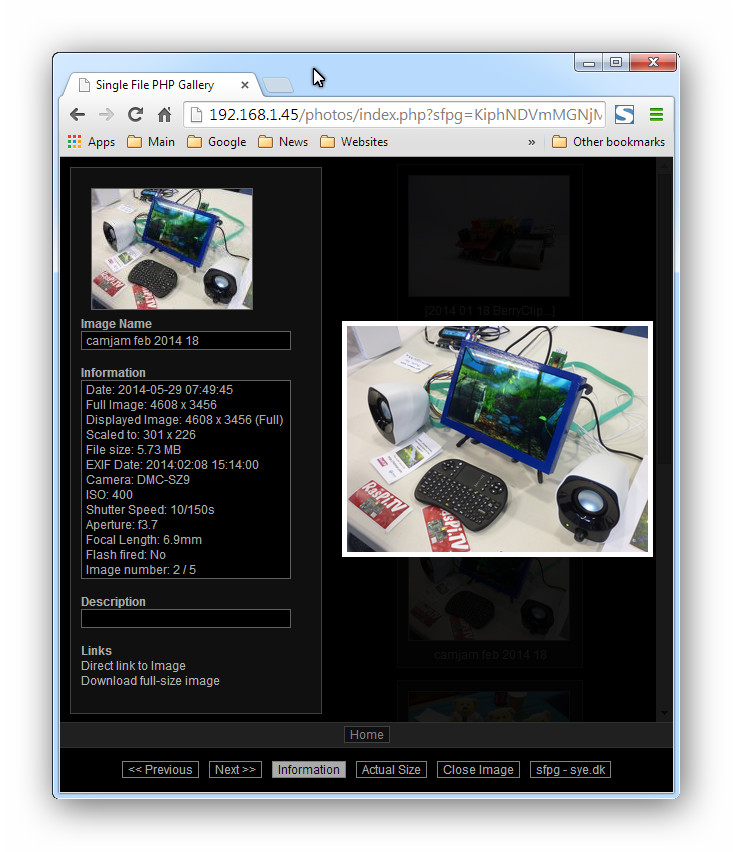
You can also turn on an information panel which will display technical information about the photo :
The thumbnails are generated the first time the page is loaded in a browser. How long it takes to generate will depend on the number of images in the directory and how big they are.
It’s possible to create your own thumbnails if you prefer. This and many other tweaks is explained in the readme.txt file which should have been extracted to the /var/www/html/photos/ directory.
Trouble Shooting
- If you can’t see a web page from another machine on the network re-do the web server tutorial and double check you are using the correct directories and IP address.
- If the thumbnails are not generated make sure you have installed php5-gd, rebooted and set the permissions on the photos directory using “chmod” and “chown”.
11 Comments
Step 3:
unzip Single_File_PHP_Gallery_4.1.1.zip /var/www/photos
results in
pi@raspberrypi ~ $ unzip Single_File_PHP_Gallery_4.1.1.zip /var/www/photos
Archive: Single_File_PHP_Gallery_4.1.1.zip
caution: filename not matched: /var/www/photos
Specifying the destination directory with -d works –
pi@raspberrypi ~ $ unzip Single_File_PHP_Gallery_4.1.1.zip -d /var/www/photos
Archive: Single_File_PHP_Gallery_4.1.1.zip
inflating: /var/www/photos/index.php
inflating: /var/www/photos/readme.txt
[Thanks for the write-up, and for giving an example of a very clear writing style.]
Thanks David. I’ve corrected it now. I used the “-d” when I tested the technique but must have missed it in a cut-n-paste somewhere.
the thumpnails are not generated
May be you did not install php5-gd, try to install it or reinstall it. The other issue may be that php has no right to write in the folder indicated in the script for the root of the gallery.
I had a problem unzipping version 4.1.1. got error message End-of-central-directory signature not found
Version 4.1.1 seems to be corrupted, I successfully used version 4.5.6 as follow:
wget http://sye.dk/sfpg/Single_File_PHP_Gallery_4.5.6.zip
unzip Single_File_PHP_Gallery_4.5.6.zip -d /var/www/photos
Thanks for the feedback. I’ve updated the link with the latest version.
Hi, any idea, why my Rasp II is very slow loading the full version of a pic (out of an 14MP DSLR) – no matter if cached or not. I am using Apache instead of lighthttpd.
I want to use it in a photobooth for the wedding of my little sister. People should be able to download their phots on Smartphones, but i guess my Rasp ‘ll tilt if more than 5 people are browsing the gallery…
Can you change the default folder so it looks elsewhere for the photos/ videos?
/var/www is the folder used by the webserver. The folder under that can be any folder(s) as long as the script is in there as well. ie /var/www/media/photos/
Solved.
As suggested by Massimo Musante, ( THANKS !!)
It was a permissions problem .
solve by ensuring that the target in DATA_ROOT (_sfpg_data) = /var/www/album (my gallery)
AND chmod -R 777 (to) /va/www/album
All thanks. Do you think it’s possible to generate a gallery with mp4 with this script ?
An other script to do a simple gallery of jpeg and mp4 ?