
Following on from Part 1 I’ll explain how you can install the Python software and get your own Video Capture Unit up and running.
You don’t need to build your unit in exactly the same way as mine but as a minimum you need :
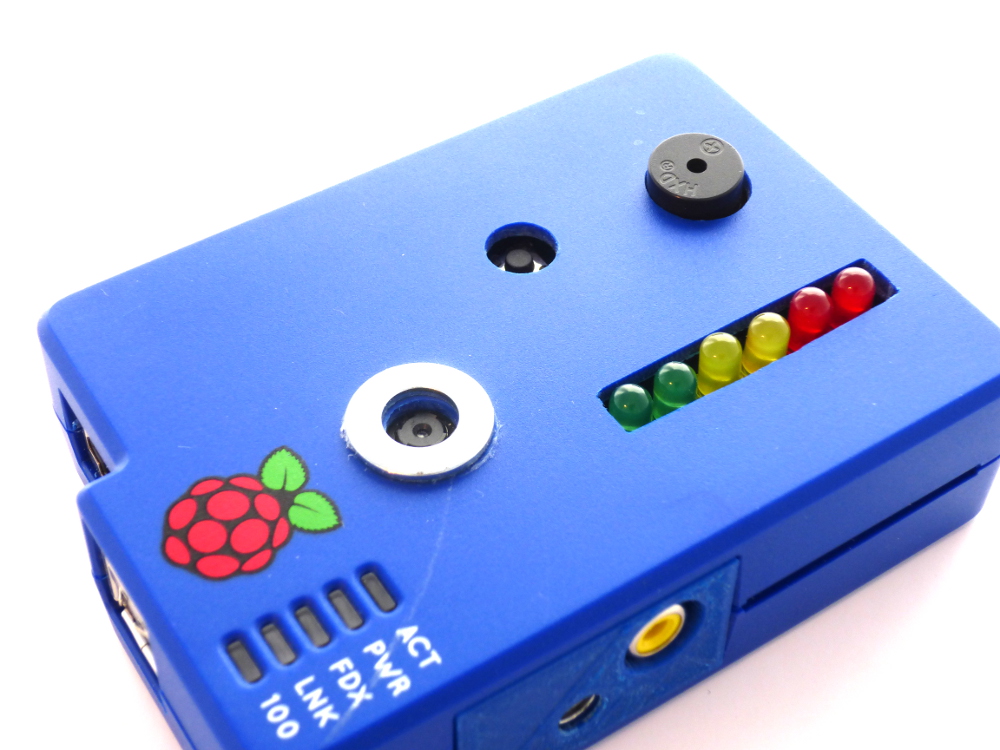
- Raspberry Pi
- SD card with Raspbian
- Camera module
- 5V power supply
- 1 LED attached to GPIO4 via current limiting resistor (ie 330 ohm)
- 1 Switch attached to GPIO7 with 10K pull-down to ground
If you want to be able to easily transfer video files to a PC you might also want to use a :
- USB Flash Drive (8GB+)
The setup might be spread over a desk or installed in raspberry pi case. The choice is yours.
Software
The software is available from the RPiSpy Video Capture Unit BitBucket repository and consists of the following main files :
- config.py
- cron.py
- instructions.txt
- prepare_mp4.bat
- prepare_mp4.sh
- vcu.py
config.py
This file contain the user defined settings used by vcu.py. It allows the user to adjust various parameters. If “/boot/vcu_config.py” exists it is copied over this config file. The vcu_config.py can be used to edit settings on a Windows PC which can see the /boot/ partition on the SD card.
cron.py
This script is run when the Pi boots. It looks for a network connection and only runs vcu.py if it doesn’t find one. This allows the Pi to boot normally when you have connected it to your network to copy video files.
instructions.txt
Summary of these installation instructions for reference.
prepare_mp4.bat
This script provides an easy way to convert the recorded h264 files to MP4 files. It may take a while to convert depending on the total duration of the videos. It uses MP4Box and is meant to run via Windows.
prepare_mp4.sh
This script provides an easy way to convert the recorded h264 files to MP4 files. It may take a while to convert depending on the total duration of the videos. It uses MP4Box and is meant to run on the Pi itself.
vcu.py
This is the main Python script which does most of the work. It is called from cron.py when the Pi boots.
Installation
First prepare a fresh SD card with Raspbian. Use a recent download from the official RaspberryPi.org site. Why Raspbian? I use it for everything!
Power up the Pi and login. You will now be in the home directory. Run the Pi configuration tool :
sudo raspi-config
Expand the file system, Enable the Pi Camera and under Boot Options select “Console Auto Login”. Now reboot using:
sudo reboot
As this will allow the file system to expand and configure the auto-login.
Create a new directory and navigate into it :
mkdir rpispy_vcu
cd rpispy_vcu
Now we can download the archive file from BitBucket using :
wget https://bitbucket.org/MattHawkinsUK/rpispy-video-capture-unit/get/master.tar.gz
If you type ls you should see the master.tar.gz file sitting in the current directory. Use the following command to extract the files from the archive :
tar -xvf master.tar.gz --strip 1
Typing ls should show you a list of the files :
You can remove the archive now using :
rm master.tar.gz
Install PiCamera
The Python scripts control the Raspberry Pi Camera Module using the Picamera module. This is installed by default on the latest version of Raspbian but if you are using the “Lite” version you will have to install it. Start by updating your list of packages using :
sudo apt-get update
sudo apt-get upgrade
then install using :
sudo apt-get -y install python-picamera
Install MP4Box
To convert the camera’s h264 files to MP4 files we can use MP4Box (aka gpac). To install this utility start by updating your list of packages using:
sudo apt-get -y install gpac
Config File Setup (optional)
If you want to be able to edit the config file in Windows you will need to place a copy in the /boot/ directory. You can do that using :
sudo cp config.py /boot/vcu_config.py
When the cron.py script runs at boot time it will check if there is a vcu_config.py file in /boot/. If there is it copies it over config.py. The main script would then run and use the new settings.
USB Flash Drive Setup (optional)
In order to save our video files to a removable drive we need to get the Pi to automatically mount the USB flash drive. This is a fairly easy process and is described in my How To Mount A USB Flash Disk On The Raspberry Pi tutorial. Follow the tutorial so that your drive is mounted as “/media/usb”.
Ensure the VIDEO_PATH parameter in the config.py file points to ‘/media/usb/’. Don’t forget to update /boot/vcu_config.py if you are using that file.
Video Path
If you don’t want to use a USB flash drive and you want to store videos on your SD card you will need to make a directory :
mkdir ~/rpispy_vcu/videos
Ensure the VIDEO_PATH parameter in the config.py file points to ‘/home/pi//rpispy_vcu/videos/’. Don’t forget to update /boot/vcu_config.py if you are using that file.
Autorun On Boot Setup
To run the script automatically when the Pi boots you can use ‘cron’. To edit it we use the command :
sudo crontab -e
Using your cursor keys scroll to the bottom and add the following line :
@reboot python /home/pi/rpispy_vcu/cron.py &
Make sure you get this line correct as the script will fail to run on boot if there are any mistakes. Note that it ends in an ampersand symbol.
To save these changes type “CTRL-X”, then press “Y” and “Return”. You should now be back at the command prompt.
First Run
 Shutdown your Pi and remove the power. Disconnect your network cable. Reconnect the power and boot the Pi. The Pi will boot and you will hear the buzzer sound once. The camera is now recording!
When you want to stop recording hold down the button until you hear a double beep from the buzzer. The Pi will shutdown. Wait 10 seconds before removing the power cable.
In part 3 I will cover converting the resulting video files into MP4 files which makes them easier to play in a media player or editing application.
26 Comments
Hi,
I have followed all the instructions from the start and have updated the boot (crontab) part and when I reboot nothing happens other than the Pi booting normally.
I’ve checked and rechecked the final steps and cant see anything wrong.
The last part, after, CTRL+X, Y where you say ‘Return’ do you mean press ‘Enter’? I tried both pressing enter and typing return but I couldn’t get it to work.
Any help is appreciated!
CTRL-X,Y,Return are just key presses. If you go back into the file your changes should have been saved. Did you place a copy of the config file in the /boot/ directory? Have you got a network cable connected? If you aren’t seeing “RPiSpy VCU” then vcu.py isn’t running which either means cron.py isn’t running or the IF statements are choosing not to run vcu.py. Did you use “sudo” when you edited the crontab?
I am a absolute beginner, but what I found is that a new line in crontab needs to be closed with a return, otherwise it will not run. Prehaps this can solve your problem.
Dear sir,
I tried several dashcam progs, but yours is the first one that I got working! Thank you!
Only: somewhere in your latest version python reports in vcu.py an unexpected indent and in the config.py file POWERLED = 4 should be replaced by LEDGPIO = [4].
It is running on a model B 256mb rev 1 raspberry.
Tanks again an I hpoe that my remarks can help others.
Thanks for the feedback. I’ve updated the BitBucket files. I was half way through replacing the “LEDGPIO” array with two variables for a POWER and ACTIVE LED as I thought it is more likely people would want a couple of LEDs rather than an array of LEDs doing the same job. Also sorted out the indent on line 152. It was a stray tab which needed to be two spaces.
Hi, I have followed all the step but when I tried to do the first run the Raspberry pi boots up, I get two beeps and then it just sits at login screen (No network cable connected)
Im using Raspberry pi 2 trying to save to usb.
Any help is appricaited many thanks.
I would get it working saving to the SD card first before trying USB. The script is run by cron on boot and so the login screen is expected. It doesn’t mean the script isn’t actually running in the background.
Hi, what can i do if i’d like to use a normal ip-cam e not a rpi cam ?
You can use a webcam with the Pi but you would need to completely write the code as you wouldn’t be able to make use of the PiCamera library.
Thank you!
sorry, I’ve got another question…
How can i add date & time (timestamp) on video ? (If possible).
Thanks in advance!
D
ok, sorry, solved.
I find a solution with camera.annotate_text.
Thanks !
Hi I am a beginner. How can I adjust how long the loop should last before it starts back at the beginning?
Thanks!
In the config file the VIDEO_INTERVAL variable determines the number of seconds the unit records before starting a new file.
Thank you so much for this article, It helped give me a baseline to start from for my project, I completely butchered your code into a form that works for me but it gave me a good understanding of what I needed to know.
Thank you
Glad it was useful. The great thing with these sort of projects is that you can make do exactly what you want them to do.
Hi, Matt
I’m having trouble with the ifconfig.txt file.
The second line in the txt file doesn’t have network address info. It has “UP BROADCAST RUNNING MULTICAST MTU:1500 Metric:1”
No mention of network address anywhere in the file but my wired network is connected and does work.
When I run ifconfig in the command line I can see inet address and the IP assignment but somehow that data isn’t getting to the ifconfig.txt file, thus the camera is always on and recording.
Any thoughts on what might be causing the missing data
It sounds like your IP address hasn’t been allocated at the time that bit of the script is run. You may need to add a few seconds of delay to give it a bit more to get allocated by your router.
For the total noob . is there a screen shot of the actual connections . i understand what the gpio references is, but , connected to what is the question . 4 to ground? 4 to hot? switch to what?
Hi.
I cannot seem to get the cron job running, Tried leaving a space before and after but still nothing.
When I type “sudo crontab -e” i pretty much get a screen with a bunch of comments prefaced with “#”
I left a free row below the last comment “@reboot python /home/pi/rpispy_vcu/crpm.py &” and then hit return after that.
any suggestions?
Are you using the latest version of Raspbian “Jessie”? If so they changed the order in which some components load so Cron isn’t so great for launching Python scripts now. You may need to use an alternative method such as “systemd” which I wrote a blog post about here : How To Autorun A Python Script On Boot Using systemd
an easier solution:
sudo nano /etc/profile
Add to the end:
sudo python /home/pi/rpispy_vcu/cron.py
ctrl o, ctrl x
reboot
Hi,
I was able to get this all working saving the videos on the pi itself. I did not place a copy in the boot directory. I am trying to save the videos to a usb at the moment. I tried this 2 ways:
1. since i can already see my usb on my pi under media, i assumed i did not need to follow your tutorial on mounting the usb. I changed the path directory in the config file to match my usb. upon starting up the pi, i get 2 beeps then nothing. no videos are saved on the usb or the pi, and no leds are lit.
2. the second method was following the tutorial on mounting the usb, steps 2, 3 show up with errors, but i can do the rest of the steps. now the usb doesn’t show up under media. and trying to boot up the pi without a network, nothing happens at all.
If you or anyone knows what it is that is my problem, I would really appreciate it.
its worth noting that i am connecting my pi through my router via ethernet and using an ssh connection to talk to it, if this makes a difference.
Thanks for a great tutorial Matt.
If anyone wants to run this while the RPi is connected to a network:
cd rpispy_vcu
sudo nano config.py
comment out the last line:
#AUTORUN_IF_LAN = False
ctrl o, ctrl x
sudo reboot
Great article, I just found it. Can you set the camera to only record on motion? That is what I need to do. Thanks so much for documenting your project.
Really this code example isn’t the best starting point for something like that. I would probably just use the “motion” application which has motion detection built in and loads of options that can be configured. I use “MotionEyeOS” as a security camera system and that does motion detection and records video and stills.
Thanks Matt, I did look at MotionEyeOS but it needs a connection and this will be a standalone unit only, no internet or network connections. I’ll keep digging thanks for the reply !