
Following on from my Basic Temperature Logging To The Internet With Raspberry Pi article I decided to upgrade my logging device. By coincidence Arthur Amarra launched a Kickstarter campaign for a “retroScreen” HAT which provided a Nokia 5110 screen, i2c header and four switches. This was exactly what I needed.
So here is a slightly modified temperature and pressure logger based on a Raspberry Pi Model A+ which provides :
- Temperature and pressure logging
- 84×48 LCD screen
- 3 buttons
- 5 display modes
- Backlight switch
Hardware
The device consists of :
- Raspberry Pi Model A+
- Basic case
- retroScreen by Arthur Amarra
- BMP180 sensor module
- 3 tactile switches
- PiHut WiFi dongle
Sensor
The BMP180 sensor is described in my BMP180 I2C Digital Barometric Pressure Sensor article. This sensor is small, cheap and provides temperature and pressure. The retroScreen provides a compatible header on its PCB so it’s a natural choice.
WiFi Dongle
In my previous version I used an Edimax EW-7811UN WiFi dongle but this time I decided to use a PiHut branded product. It was equally easy to setup using my Setting Up WiFi On The Raspberry Pi guide.
Switches
Previously I added a single switch to allow the device to be powered down gracefully. The retroScreen provides space for four switches so I soldered in three 2-pin tactile switches. This was a neater solution and gave me some more options for user input.
The switches connect the GPIO pins to ground so in the Python script they are pulled high. When the switches are pressed they are connected to Ground and pulled LOW. The script uses “callbacks” to take appropriate action when it detects these falling edges.
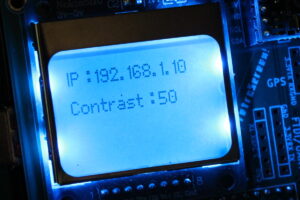
- Switch #1 (GPIO 22) allows the user to cycle through the 5 available display modes.
- Switch #2 (GPIO 27) allow the user to cycle through a set of contrast values so the screen can be fine tuned.
- Switch #3 (GPIO 17) tells the script to exit and/or shutdown the Pi. By setting the AUTO_SHUTDOWN flag to 1 the Pi can also shut itself down if required.
Thingspeak and The Internet of Things
To log data to the Internet I use the Thingspeak service. I explain this in a bit more detail in the previous article.
To use my example script you will need to setup a Thingspeak account, create a new channel and acquire the “Write API Key” from the API settings. See the official documentation for help.
Initial Preparation
Here are the sequence of steps I used to build the device :
- Created a fresh SD card using the latest Raspbian
- Configured WiFi via the LXDE desktop
- Ran “sudo apt-get update”
- Ran “sudo apt-get upgrade”
- Enabled SPI using this guide (including “py-spidev” and “python-dev”)
- Enabled i2c using this guide (including “python-smbus” and “i2c-tools”)
retroScreen Installation
The Nokia screen needed a few more bits and pieces installed. I didn’t need all the retroScreen examples to work so I used a simplified installation procedure than the one described on the retroScreen site. Obviously if you want to explore the board in more detail you can follow the full process and try out the examples.
git clone https://github.com/adafruit/Adafruit_Nokia_LCD
cd Adafruit_Nokia_LCD
sudo python setup.py install
Temperature Logging Script
Make sure you are in your home directory :
cd ~
Then download three files from my BitBucket repository direct to the Pi :
wget https://bitbucket.org/MattHawkinsUK/rpispy-misc/raw/master/python/bmp180.py
wget https://bitbucket.org/MattHawkinsUK/rpispy-misc/raw/master/python/templogger2.py
wget https://bitbucket.org/MattHawkinsUK/rpispy-misc/raw/master/python/templogger2_cfg.py
The script also uses two font files (from fonts2u.com) which must be downloaded :
wget https://bitbucket.org/MattHawkinsUK/rpispy-misc/raw/master/python/5x7_practical.ttf
wget https://bitbucket.org/MattHawkinsUK/rpispy-misc/raw/master/python/F25_Bank_Printer_Bold.ttf
Note : On the command line you can use the Up/Down arrow keys to cycle through previous commands and then just retype the file names to save a lot of typing!
Edit the config file and add your Thingspeak API key to the THINGSPEAKKEY parameter.
nano templogger2_cfg.py
You can save and exit the nano editor using [CTRL-X], [Y] then [ENTER].
Running The Script
in your home directory when you run the “ls” command you should have the following files :
- templogger2.py
- templogger2_cfg.py
- 5x7_practical.ttf
- F25_Bank_Printer_Bold.ttf
You should also have an “Adafruit_Nokia_LCD” directory.
You can run the logger using
sudo python templogger2.py
You can quit using CTRL-C or press Switch #3 to stop the script. If AUTO_SHUTDOWN is set to 1 then the Pi will shutdown. After 20 seconds the power can be disconnected.
Automatically Run On Boot
In order to avoid having to start the script manually you can configure it to launch when the Pi boots up. It was at this point I had problems using my usual “autoboot” techniques and instead used the systemd method for starting Python scripts.
I followed this tutorial : How to Autorun A Python Script On Boot Using systemd
My Unit file, templogger2.service looks like this :
Description=Templogger2 Service
After=multi-user.target
[Service]
Type=idle
ExecStart=/usr/bin/python /home/pi/templogger2.py > /home/pi/templogger2.log 2>&1
[Install]
WantedBy=multi-user.target
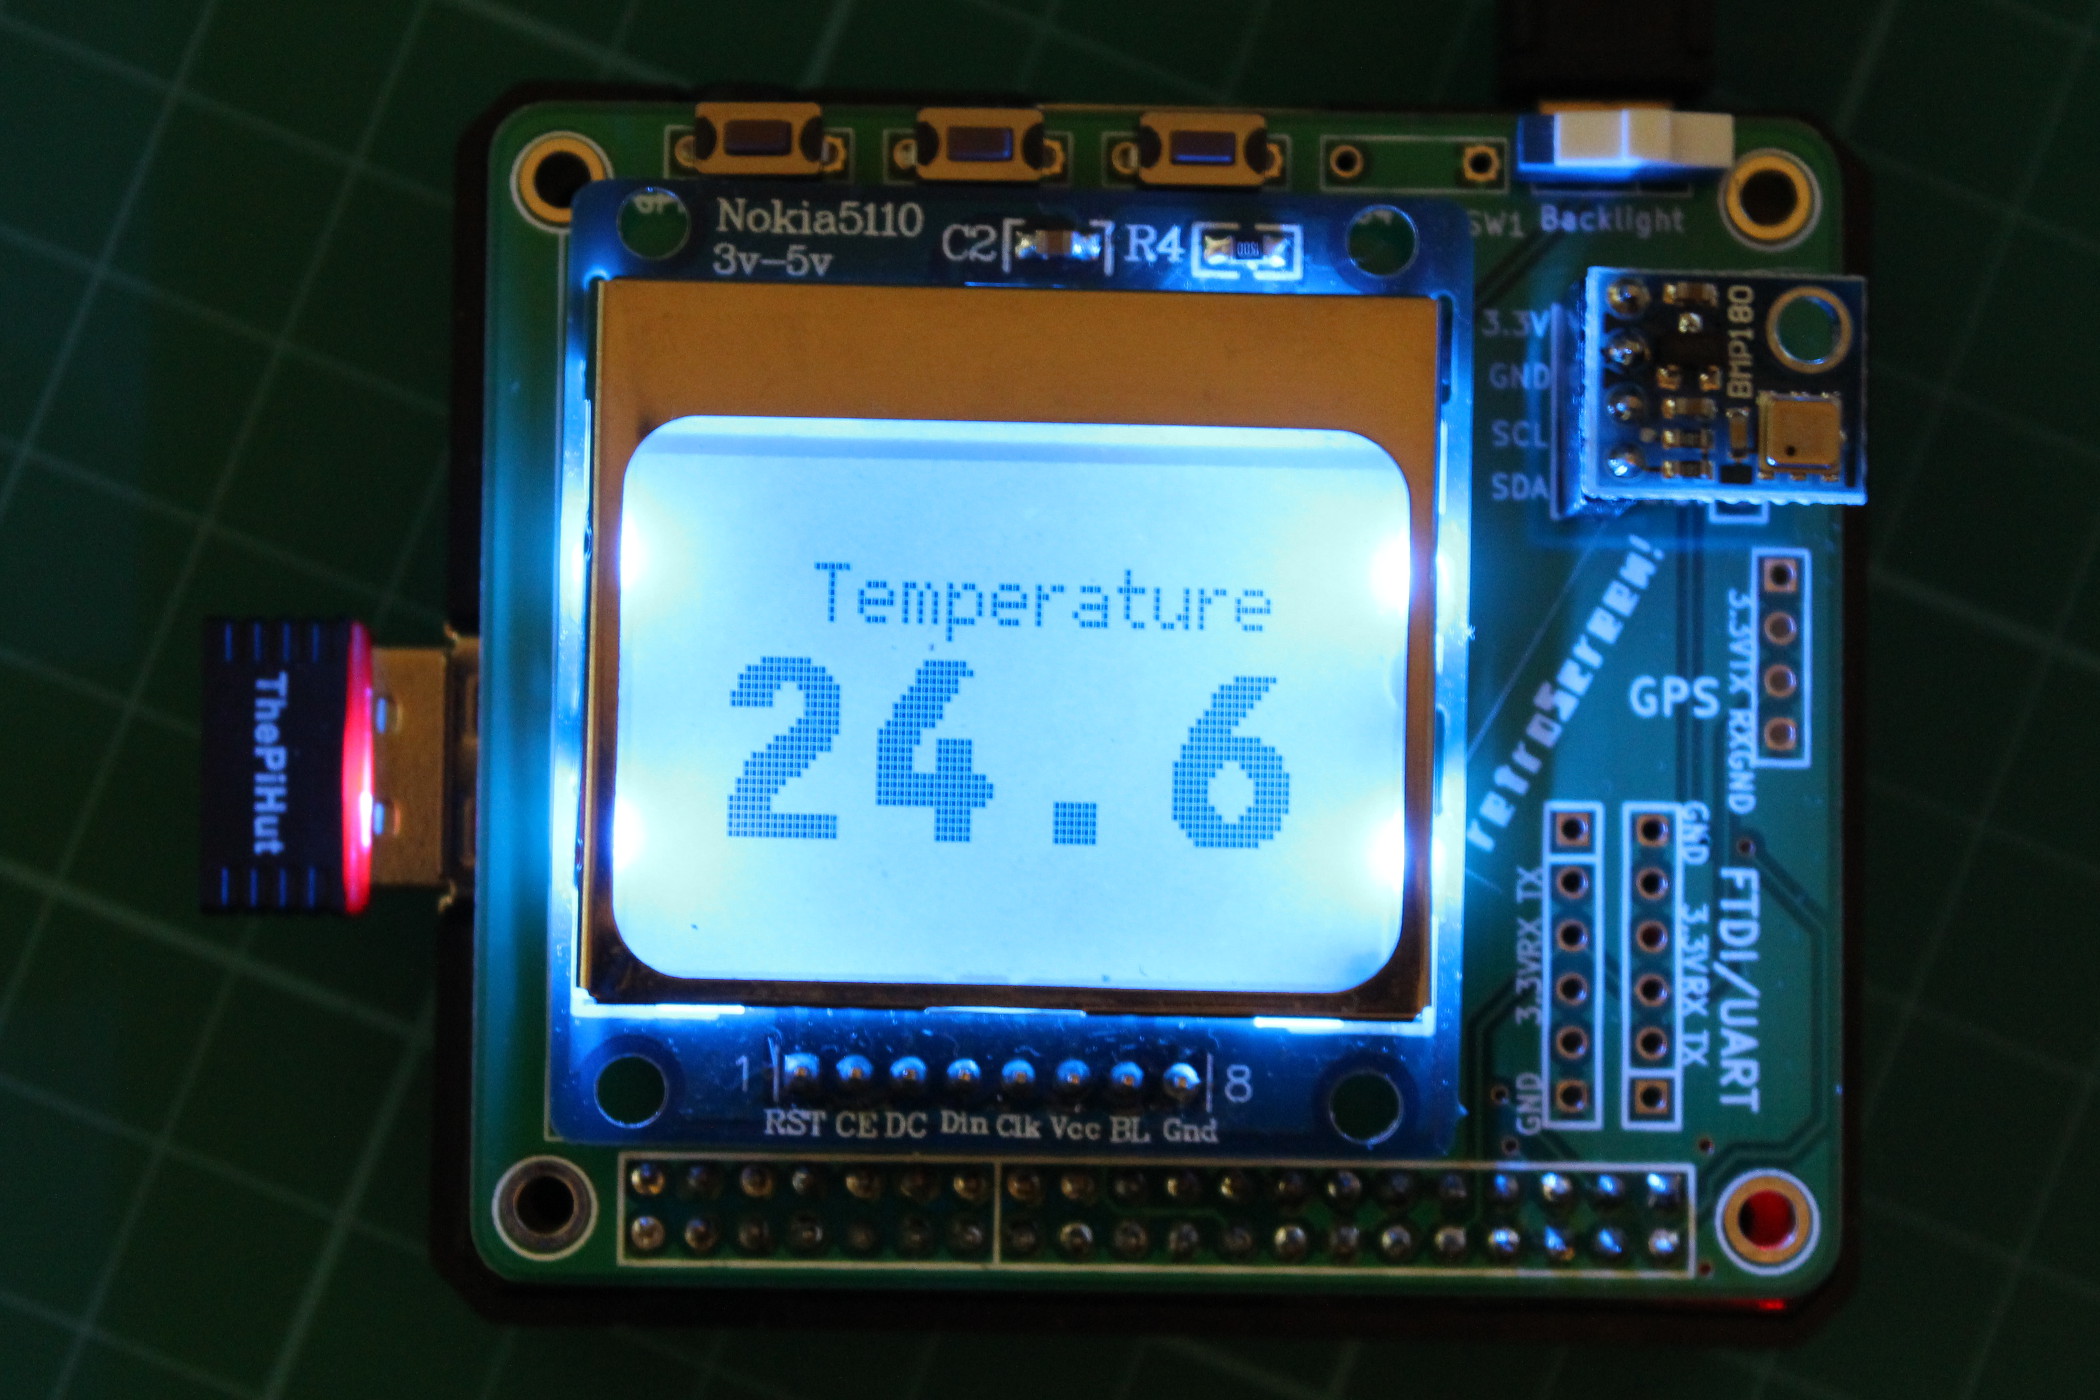
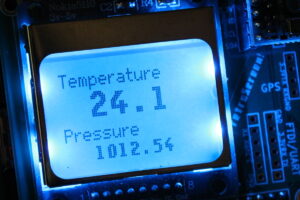
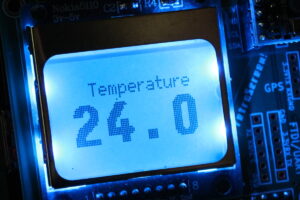
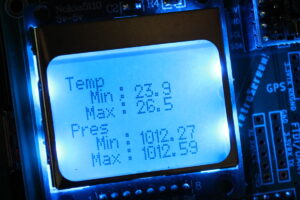
Display Modes
Button 1 allows you to scroll through 5 different display modes. They look like this :

Final Results
Once the device is up and running and you’ve configured your Thingspeak Channel you can produce outputs like this :
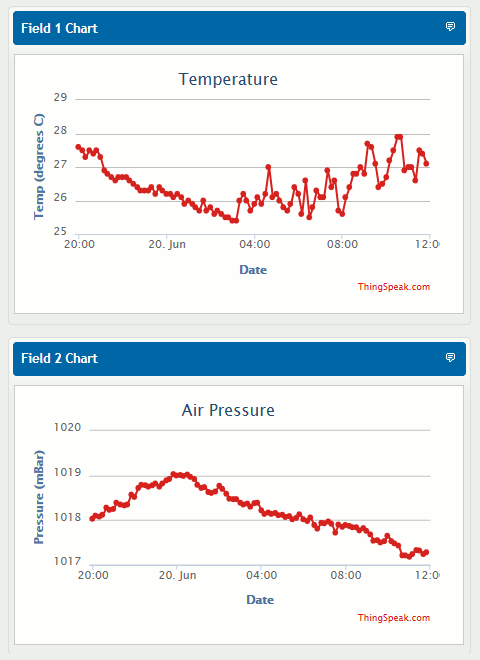
The graphs update these in realtime as new data arrives. The channel also allows you to download your data in CSV, XML and Json formats.
With an interval of 10 minutes that gives you 144 data points every 24 hours. You can set the graphs to display a set number of data points so you can adjust this to give you a suitable spread of data.
I only used two streams of data in my example (temperature and pressure) but Thingspeak will accept a total of eight.
Here is my public RPiSpy Temp Logger Channel.
Alternative Fonts
In order to clearly display text on the screen I made use of two fonts :
5×7 Practical Regular from http://www.fonts2u.com/5×7-practical-regular.font
F25 Bank Printer Bold from http://www.fonts2u.com/f25-bank-printer-bold.font
You can use other fonts as long as you adjust the appropriate sections of Python. Some work better than others and there is plenty of room for experimenting.
3 Comments
I can’t seem to figure out how to physically hook up the display to the RPi. Can you point me to the details for the connections?
The screen is part of the retroScreen addon board which just plugs onto the GPIO header. So in this case the screen was easy to attach. At some point I will do a quick tutorial on connecting a 5110 screen directly.
Works great!
Thank you!