Facebook Twitter Instagram Pinterest YouTube
    Trending
    • Add Kodi to RetroPie Menu
    • Disable Auto-login in Raspberry Pi OS
    • Raspberry Pi Cloud Storage with MEGA
    • RetroPie Temperature Monitor from Menu
    • Pi Pico Pinout and Power Pins
    • Install Arduino IDE on Raspberry Pi
    • Raspberry Pi 400 SSD Upgrade
    • Raspberry Pi Temperature Monitoring
    Facebook Twitter Instagram Pinterest YouTube RSS
    Raspberry Pi SpyRaspberry Pi Spy
    • Home
    • Categories
      • General
      • Hardware
      • Programming
      • Python
      • Software
      • Tutorials & Help
    • BerryClip
      • BerryClip Instructions
      • BerryClip Plus Instructions
      • Videos & Reviews
    • Buy
      • Buy Pi
      • Buy Pi Accessories
      • Buy Books
    • Tools
      • Ultimate Raspberry Pi Alexa Skill
      • Pi Power Estimator App
      • Pi-Lite 14×9 LED Matrix Sprite Editor
      • RPiREF Pin-out Reference App
      • Simple Ohm’s Law Calculator
      • Web Sites & Links
    • Tutorials & Help
        Featured
        November 9, 20200

        Raspberry Pi Temperature Monitoring

        Recent
        May 6, 2022

        Add Kodi to RetroPie Menu

        February 26, 2022

        Disable Auto-login in Raspberry Pi OS

        February 2, 2022

        Raspberry Pi Cloud Storage with MEGA

      1. Contact Us
      2. Site Map
      Raspberry Pi SpyRaspberry Pi Spy
      You are at:Home»Hardware»Interfaces»SPI»7-segment Display Modules and the Raspberry Pi
      7 Segment Display and the Raspberry Pi

      7-segment Display Modules and the Raspberry Pi

      8
      By Matt on March 10, 2016 SPI, Tutorials & Help

      7 segment displays are a well established way of electronically displaying numbers and a small set of letters. They’ve been around for as long as I’ve been playing with electronics but were a pain to wire up given the number of LEDs involved.

      Luckily things are a lot easier now that they are available on pre-made modules that uses an SPI interface. This is easy to setup and use on the Raspberry so for about £3 you can add a strip of 8 7 segment digits.

      These modules tend to all use the Maxim MAX7219. This IC does all the hard work and we can communicate with it using SPI and a few lines of Python.

      7 Segment Display Module

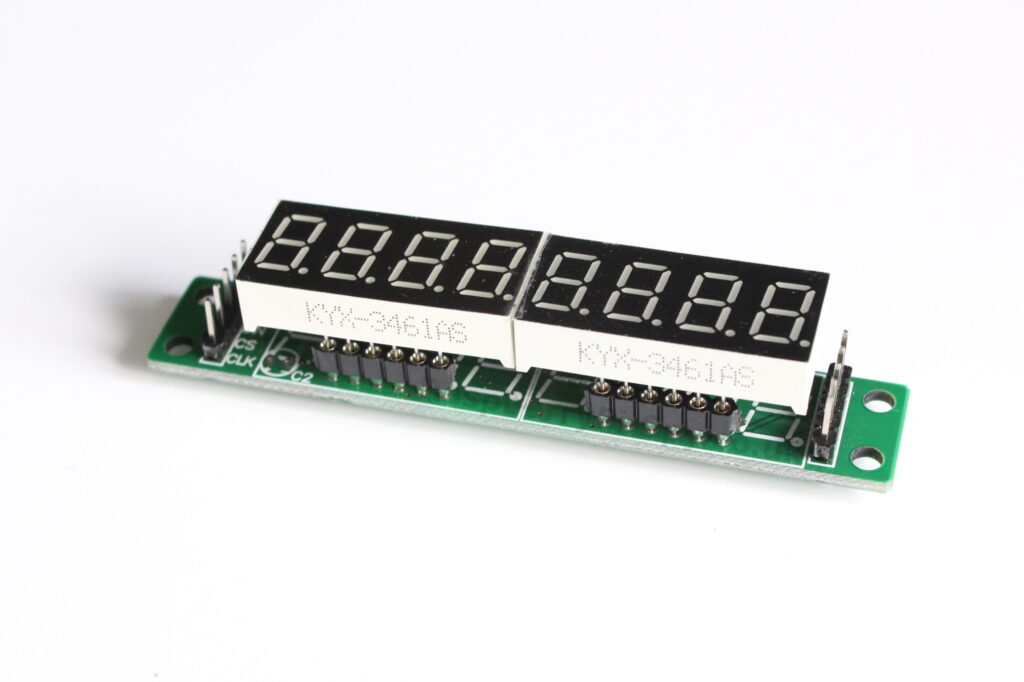
      They have pins at both ends because you can daisy-chain multiple modules.

      Hardware Setup

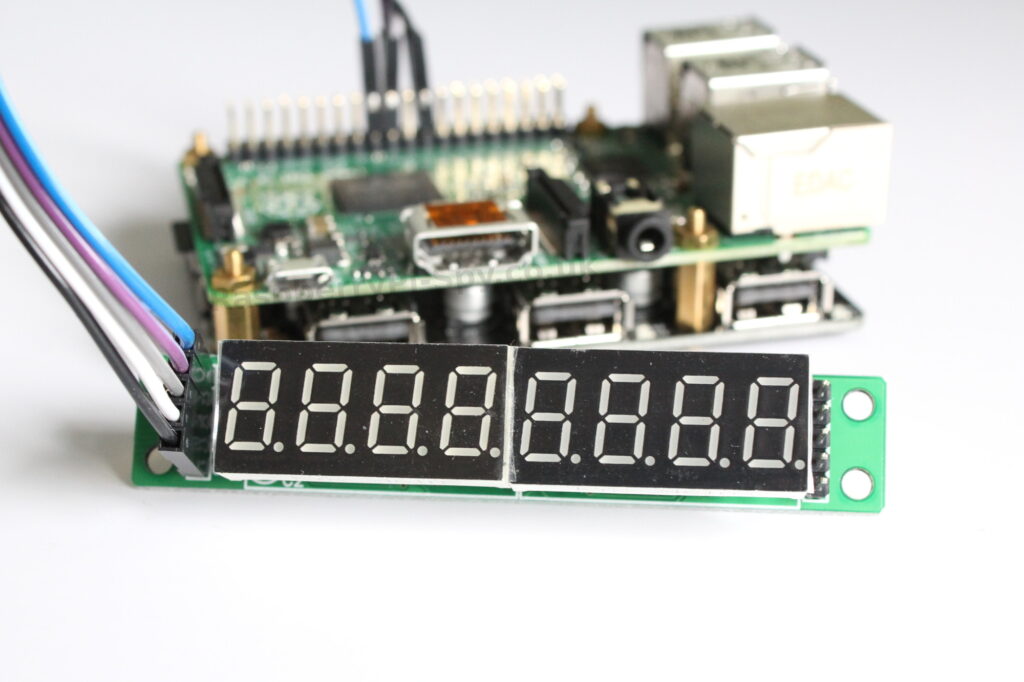
      The module has five pins on the left hand side. These can be connected directly to the Pi’s GPIO header with some female to female jumper cables.

      Module Pi GPIO Header
       VccPin 17 (3V3)
       GNDPin 20 (GND)
       DINPin 19 (GPIO10)
       CSPin 24 (GPIO8)
       CLKPin 23 (GPIO11)

      Other pins on the GPIO header can be used for 3V3 and GND. The pins suggested above are close to the required SPI pins which made it easier for me to attach my jumper cables.
      7 Segment Display and the Raspberry Pi

      Enable SPI

      I used the latest version of Raspbian but you might want to update your SD card using :

      sudo apt-get update
      sudo apt-get upgrade

      The module uses the SPI interface so we need to set that up first. It isn’t enabled by default so follow my Enabling SPI on the Raspberry Pi guide.

      If you’ve enabled SPI correctly you should see the “spi_bcm####” module listed when you run :

      lsmod | grep spi

      MAX7219 Library Setup

      To make use of the MAX7219 device we need to install a library by Richard Hull. This is easy to do using the following commands :

      git clone https://github.com/rm-hull/max7219.git
      cd max7219
      sudo python setup.py install

      Assuming you have rebooted since enabling SPI and connecting your hardware you should be ready to run an example. There is an example script in the examples folder but this script assumes you’ve got three modules daisy-chained together. For a single module I created a simplified script. You can download it directly to your Pi using :

      wget https://bitbucket.org/MattHawkinsUK/rpispy-misc/raw/master/python/7segment.py

      This script can be run using :

      sudo python 7segment.py

      If you are using the latest version of Raspbian you may be able to run the script without the “sudo” on the front.

      With any luck your display should be lit up and showing random numbers something like this :

      https://vine.co/v/i6L3xtPK0qW

      Troubleshooting

      If you are having issues here are some tips :

      • Check your wiring. Make sure the connections to the Pi are correct
      • Check the 7 segment modules are firmly attached to the module’s PCB
      • Use “lsmod | grep spi” to check the SPI module is loaded
      • Did you remember to install the MAX7219 library?
      • Reboot to make sure all the changes are active

      Buying a Module

      These modules are available from various places but try looking here :

      • Amazon
      • eBay
      Share. Facebook Twitter Pinterest LinkedIn Tumblr Email
      Previous ArticleRaspberry Pi 4th Birthday Party in Cambridge
      Next Article 7-Port USB Hub For Raspberry Pi

      Related Posts

      Add Kodi to RetroPie Menu

      Disable Auto-login in Raspberry Pi OS

      Raspberry Pi Cloud Storage with MEGA

      8 Comments

      1. Dougie on March 12, 2016 11:29 am

        I wrote some C code to drive a MAX7219, it’s available for download at
        https://github.com/DougieLawson/RaspberryPi/tree/master/max7219

        Reply
        • asiq syed on March 17, 2018 1:26 am

          nice work man !!!!!
          can you add max7219 7 segment with bmp280 for Raspberry pi 3

          Reply
      2. Egbert Ouwehand on March 12, 2016 12:01 pm

        Where can I buy this strip?

        Reply
        • Matt on March 12, 2016 9:55 pm

          I got mine from eBay.

          Reply
      3. Ben Scarboro on March 16, 2016 10:59 pm

        This is a great tutorial, got me going in the right direction straight away (after a little “which is pin one again” moment when it didn’t work first time!).

        Thanks 🙂

        Reply
      4. Terawatt on April 4, 2016 10:09 pm

        Neat project, got it running pretty quick, Has anyone experienced blinking segments. segments 2 & 3 from the right hand side…..

        Reply
      5. Ryan on May 20, 2016 7:48 pm

        I am looking for essentially the same thing as this but only smaller, you boys have any ideas or can point me in the right direction?

        Reply
        • Matt on July 20, 2016 9:36 am

          Actually I’ve just ordered an alternative module that should have smaller displays. When they arrive I’ll do a new blog post. The reason why I wanted smaller digits will become clear. I wonder if we want them for the same reason? 🙂

          Reply

      Leave A Reply Cancel Reply

      This site uses Akismet to reduce spam. Learn how your comment data is processed.

      Recent Posts
      May 6, 2022

      Add Kodi to RetroPie Menu

      February 26, 2022

      Disable Auto-login in Raspberry Pi OS

      February 2, 2022

      Raspberry Pi Cloud Storage with MEGA

      January 7, 2022

      RetroPie Temperature Monitor from Menu

      January 24, 2021

      Pi Pico Pinout and Power Pins

      Categories
      • 1-wire
      • 3D Printing
      • Add-ons
      • BBC Micro:bit
      • BerryClip
      • Books
      • Camera Module
      • Cases
      • Events
      • General
      • Hardware
      • I2C
      • Infographics
      • Interfaces
      • Minecraft
      • Model A+
      • Model B+
      • News
      • Pi Models
      • Pi Zero
      • Power
      • Programming
      • Python
      • Raspberry Pi OS
      • Raspbian
      • RetroGaming
      • Robotics
      • Sensors
      • Software
      • SPI
      • Tutorials & Help
      Tags
      3D Printing Arduino audio battery berryclip Birthday bluetooth cambridge camera CamJam DigiMakers display games GPIO I2C interface Kickstarter LCD LED Linux media Minecraft Model A Model B motionEyeOS PCB photography photos Pi-Lite portable power python Raspberry Jam Raspberry Pi Bootcamp raspbian Retrogaming retroPie screen SD card security sensor SPI temperature ultrasonic video
      Raspberry PI Related
      • Adafruit Blog
      • Average Maker
      • Official RaspBerry Pi Site
      • Raspberry Pi Pod
      • RasPi.tv
      • RaspTut
      • Stuff About Code
      Tech Resources
      • MattsBits – Pi Resources
      • Microbit Spy
      • Technology Spy
      Archives
      About

      Unofficial site devoted to the Raspberry Pi credit card sized computer offering tutorials, guides, resources,scripts and downloads. We hope to help everyone get the most out of their Pi by providing clear, simple articles on configuring, programming and operating it.

      Popular Posts
      September 19, 2014

      Top 5 Reasons The Raspberry Pi Sucks

      July 27, 2012

      16×2 LCD Module Control Using Python

      October 20, 2013

      Analogue Sensors On The Raspberry Pi Using An MCP3008

      Recent Posts
      May 6, 2022

      Add Kodi to RetroPie Menu

      February 26, 2022

      Disable Auto-login in Raspberry Pi OS

      February 2, 2022

      Raspberry Pi Cloud Storage with MEGA

      Facebook Twitter Instagram Pinterest YouTube RSS

      Entries RSS | Comments RSS

      This site is not associated with the official Raspberrypi.org site or the Raspberry Pi Foundation. Raspberry Pi is a trademark of the Raspberry Pi Foundation.

      Copyright © 2022 - All Rights Reserved - Matt Hawkins

      Type above and press Enter to search. Press Esc to cancel.