Facebook Twitter Instagram Pinterest YouTube
    Trending
    • Pi Pico W Launched
    • Add Kodi to RetroPie Menu
    • Disable Auto-login in Raspberry Pi OS
    • Raspberry Pi Cloud Storage with MEGA
    • RetroPie Temperature Monitor from Menu
    • Pi Pico Pinout and Power Pins
    • Install Arduino IDE on Raspberry Pi
    • Raspberry Pi 400 SSD Upgrade
    Facebook Twitter Instagram Pinterest YouTube RSS
    Raspberry Pi SpyRaspberry Pi Spy
    • Home
    • Categories
      • General
      • Hardware
      • Programming
      • Python
      • Software
      • Tutorials & Help
    • BerryClip
      • BerryClip Instructions
      • BerryClip Plus Instructions
      • Videos & Reviews
    • Buy
      • Buy Pi
      • Buy Pi Accessories
      • Buy Books
    • Tools
      • Ultimate Raspberry Pi Alexa Skill
      • Pi Power Estimator App
      • Pi-Lite 14×9 LED Matrix Sprite Editor
      • RPiREF Pin-out Reference App
      • Simple Ohm’s Law Calculator
      • Web Sites & Links
    • Tutorials & Help
        Featured
        November 9, 20200

        Raspberry Pi Temperature Monitoring

        Recent
        May 6, 2022

        Add Kodi to RetroPie Menu

        February 26, 2022

        Disable Auto-login in Raspberry Pi OS

        February 2, 2022

        Raspberry Pi Cloud Storage with MEGA

      1. Contact Us
      2. Site Map
      Raspberry Pi SpyRaspberry Pi Spy
      You are at:Home»Software»Write Pi SD Card Image Using Etcher On Windows, Linux & Mac
      SD Card Benchmarking on The Raspberry Pi

      Write Pi SD Card Image Using Etcher On Windows, Linux & Mac

      6
      By Matt on April 11, 2016 Software, Tutorials & Help

      My preferred method for writing an Raspberry Pi SD card image is a tool called Etcher. It is free, works on Windows, Linux and Mac and has a nice clean interface. The newer version even allows multiple SD cards to be written at the same time.

      Download and Install Etcher

      Etcher can be downloaded from https://www.balena.io/etcher/. The Windows version is available in Portable and Installed versions for both 32-bit and 64-bit flavours. I use it on my Windows PC and Ubuntu laptop.

      To our surprise there was nothing out there that fitted our needs. So we built Etcher, a SD card burner app that is simple for end users, extensible for developers, and works on any platform. – resin.io Team

      Download Your Favourite Raspberry Pi Image

      Download your preferred SD card image. If in doubt the Official Raspbian (with Desktop) image from the Raspberry Pi Foundation’s website is a good start : Official Raspbian SD Card Images

      Using Etcher to Write a Raspberry Pi SD Card Image

      The interface looks like this :
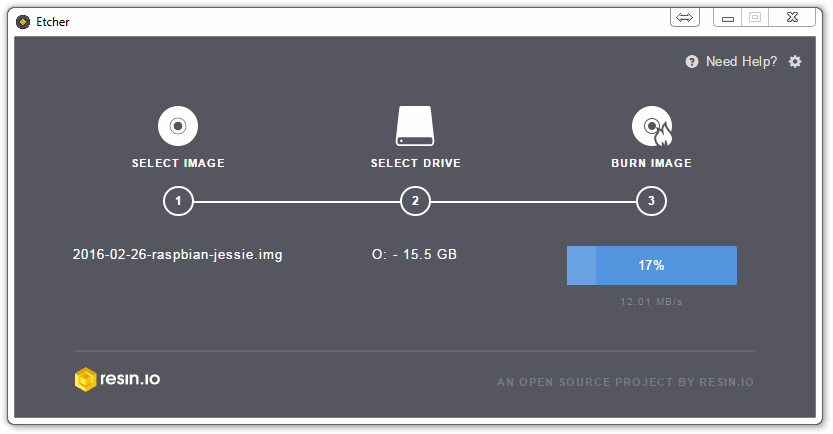
      Etcher SD Card Image Burning

      Step 1

      Browse to the image file. This can be a conventional img file or a zip file. This allows you to burn Raspberry Pi images without even extracting them from the source Zip files.

      Step 2

      Select a drive. The list of drives provides a nice set of information so it should be clearer exactly what physical device you are selecting. You can select multiple drives and it is possible to write multiple SD cards at the same time.

      Step 3

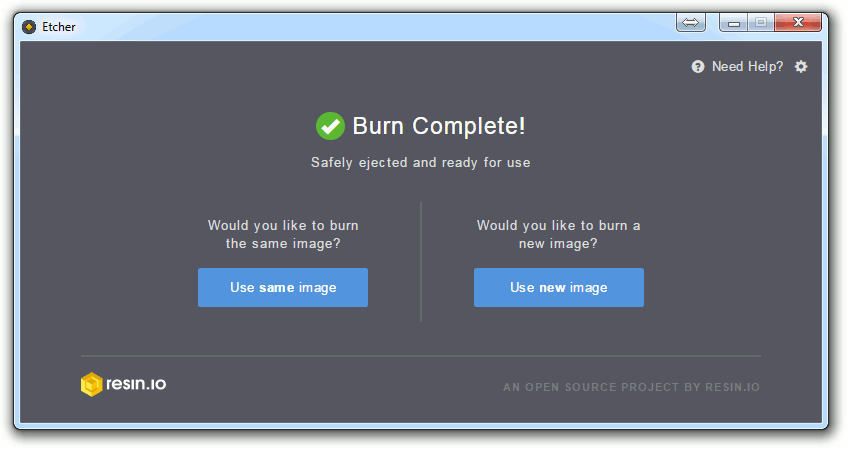
      Wait for the process to complete.

      Once the process has finished you have the option to burn the same image again or to choose a different image.

      Etcher SD Card Image Burning

      Troubleshooting

      Depending on the state of the SD card you are using you may need to format it first. On Windows I always use the official SD Formatter application.


      Overall I’m very impressed and not sure if SD card image burning can get any easier than this!

      Share. Facebook Twitter Pinterest LinkedIn Tumblr Email
      Previous ArticleHow to Change Your Character Skin In Minecraft Pi Edition
      Next Article 8-megapixel Raspberry Pi Camera Module v2

      Related Posts

      Add Kodi to RetroPie Menu

      Disable Auto-login in Raspberry Pi OS

      Raspberry Pi Cloud Storage with MEGA

      6 Comments

      1. Julian on April 11, 2016 5:49 pm

        The Chromebook recovery utility is also excellent for writing SD card images. This tool can be installed as an extension and run from any Chrome browser or Chromebook (most Chromebooks come with SD card slots so this is a complete no brainer if you own one of these handy devices).

        This utility is usually used to create backup media for the Chromebook, but instead of using an online Chromebook image, you can choose any disk image by clicking the cog icon after starting the tool. A zip file containing the disk image is the expected format, although I think it will use a .img file as well.

        This tool is a Google product so is pretty well guaranteed to be free from malware etc., and it is small and works reliably.

        Reply
      2. Jade Fischer on April 15, 2016 2:07 pm

        Would it be possible to fix this issue. For example the issue happens when you write an image from your RPI SD card that is 8 gig. You won’t be able to write that image to another 8 gig SD card you will have to write it to a 16 gig. For some reason the Win32DiskImager app would append more information when it would create an image. I would love to be able to make a 8 gig image go onto another 8 gig image.

        Reply
      3. jpartain89 on June 6, 2016 2:15 am

        DDRescue is my personal favorite.

        Reply
      4. zrx8 on February 5, 2017 4:06 pm

        I thought I give it a try. Started to dowload. Then I realized, it is 78Mb. WHAT ??? An SD-card writing tool ? Seriously ??? There is no way I use it.

        Reply
        • Lee on March 5, 2017 8:44 pm

          Well it’s 170MB when installed, but this is by far the best SD Tool ever, I’m so impressed with it. Literally 2 clicks and image is written.

          Reply
          • Matt on March 7, 2017 8:03 pm

            It is a bit bulky but a nice interface and really simple to use. It also reduces the risk of writing an image over your system disk!

            Reply

      Leave A Reply Cancel Reply

      This site uses Akismet to reduce spam. Learn how your comment data is processed.

      Recent Posts
      June 30, 2022

      Pi Pico W Launched

      May 6, 2022

      Add Kodi to RetroPie Menu

      February 26, 2022

      Disable Auto-login in Raspberry Pi OS

      February 2, 2022

      Raspberry Pi Cloud Storage with MEGA

      January 7, 2022

      RetroPie Temperature Monitor from Menu

      Categories
      • 1-wire
      • 3D Printing
      • Add-ons
      • BBC Micro:bit
      • BerryClip
      • Books
      • Camera Module
      • Cases
      • Events
      • General
      • Hardware
      • I2C
      • Infographics
      • Interfaces
      • Minecraft
      • Model A+
      • Model B+
      • News
      • Pi Models
      • Pi Pico
      • Pi Zero
      • Power
      • Programming
      • Python
      • Raspberry Pi OS
      • Raspbian
      • RetroGaming
      • Robotics
      • Sensors
      • Software
      • SPI
      • Tutorials & Help
      Tags
      3D Printing Arduino audio battery berryclip Birthday bluetooth cambridge camera CamJam DigiMakers display games GPIO I2C interface Kickstarter LCD LED Linux media Minecraft Model A Model B motionEyeOS PCB photography photos Pi-Lite portable power python Raspberry Jam Raspberry Pi Bootcamp raspbian Retrogaming retroPie screen SD card security sensor SPI temperature ultrasonic video
      Raspberry PI Related
      • Adafruit Blog
      • Average Maker
      • Official RaspBerry Pi Site
      • Raspberry Pi Pod
      • RasPi.tv
      • RaspTut
      • Stuff About Code
      Tech Resources
      • MattsBits – Pi Resources
      • Microbit Spy
      • Technology Spy
      Archives
      About

      Unofficial site devoted to the Raspberry Pi credit card sized computer offering tutorials, guides, resources,scripts and downloads. We hope to help everyone get the most out of their Pi by providing clear, simple articles on configuring, programming and operating it.

      Popular Posts
      September 19, 2014

      Top 5 Reasons The Raspberry Pi Sucks

      July 27, 2012

      16×2 LCD Module Control Using Python

      October 20, 2013

      Analogue Sensors On The Raspberry Pi Using An MCP3008

      Recent Posts
      June 30, 2022

      Pi Pico W Launched

      May 6, 2022

      Add Kodi to RetroPie Menu

      February 26, 2022

      Disable Auto-login in Raspberry Pi OS

      Facebook Twitter Instagram Pinterest YouTube RSS

      Entries RSS | Comments RSS

      This site is not associated with the official Raspberrypi.org site or the Raspberry Pi Foundation. Raspberry Pi is a trademark of the Raspberry Pi Foundation.

      Copyright © 2022 - All Rights Reserved - Matt Hawkins

      Type above and press Enter to search. Press Esc to cancel.