
The BME280 device is a digital barometric pressure sensor and is a slightly upgraded version of the BMP180. This is available on a small module which provides access to the sensor via the I2C interface. This allows us to easily connect it to the Raspberry Pi and read the data using Python. The BME280 provides temperature, pressure and humidity.
 The BME280 is made by Bosch and the official BME280 datasheet includes all the technical details. Their device can offer both SPI and I2C interfaces so you need to make sure your module provides the interface you prefer.
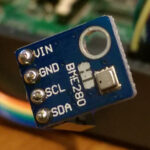
My module is a small pcb measuring 14x10mm with a 4 pin I2C header. The order of the pins may vary on other modules so keep an eye on the labels so you connect up the correct wires from the Pi.
Configure I2C Interface
In order to use this module you must enable the I2C interface on the Raspberry Pi as it is not enabled by default. This is a fairly easy process and is described in my Enabling The I2C Interface On The Raspberry Pi tutorial.
Connecting Hardware
The table below shows how the module is connected to the Raspberyr Pi’s GPIO header (P1). Please refer to my GPIO header guide for a diagram.
| Module PCB | Desc | GPIO Header Pins |
|---|---|---|
| VCC | 3.3V | P1-01 |
| GND | Ground | P1-06 |
| SCL | I2C SCL | P1-05 |
| SDA | I2C SDA | P1-03 |
Here is a diagram of a breadboard setup. If you are connecting the module’s four pins directly to the Pi you only need four female-female wires.

Other modules are available which have different pin arrangements so make sure you are connecting the correct pins to the Pi if yours is different to the one shown in this tutorial.
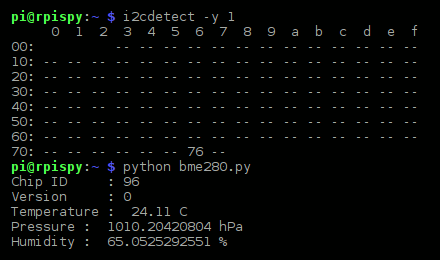
With the device connected and the Pi powered up the “i2cdetect” command should show the device with address 0x76 or 0x77.
Download BME280 Script
To download the BME280 Python script from my Bitbucket repository you can use :
wget -O bme280.py http://bit.ly/bme280py
or
wget https://bitbucket.org/MattHawkinsUK/rpispy-misc/raw/master/python/bme280.py
or right-click on this link in your browser and save locally.
Run the Script
Before running the script you should check that your device is connected. If you installed the i2c-tools package as part of the i2c setup you should use the i2cdetect command to check it returns an address for your device. The script assumes the address is 0x76. You can change that by editing the DEVICE variable in bme280,py using your favourite text editor.
Run the script using :
python bme280.py
Here is the output I see on my Pi :
Script Breakdown
The script is fairly straight forward but has some scary looking maths in it. This is defined in the datasheet and you will be forgiven for not worrying too much how it works! I rough summary of the script is given below if you want to follow it through in a bit more detail :
- imports some libraries
- defines some functions
- function main uses the readBME280ID function to get the ID of the device
- function main then calls readBME280All which …
- sets the oversampling and mode
- reads calibration data from the device that was preset in the factory
- reads the raw temperature, pressure and humidity data
- refines the data using the maths from the datasheet
- returns the values to main()
Include In Your Own Script
You could just modify the main function in my script but you may want to include the functionality in your own. To do this you can import my script and then reference the readBME280ID and readBME280All functions as in the example below :
import bme280

(chip_id, chip_version) = bme280.readBME280ID()
print "Chip ID :", chip_id
print "Version :", chip_version

temperature,pressure,humidity = bme280.readBME280All()

print "Temperature : ", temperature, "C"
print "Pressure : ", pressure, "hPa"
print "Humidity : ", humidity, "%"
The rest is down to your imagination.
Troubleshooting
- If the i2cdetect command results in an error you have either not installed i2c-tools or you need to use 0 rather than 1
- If your device is not detected and you don’t see the address you have either not connected the device properly or have not correctly enabled the i2c interface
- Double check your wiring and reboot the Pi
In most cases i2c experiments fail to work because :
- i2c is not enabled
- The device is not connected properly
- i2c-tools has not been installed so the i2cdetect command is not available
In rare cases your device may be faulty but it is far more likely to be one of the above issues.
The module is available from Amazon and many other online electronics shops. You can also find .
43 Comments
thank you! the script works great and i used your example as a ‘library’ – all i needed to do was import one function and i had a working display showing ambient conditions! great work!
Hi, will this also work with the BMP280 which appears to have an extra pin? Thank you.
Hey. What is the wire length limit for BME280 because of the I2C? I’ve read some time ago that I2C has aproblem with long wires, do you know anything about this?
I think the limit for i2c is a few metres but it depends on a number of factors including resistance and the i2c clock frequency.
My BME280 module doesn’t have an SDA connection, but has two labeled as SDI and SDO – should I be using the SDO for output data? Because of this, I’m receiving I/O errors (IOError: [Errno 5] Input/output error).
Do you have a SCK pin as well? SDO/SDI is usually for an SPI interface but some modules let you do i2c using the SCK/SDI pins.
I had the same problem. Fixed it by connecting SDO to GND.
THANK YOU SO MUCH
I realized that the first reading is not accurate, only second and next.
Hi,
Working fine for now.
Next steps to be:
1. Log details to file so I can export manual to excel
2. Future export auto to exel and make graph’s for it
3. Getting the BME280 working in OpenPlotter
But as greenhorn in Python I want to do step by step so I also will get some understanding about Python.
Can someone point me in good direction for next step, the logging script?
Thanks
Al
Thank you, Matt. I struggled to find information about how to use this module before finding your blog post.
Hi, great site, noticed a problem in this BME280 code in that you are not configuring the oversample mode for the humidity so does not read accurately. I added the following 3 lines to your code before the write of the BMP180 (REG_CONTROL) register,
# add configuration of humidity register
OVERSAMPLE_HUM = 2
REG_CONTROL_HUM = 0xF2
bus.write_byte_data(addr, BME280_REG_CONTROL_HUM, OVERSAMPLE_HUM)
also need to add a delay after the write of read command, adafruit did it like this where self._mode is the oversampling mode of each unit humid,temp,pressure, or the first reading will be duff.
sleep_time = 0.00125 + 0.0023 * (1 << self._mode)
sleep_time = sleep_time + 0.0023 * (1 << self._mode) + 0.000575
sleep_time = sleep_time + 0.0023 * (1 << self._mode) + 0.000575
time.sleep(sleep_time) # Wait the required time
Hello!
I was comparing the code with the datasheet and I wonder if there is a typo at line 140: may be the 16384.8 should be 16384.0 instead?
I’m also a bit confused because the refine calculation uses different formulas than the ones in the datasheet. I’m investigating about humidity and I get different values (about 0.001 on the final % value). May be the bit shift (as per datasheet) performs round-up differently than converting early to float (as your code do)?
Thank you very much for your code!
I was puzzled by the humidity data coming out of my BME280 using this code, as the values were constantly in the 72% area. Investigation showed that you are not initialising register 0xF2 wich sets the humidity oversampling. When I added a couple of lines to correct this, I started receiving values that matched an HTU21D.
Steve
I am new at all this and very confused.
can you be more specific about the lines you added to correct this please.
Thanks
The script has already been updated. The two lines after “# Oversample setting for humidity register – page 26” initialise the humidity register.
I am having difficulties with this script. I made 2 changes in order to round the pressure value and to output the raw_hum value (for debug). The Humidity is always 0.0% and raw_hum never changes from 35152. Has anyone else had this issue, or is it a problem with my sensor?
pi@raspberrypi:~ $ python bme280.py
Chip ID : 88
Version : 0
Temperature : 27.38 C
Pressure : 997.71 mbar
Humidity : 0.0 %
Raw Humidity : 35152
Are you definitely using a BME280? Lots of people who have trouble with humidity are using a BMP280 which doesn’t support it.
I had exactly this problem. I only just noticed that I had the BMP20 not the BME280.
!!! BOTHER !!!
After many weeks of data acquisition with BME280 sensor, I confirmed that Matt’s software has a problem with humidity reading. Strangely, the graph of temperature and humidity have the same identical shape. The problem was solved when I installed the Adafruit library. Having checked the source code, it seems that the only difference is in the pause that the Adafruit library performs between writing to the registry and reading the humidity value, where the Matt’s code does not pause at all. From BME datasheet, Appendix B “Measurement time and current calculation” it seems indeed that a pause is required.
Thanks Niccolo. You are correct. I’ve added the wait just before the “read” based on the equation given in the datasheet under “Appendix B: Measurement time and current calculation”.
Hi
1 – I would like to adapt this script to use it on microPython MCU (Lopy), how do i deal with the ctypes library ?
2 – I need to switch to SPI because of a to too long wire cable any idea ?
Thanks for help
Alain
HI it works fine, but since yesterday it stops reading anything. After a quick check I just get this message as response of the script:
Traceback (most recent call last):
File “/usr/lib/python2.7/site.py”, line 68, in
import os
File “/usr/lib/python2.7/os.py”, line 400, in
import UserDict
ValueError: bad marshal data (string ref out of range)
but I did nothing on the pi… is my device broken?
Delete the .pyc files. This error can occur if they are corrupt. When you run the .py script the .pyc file will be re-created.
Hi Matt, would like to say thank you for your work, it made my life easy!
Im using bme280 on orange-pi-pc, and works fine as imported module /smbus0/
Really great job, im grateful!
Thank you for sharing. This worked great for me and saved a lot of time. I appreciate it!
Thank you Matt! You saved me hours of work. Thank you so much!!
Matt on January 3, 2017 11:39 pm
Delete the .pyc files. This error can occur if they are corrupt. When you run the .py script the .pyc file will be re-created.
Im interested in measuring outdoor humidity and temperature – could I use this outside? Would I need to protect it from the elements in some way (assuming the pi itself was in a waterproof box)
I think the pressure sensor is a tiny hole in the device. So it would need protection from rain and dust.
I have this device:
bottum : https://i.imgur.com/epDTAf1.jpg
top: https://i.imgur.com/mEgQxZN.jpg
Is this a BMP280 or a BME280 ?
It doesn’t read humidity. (??)
===================================
pi@raspberrypi2:~/test $ python bme280.py
Chip ID : 88
Version : 1
Temperature : 26.9 C
Pressure : 1012.39631211 hPa
Humidity : 0.0 % <———-?????
=================================
Does the chip id (88) give any clarification ?
I think the BMP280 is chip ID 88 (0x58) but the BME280 is 96 (0x60). So I suspect your device is a BMP280.
Hello,
your python script is working great ! I extended it to two sensors for measurement of humidity at intake and outlet of a air-dehumidifier. I would like to use it for instructional purposes in my class on applied thermodynamics. Would you allow me to use your script and to publish it when I cite your reference ?
best regards,
Andre
Hi Andre, glad you found the script useful. Happy for you to use it in your class instruction material.
This is the the best way to read bme280! I tried many other options, and this works well, thank you for sharing!!!
Great! Thanks a lot. Good job.
Great! Thanks a lot. Good job.
The script run out the box. I’ll make a class for my purposes.
Enjoy!
I tried also many other “ways” to read this sensor, but your script is by far the best!
Thanks a lot for sharing – good work
Thank you!!!!
Worked like a charm! Thanks for this straightforward tutorial.
Hi Matt, great work! The temperature and humidity reading is fine, but the pressure allways shows around 948 – 952 hPa. Might this be a sensor problem?
Hi,
What to do in order to let this running into a loop?
Thank you,
Catalin
Great script! Thank you for sharing and for the step-by-step instructions.
Worked perfectly after I finally managed to connect the sensor properly.
Hi,
Great Job!
Is there a way to add the data to Influx/Grafana?