
While researching possible upgrades for my son’s Star Wars Bounty Hunter costume I came across an excellent blog post by Dave Shevett over at Planet-Geek.com on using a Raspberry Pi to create a voice changer for a halloween costume. This looked like something I could integrate into our lovingly constructed bounty hunter helmet.

The system uses SoX to record sound via a microphone, distort it and then send to an amplified speaker.
I collected the hardware and followed in Dave’s footsteps. For my project I decided to use the Raspbian Lite and a Pi Zero W. It all work so this post is presented for anyone who wants to do something similar and may find these steps useful.
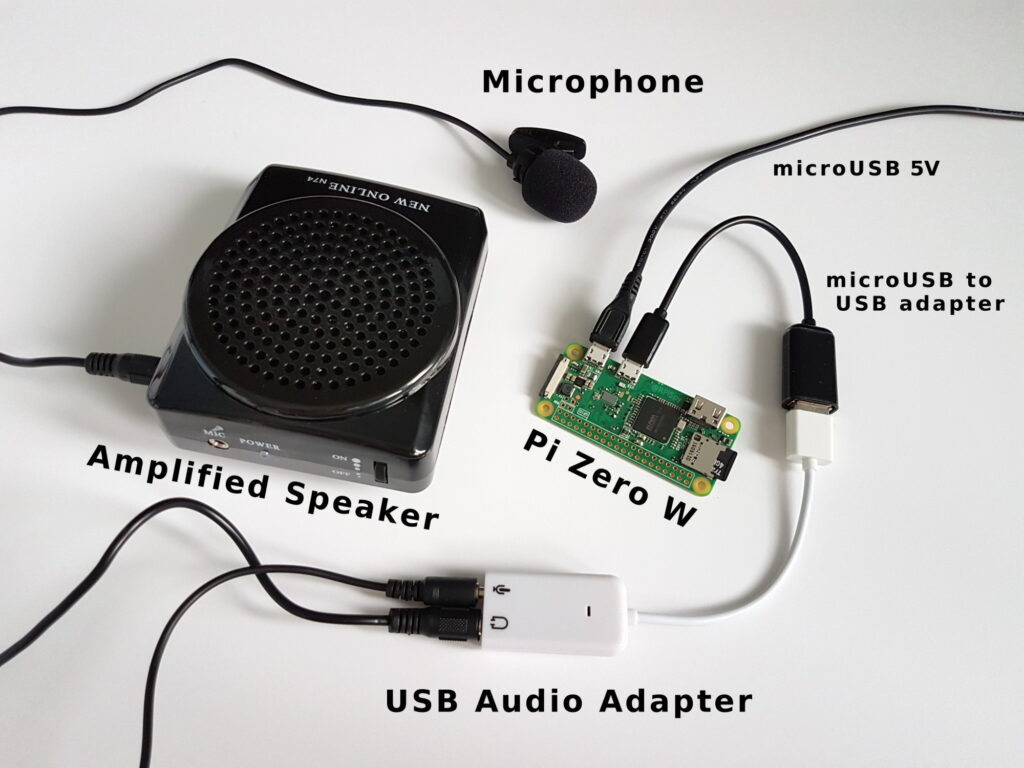
Voice Changer Hardware
- Raspberry Pi Zero W
- microUSB to USB adapter
- USB hub (optional)
- Keyboard
- USB sound adapter
- 5V power supply
- Amplified speaker
USB Sound Adapter
M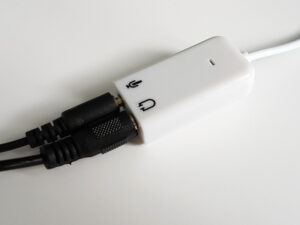 y USB sound audio adapter dongle thingee was a “C-Media Electronics Inc CM108 Audio Controller”. It has a standard USB plug, 3.5mm microphone jack and a 3.5mm headphone jacks. Inside there is a really bright red LED which I tamed with some electrical tape.
There are lots of alternatives but it’s hard to know how compatible they are with the Pi. They are available from [eBay] for a few $/£.
Amplified Speaker
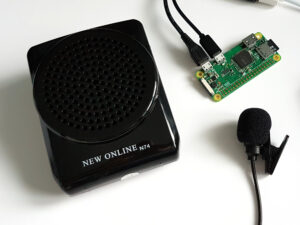 I bought a “N74” portable amplified voice speaker from [eBay] for £20. It has a built-in rechargeable battery, a line-in socket and came with two microphones. I needed to dig out a 5V power adapter to charge it up.
Configuration
To start off create a fresh 4GB microSD card using the latest Raspbian Lite image. The Pi Zero should be connected to an HDMI monitor and a keyboard using appropriate adapters. When the Pi boots for the first time log in with the default username and password (pi/raspberry).
Start the configuration utility :
sudo raspi-config
and make the following setting changes :
- Hostname > “VoiceChanger”
- Boot Options > Desktop/CLI > Console Autologin
- Boot Options > Wait for Network at Boot > No
- Interfacing Options > SSH > Yes
- Advanced Options > Expand Filesystem
Select <Finish> and reboot the Pi when prompted.
Setup WiFi (Optional)
Connecting the Pi to a network allows you do the rest of the configuration using SSH on a PC. This saves a bit of typing as you can cut-n-paste text and transfer files.
To configure the WiFi edit the wpa_supplicant.conf file :
sudo nano /etc/wpa_supplicant/wpa_supplicant.conf
It should already contain :
ctrl_interface=/var/run/wpa_supplicant
update_config=1
then insert :
network={
  scan_ssid=1
  key_mgmt=WPA-PSK WPA-EAP
  psk="1234567890"
  ssid="MyWIFISSID"
}
Use your own password and SSID. Double check the values , save (CTRL-X, Y) and return to the command line.
Connect USB Audio Device
Shutdown the Pi using :
sudo halt
and disconnect the power.
If you have a USB hub you can connect both the keyboard and the USB sound dongle at the same time. If you are going to connect to the Pi using SSH then you don’t need the hub and replace the keyboard with the USB sound dongle.
Reconnect the power and allow the Pi to startup. With any luck your Pi will be connected to WiFi and SSH will be enabled.
Check USB Audio Device
Once booted connect to the Pi using any SSH terminal utility (such as Putty or MobaXterm). Or use the keyboard if you’ve still got it attached.
Now check the USB audio device was detected :
lsusb
You should see the audio device listed along with any other USB devices connected :
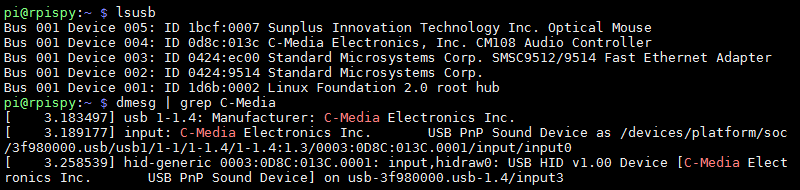
More information about the adapter can be seen using :
dmesg | grep C-Media
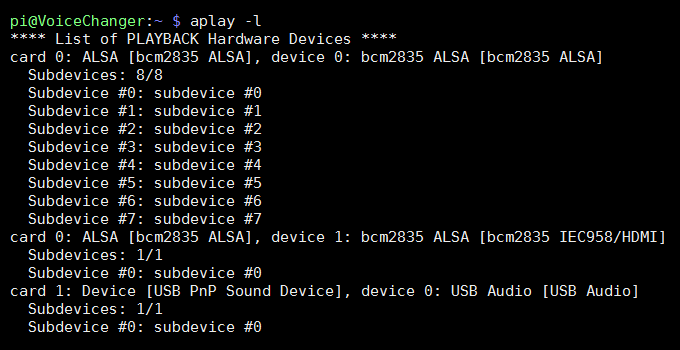
To find out the device’s card number use :
aplay -l
The device should be listed as “card 1”.
Create the “asoundrc” file using :
sudo nano .asoundrc
and add the following text :
pcm.!default {
 type hw
 card 1
}

ctl.!default {
 type hw
 card 1
}
This tells the system to use Card 1 as the default audio input and output.
Once you have saved the file (CTRL-X, Y) you can check the content at any time using :
cat .asoundrc
Install SoX
In order to use the “play” utility we need to install “SoX” :
sudo apt-get install sox
Install mpg123 (Optional)
To enable the system to play MP3 files I also installed mp123 but this is optional.
sudo apt-get install mpg123
You can play MP3 files using :
mpg123 mysong.mp3
Alsamixer
To check the speaker and microphone are not muted you can run Alsamixer using :
alsamixer
This should show you a gauge for “Speaker”, “Mic” and “Auto Gain Control”.
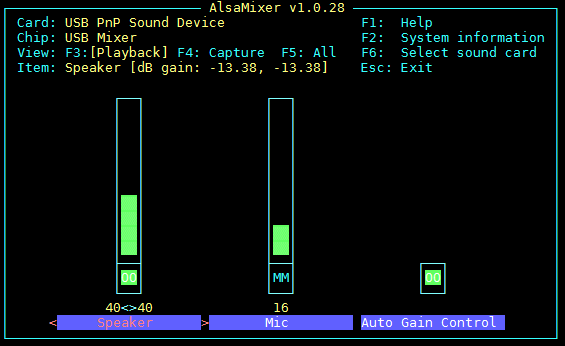
Using the arrow keys you can adjust the gain of both channels and turn auto-gain on or off. A channel can be muted using the M key. “MM” appears if the channel is muted. Press “Esc” to return to the command line.
Speaker Test
With headphones or a speaker attached to the dongle you can use the simple speaker-test utility :
speaker-test -c2
or
speaker-test -c2 -t sine -f 500
You should hear white-noise or a 500Hz tone through your speaker. Press CTRL-Z to exit the test.
Reboot
As you have installed some packages and edited the .asoundrc file reboot to ensure all changes are active. The speaker-test command can sometimes result in “Device or reource busy” errors so a reboot it useful at this point :
sudo reboot
Playing WAV Files (optional)
Almost there! If you want to play a test WAV file you can download a test file using :
wget http://www.kozco.com/tech/piano2.wav
and then play using :
play piano2.wav
Voice Changing Using SoX
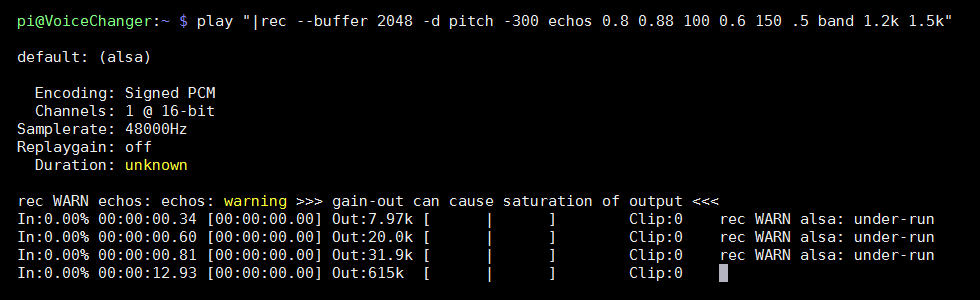
Using Dave Shevett’s method you can dynamically change your voice using :
play "|rec --buffer 2048 -d pitch -300 echos 0.8 0.88 100 0.6 150 .5 band 1.2k 1.5k"
This processes data from the microphone channel using “rec” and passes it to “play” which sends the result to the speaker.
- buffer allows the stream to collect microphone data to process before sending it to the speaker. This will add some delay. You can reduce the number but the buffer may overflow if it can’t keep up.
- pitch reduces the pitch of the voice
- echos add some echos (you guessed that already, right?)
- band adds a filter centred on 1.2kHz with a 1.5Hz slope either side.
All the SoX options are detailed on the SoX options page.
You can play around with the options and values to get different effects.
Auto-start on Boot
If you want the voice changer to be portable you can set up a script to auto-run the play command when the Pi boots. This can be done by configuring a cron job.
First we need to create a script :
nano voicechanger.sh
then paste in the play command :
play "|rec --buffer 2048 -d pitch -300 echos 0.8 0.88 100 0.6 150 .5 band 1.2k 1.5k"
Access the cron settings for the Pi user using :
crontab -e
Select “nano” if it asks for a text editor. Then add the following line :
@reboot sh /home/pi/voicechanger.sh > /home/pi/voicechanger.log 2>&1
Save and quit using CTRL-X, Y.
When you next reboot the play command should be automatically executed.
Final Thoughts
One thing that I wasted a lot of time on was the microphone connection to the USB audio device. If the 3.5mm jack was pushed all the way into the socket the microphone didn’t work. I spent ages wondering why it wasn’t working until I pulled it out slightly, the connection was made and the microphone worked as expected.
In some ways the voice changer worked great but just didn’t quite sound how I expected. I decided not to use the voice changer in the end because my son’s actual voice was just too obvious in the background. I had covered a lot of ground at this point so decided to write it up anyway in case anyone else found it useful.