
This article explains how to setup WiFi on a Raspberry Pi without needing to connect a monitor or keyboard to the Pi. Although you can configure WiFi using the graphical utility within the Raspbian Desktop this requires that you connect a keyboard, mouse and monitor to your Pi. It is sometimes useful to be able to do it before you’ve booted the Pi. This is especially useful when using the Pi Zero W or A+ models where attaching a keyboard and mouse requires a USB hub.
The following technique will allow you to take a fresh SD card, setup WiFi and boot a Pi without any other wires than a power cable. It should work for all Pi models but it’s easier on the devices with on-board Wi-Fi as you don’t need to worry about a WiFi dongle.
Step 1 – Create a fresh SD card using Raspbian image
Create fresh SD card using the latest available Raspbian image from the Official Download page.
NOTE: This method to setup WiFi must be completed before you boot this card for the first time. This is the point at which the system checks for the wpa_supplicant.conf file. If you have already booted the card you will need to re-write with a fresh image and continue.
Step 2 – Create a blank text file
Create a blank text file named “wpa_supplicant.conf”. Use a plain text editor rather than a Word Processor.
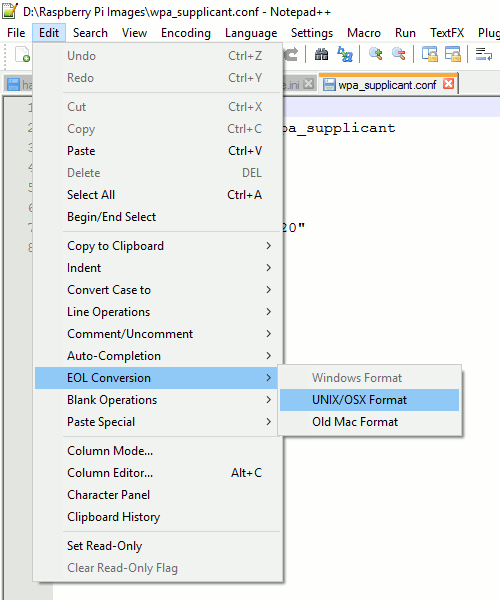
If using Windows you need to make sure the text file uses Linux/Unix style line breaks. I use Notepad++ (it’s free!) and this is easy to do using “Edit” > “EOL Conversion” > “UNIX/OSX Format”. “UNIX” is then shown in the status bar.
Insert the following content into the text file :
country=us
update_config=1
ctrl_interface=/var/run/wpa_supplicant

network={
 scan_ssid=1
 ssid="MyNetworkSSID"
 psk="Pa55w0rd1234"
}
Double check the SSID and password. Both the SSID and password should be surrounded by quotes.
The Country Code should be set the ISO/IEC alpha2 code for the country in which you are using your Pi. Common codes include :
- gb (United Kingdom)
- fr (France)
- de (Germany)
- us (United States)
- se (Sweden)
Step 3 – Copy to SD Card
Copy the file to the boot partition on your SD card. In Windows this is the only partition you will be able to see. It will already contain some of the following files :
- bootcode.bin
- loader.bin
- start.elf
- kernel.img
- cmdline.txt
Step 4 – Eject, Insert and Boot
Safely remove the SD card from your PC and insert into the Pi. Power up the Pi and once it has booted you should be connected to your WiFi network.
You may be able to use your Router admin interface to list connected devices. Your Pi should appear in the list with an assigned IP address.
Additional Thoughts
As Sebastian Bjurbom points out in the comments below you might want to take this opportunity to enable SSH as well. It is disabled by default but it is easy to enable by copying a blank text file named “ssh” to the boot partition. This can be done at the same time “wpa_supplicant.conf” is copied across.
If you save a copy of the wpa_supplicant.conf file (in a secure location) you can quickly copy it to all your SD cards when they have a fresh image written to them.
Troubleshooting
If after waiting a few minutes your Pi is not connected to your WiFi consider the following points :
- Did you complete this method before booting this SD card for the very first time? If not start again from Step 1
- Check wpa_supplicant.conf exists in the boot partition and the filename is correctly spelt
- Check the file contains the text listed above
- Double check every character in the SSID
- Double check every character the password
- Check the SSID and password are correctly surrounded with double quotes “….”
- Ensure your text editor is using Linux style line breaks
30 Comments
Worth mentioning is that you usually would need a blank file named “ssh” in root in order to be able to connect remotely on a “headless” installation.
Hey dude!
Thanks a bunch for your concise guide!
great guide, thanks. took me a while to get it to work, until i realized the file had to be copied over before first boot, if anyone else is having trouble make sure you’re copying into a fresh image.
omg thank you!!!
I got it to boot, but it brings me to a login prompt for motioneye. I dont know username or password nor can I determine the IP address.
The default user name is “admin” with a blank password. You should set a password as soon as possible!
my first time doing wpa_supplicant was not easy
first noob step was naming text file wpa_supplicant.conf.txt
took me half a day to figure out what was wrong
hey guys i’ve got the ip address, everything should be working but it won’t connect to it. any ideas are welcome. thank you
Check in your router settings to see if the Pi can connected and been allocated an IP address. If not double check the file is named correctly and the SSID and PSK values are 100% correct.
I have trouble with connecting to two different networks.
Can you confirm my code works?
country=nl
update_config=1
ctrl_interface=/var/run/wpa_supplicant
network={
scan_ssid=1
ssid=”NETWORK1″
psk=”password111″
}
network={
scan_ssid=1
ssid=”NETWORK2″
psk=”password222″
}
This worked for me, thanks.
Worked first time on my Zero-W. Still trying to get it to talk to my gmail, but an excellent guide 🙂 Thanks for sharing.
Hi,
I performed carefully your guide.
My monitor shows:
Interface wlan0 has IP address 192.168.1.77/24
Default gateway is 192.168.1.1
DNS server address is 192.168.1.1
In Windows 10 from MS Edge I enter URL 192.168.1.77/24
Get error message page not found.
In Windows 10 from MS Edge I enter URL 192.168.1.77
Get error message page not found.
On my WiFi router the Raspberry Pi Zero have IP address 192.168.1.77
What went wrong?
Peter Loth
Netherlands
Nothing has gone wrong. Your Pi has IP adddress 192.168.1.77 on your network. You won’t see anything in a browser unless the Pi is running a web server capable of delivering webpages. Try installing a basic web server using this guide : How To Setup A Web Server On Your Raspberry Pi
hit windows key+R and type cmd.exe then when it opens a console type ssh pi@youripaddress eg:
ssh pi@192.168.1.77then it should ask you for a password.
(Matt changed user from root to pi)
My problem was that Windows made the wep_supplicant.conf file into .txt file, got rid of the problem after i made the file with notepad++.
Now it works just fine, thanks for the guide!
Nice, but this didn’t work without:
key_mgmt=WPA-PSK
🙂
WOW it saves my raspberry pi 3b+ . Its HDMI and LAN port was damaged so i cant connect it with monitor or ssh for first time.. but with the help of this tutorial i have connected it with my wlan and using putty.. Thanks a LOT.. Love from India
Great tutorial. To the troubleshooting section ‘if the Pi W will not connect to your WiFi network’ I would add (relevant to me and maybe others);
Make sure the Pi W’s MAC address is allowed in your network if you have MAC Filtering enabled. The simplest way to do this is disable the MAC Filtering, reboot the Pi W again and – assuming everything else is correct – it will connect. Check the list of connected devices in your router and add the Pi W’s MAC address to your filter. Re-enable the filter, reboot and all should be well.
Great tutorial…
Only place I have seen that makes it clear that WE put the wpa_supplicant.config in the boot folder. (The boot process moves it to it’s final home.)
I have a steam age router. It did not work for me until I expanded the network section. I discovered what to put in there by setting up WiFi manually on the Pi, with a monitor, keyboard and mouse physically connected. I then stole the extra lines from /etc/wpa_supplicant/wpa_supplicant.conf.
My network section…
network={
ssid=””
scan_ssid=1
psk=””
key_mgmt=NONE
wep_key0=””
}
Please mention the version of Raspbian that would work with the instruction. I even tried with Jessie, “2017-07-05-raspbian-jessie-lite.img” , which is the latest of Jessie. The instructions can not get WiFi to connect to an AP. This article has got a higher ranking in web-search and is one of the first links returned by a search engine.
It should work with the latest version. No idea if it will work with a 3 year old image and I can’t test all my blog posts against all versions. I always start with the latest version and update my blog posts when I use them myself in projects.
Is there any other way to connect to wifi without using wpa_supplicant
Obviously if you use the desktop with a monitor, keyboard and mouse you can use the graphical interface to setup the WiFi.
Great tutorial!
Might it be worth noting that the Pi cannot use a 5Ghz Wifi signal?
Above is half the story.
The wpa_supplicant part is correct, but rfkill might be active by default on a new installation (RPI4).
I spent an hour looking for the command “rfkill list”.
Trying to get my RPI4 board to connect to my wifi …
After days of searching and trying out various suggestions and / or “solutions ” posted in Raspberry pi and stackoverflow sites …
The command wpa_supplicant -iwlan0 -c/etc/wpa_supplicant/wpa_supplicant.conf is the only useful way I could use to find what the problem was
That very useful command reported back problems with the syntax of the text in my wpa_supplicant.conf file
I was then able to fix the text.
FYI …
I had to change some lines from uppercase to lowercase text
and
I also had to rem out ( using #) the key_mgmt line
This text in /etc/wpa_supplicant/wpa_supplicant.conf worked;-
ctrl_interface=DIR=/var/run/wpa_supplicant GROUP=netdev
update_config=1
country=GB
network={
ssid=”ROUTER SSID”
psk=”xxxxxxxxxxxxxx”
#key_mgmt=WPA
}
I’m still working on getting this set up. My password has spaces in it. Do I need to replace those with underscores?
Because the password is wrapped in quotes you shouldn’t need to do anything special with the spaces.
Does not work anymore with bookworm.
Completely new process, use rpi-imager (and don’t forget the second tab where ssh is enabled)