
After the successful deployment of my first motionEyeOS Pi CCTV camera last year I was keen to get another security camera setup. I wanted to use a Pi Zero W so I could mount it inside my conservatory using a Pi Hut “ZeroView”. This is a mount for the Pi Zero that lets you stick a Pi camera to a glass window.
motionEyeOS makes it so easy to setup a security camera and the difficult bit is usually the practicality of physically mounting it all. By using the ZeroView mount even this stage can be straightforward. The Pi Zero W would also allow me to put the camera in a place where I had no Ethernet available.
The following instructions explain how to quickly create a motionEyeOS based CCTV camera with a Pi Zero W.
Hardware
The components you will need for this project are :
- Raspberry Pi Zero W (or Pi Zero with WiFi dongle)
- Official Pi Camera
- Camera ribbon cable
- Official 5V power supply
- 16GB SanDIsk microSD card [Amazon]
- Optional : Pi “ZeroView” camera mount
I chose a standard camera rather than the Pi NoIR version as I’ve got standard motion activated flood lights which can provide illumination at night.
You can use a different sized SD card but I think 16GB is a good starting point.
Step 1 – Download motionEyeOS SD Card Image

motionEyeOS is available for a number of different hardware platforms. For the Pi Zero you need to download the image compatible with the “Raspberry Pi” rather than those available for the Pi 2, Pi 3 and Pi 4.
The filename will look something like :
motioneyeos-raspberrypi-########.img.xz
- Download image from the official GitHub releases page
- Extract the img file from the archive
- Write the img file to a microSD card (e.g. using BalenaEtcher)
On Windows I used 7-zip to extract the image from the archive.
If you use BalenaEtcher to write the SD card image you do not need to extract anything. It can write the “img.xz” file directly.
Step 2 – Configure Wireless
This is a crucial step when using the Pi Zero W. In order to configure the Wireless without messing about with monitors and keyboards you can configure it manually. To do this you need to add a text file to the boot partition on the SD card named “wpa_supplicant.conf”. Instructions for creating the wpa_supplicant.conf can be found in the Manually setting up Pi WiFi using wpa_supplicant.conf tutorial.
Pay careful attention to this step as a mistake can result in the Pi Zero failing to boot. You may need to re-write the SD card and start again in order to get a network connection.
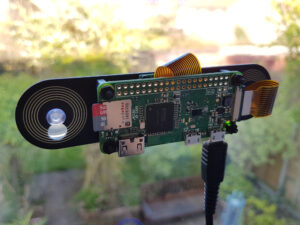 Step 3 – Assemble Pi Camera
Next you should assemble the components :
- Connect camera to Pi
- Mount Pi and camera to the ZeroView mount
- Insert microSD card
- Attach ZeroView to window
- Connect power supply
Step 4 – First Boot
Once everything was connected turn on the power. During the first boot the system performs some configuration so is best left for 5 minutes.
Assuming the Pi has connected to your WiFi you need to find its IP address. You can either look in your router admin interface or use an IP scanner. “Angry IP Scanner” is suitable for this and is available for Windows, Linux and Mac.
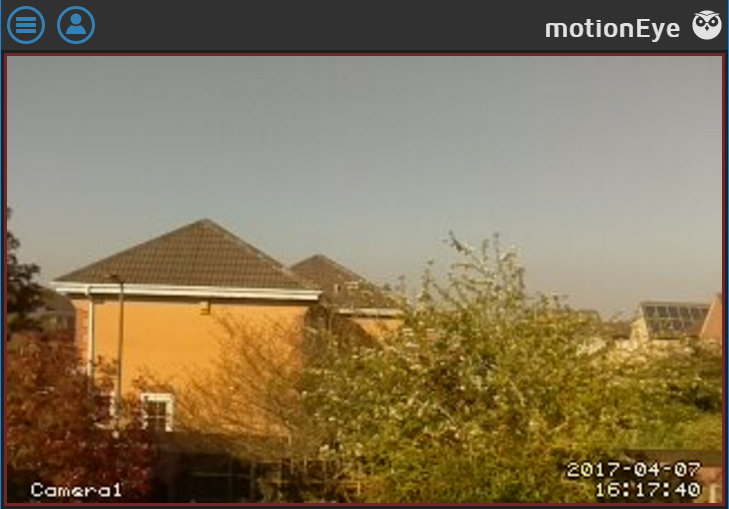
Once you have the IP address you can enter it into the address bar of your browser to load the motionEyeOS web interface. With any luck you should see the output of your camera :
The icon in the top left can be used to open the settings side panel. Click the “person” icon to login :
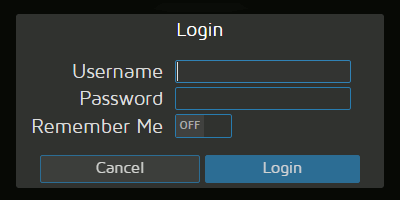
Use “admin” as the username and leave the password blank. Click “Login” and you can now access the settings side panel.
Step 5 – Settings
Under general settings you should set passwords for “Admin Password” and “Surveillance Password”. I usually change the default “Camera Name” to something more unique and this is particularly useful if you have more than one camera.
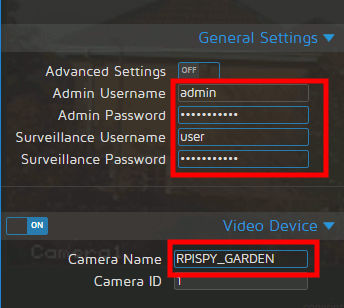
Click the “Apply” button to save these changes.
Step 6 – Advanced Settings
By setting “Advanced Settings” to “ON” and clicking “Apply” switch you can enable a lot of useful extra settings :
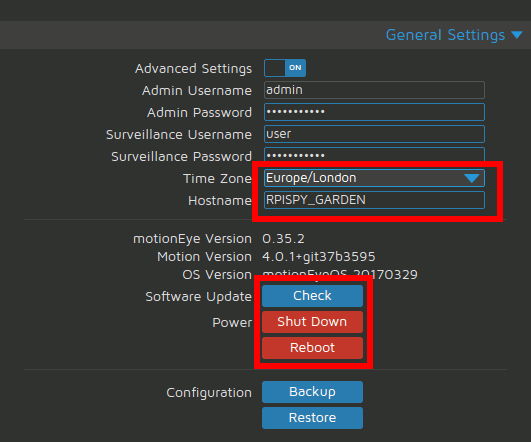
These include the ability to :
- change the Time Zone
- change the Hostname
- check for updates
- Shutdown
- Reboot
Step 7 – Other Settings
The following are settings I tend to change from the defaults.
– Preferences
As motionEyeOS can support more than one camera you can display their feeds in a grid. With only one camera I change these settings :
- Layout Columns = 1
- Layout Rows = 1
– Expert Settings
As we are using a Pi Zero :
- Enable CSI Camera Led = OFF
- Overclocking = modest
– Video Device
- Camera Name = “Garden”
- Video Resolution = 1600×1200
- Frame Rate = 2
If your camera is mounted upside-down you can use the Video Rotation setting to rotate the image. I use this setting in my Garage camera. You may also want to experiment with different video resolutions. Bigger is better but higher resolutions will create bigger images and these will take longer to shift over your network/mobile connections. Finding the ideal resolution is a balancing act between quality and performance.
– Text Overlay
- Text Scale = 6
– Video Streaming
These settings allow you to adjust the properties of the image streamed to the browser. These may require adjusting depending on the performance of your network and/or internet connection.
- Frame Rate = 1
- Image Resizing = ON
- Resolution = 50%
- Motion Optimization = ON
The image resizing allows the stream to use a lower resolution than the resolution set under “Video Device”. A low frame rate reduces the data-rate but still allows you to see what is going on in the scene.
– Still Images
- Capture Mode = “Motion Triggered”
- Preserve Pictures = “For One Month”
– Movies
- Movie Format = H.264 (.mp4)
- Preserve Movies “For One Week”
– Motion Detection
You will almost certainly need to experiment with these settings depending on where your camera is and what it can see :
- Frame Change Threshold = 10%
- Light Switch Detection = 75%
- Motion Gap = 20
- Captured Before = 25
- Captured After = 25
- Minimum Motion Frames = 10
- Show Frame Changes = ON
Step 7 – Fixed IP Address (Optional)
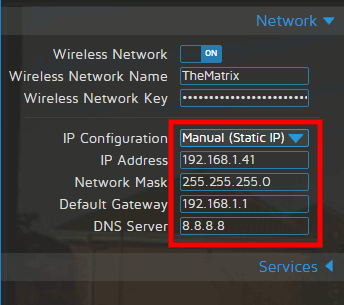
To make it easier to find the web interface in the future I like to give my cameras a fixed IP address. The IP address can be specified in the Network settings.
Step 8 – Viewing Images and Movies
Now the camera is up and running you just need to sit back relax.
To view images and movies you can click on the camera image and use the icons that appear in the top right.
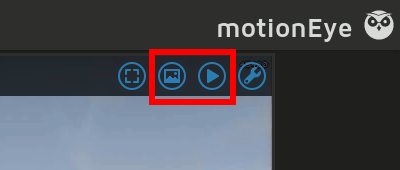
You will then be presented with a gallery that you can click on.
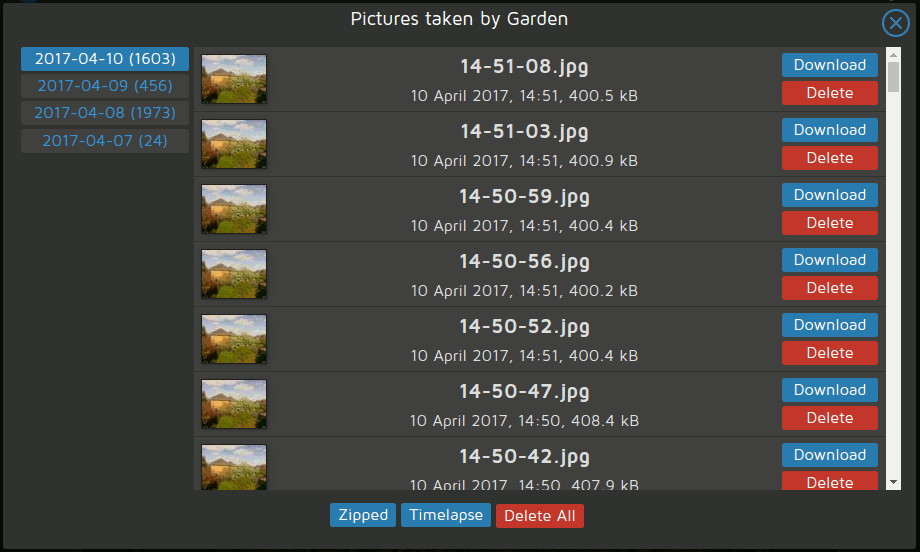
Timestamps are shown so you can see when the media was created. The gallery takes longer to load if there are more images. Play around with it and you will get a feel for how it works.
Legalities of CCTV Camera Operation
Please take some time to familiarise yourself with your local laws regarding the use of a CCTV camera. In the UK you are free to record your own property but if you start covering property owned by someone else additional regulations start to apply.
Final Thoughts
I am very impressed with motionEyeOS and it does almost everything I would expect from a DIY CCTV camera. It’s easy to setup which allows more time to worry about mounting the camera. It is the main reason I decided to not continue creating my own software.
It is worth experimenting with the settings (resolution, motion detection percentages etc) to get the best performance for your location given the number of detection events you are likely to get on a day-to-day basis.
It’s worth looking at the motionEyeOS Wiki for details on the settings as well as other features that I haven’t covered here. The github page also has an “issues” section where you can research any problems you may experience. It may be worth asking questions in the Google Group unless you are sure you have found a genuine issue.
motionEyeOS Links
Here are some motionEyeOS links that are worth visiting for additional information :
All my motionEyeOS CCTV camera based projects are listed under the motionEyeOS tag.
27 Comments
The wire hanging down is what ruins this. If you could add a solar cell at the front with a battery it would change this from an eyesore to a really useful bit of kit. Very few wives/girlfriends would allow you to get away with something to ugly.
This photo was taken of my test setup upstairs. It is stuck in the middle of the window and as you say the wire looks a bit messy. I am going to move it downstairs and stick on a conservatory window and route the wire along the window frame to make it a bit neater. In most home automation/security projects the technology is easy. Making it look nice and dealing with power cables is the hard bit!
I might also have a go at 3D printing a back-shell for the ZeroView.
Can this setup be used as a security camera? I mean if i can connect to the Raspberry Pi Zero W CCTV camera outside of my WiFi network (e.g. via cellphone, from abroad, etc.).
Yes! It has to have a network connection but with “port forwarding” setup on your router you can check the video feed from anywhere in the World.
Can you change the port so that your can support multiple instances on your network?
You can give each system a different IP address so you can have lots of cameras on the same network. If you access those cameras outside your network you can get your router to port forward. A different port on your external IP can be used to access to each internal IP address.
Thanks much for this tutorial. Nubie question tho: How does one shut down the RPI. Do you SSH in to the device, then type “shutdown” or something? If so, what would be the SSH password?
Thanks!
Within the MotionEyeOS web interface there is a Reboot and Shutdown button.
Matt- Do you continue to have success with motioneyesos using the RPI Zero W? Most times when I (re)boot my Zero W, it won’t connect to my router. The boot echo notices seems to hang for longer that expected on the “Configuring wireless network” step, then in the next step indicates failure to get the date via HTTP.
If you’re still having success, can you confirm you are using the following motioneyes image file from github:
motioneyeos-raspberrypi-20170329.img.gz
I can’t see on the git page “Raspberry Pi 1” per your instructions above. So I’m assuming the image file without the “2” or “3” after “raspberrypi” is for the Zero.
Thanks!
I’m currently using motionEye Version 0.35.2, 4.0.1+git37b3595, 20170329.
I was getting a lot of reboots but that was with a 700mA power supply. I swapped for an official supply rated at 2.5A and that has been much better. The image for the Pi Zero W is indeed the “raspberry pi” version rather than the two others for the Pi 2 and 3.
Tip: I found that DHCP was flakey, and often no connection was made with my router. (Could be router issue, PiOS, not sure.) No problems when I set a static address.
Hi,
I tried to set up a similar Spy-Cam, but the performance of the Pi Zero seems to be very bad. I switched of the stream because there were only 1-2 frames per second. I set up only motion detection for video and still immages, but the recorded video is also only 1 frame without motion. Even the time displayed is still.
Is that the same with you?
Henry
Great write up! Im on noob to the world of raspberry pi and was in the market for a home poe cctv system. However this project looks like it could fit the bill. My only concern is the open nature of the circuitry. With a small child i’d be worried about curious little fingers touching the board. Do you know if there an enclosure for the rear side available? Im very tempted by this as it ticks all the boxes for a camera to monitor the front of my house.
greeting wizards, i’ve just set all this up and all should be well but cant seem to connect using the ip address, it says it cannot connect 🙁 any ideas are welcome and thank you in advance
kind regards
jowee
Re-write the SD card and do it again. Make sure the file is named “wpa_supplicant.conf” and it is saved on the boot partition. You will have to use another PC to do this. You absolutely have to get the ssid and psk correct first time. If you try booting and something isn’t correct it will get stuck in a loop.
now how can i deploy this in a standalone area?
example i want to set it in my car and watch from 100 yards to see if someone is entering my car
As long as you can power it and connect to a WiFi network you can place the system anywhere you like. If it is outside it would need to be protected from rain etc.
Great tutorial all setup. Unfortunately, I bought the ZeroCam NOIR.
I noticed on your tutorial you mentioned that you have a standard motion activated flood lights – is this using your raspberry pi to activate or are you using an off-the-shelf product?
The lights are just standard PIR flood lights from a DIY store. They activate using their own sensor and have no connection to the Pi at all. In the dark MotionEyeOS would not notice any movement but once the lights are triggered it can “see”. Obviously there is scope for getting the Pi to control the lights but I wanted to keep it simple and get it working as soon as possible. It’s worked out OK so I’ve not gone back to change it.
What is the range of detection? I mean how far away will it detect movement? I am thinking of using the same type of setup in my upstairs window to monitor my front garden and the street, where my van is parked? It would need to be around 20 Meters or so.
Thanks.
Because the detection is done visually the range is almost unlimited. It just depends on how large your object appears as it moves. A person 20m away shouldn’t be a problem assuming there aren’t other objects that would trigger lots of false alarms (ie swaying trees etc).
Thanks.
I would like to have a go at this project but as I’m new to the Raspberry Pi range does the Pi Zero W have enough processing power or would a higher end Pi be better? Also, are there options for other cameras? Thanks very much.
I run a Pi Zero W with a Raspberry Pi camera and it works fine. You do need to be modest with the resolutions and frame rates. You can USB cameras rather than the official camera but these load the CPU and am not sure what the performance difference would be.
Do you have any video to show how the recorded video file comes out?
Unfortunately not. I’ve just moved house and this camera is currently in a box. I’m going to rebuild the SD card using this article and double check it still works with the latest Raspbian etc. I will attempt to get some example footage from it and upload to my YouTube channel.
Many thanks for this tutorial, I had managed to get my pi Zero W set up without it but took a few goes to get it sorted and some tinkering to get the settings just right. So many uses for this I will need to build a few more.
Using a 1000mAh power bank it pasts about a day I plan to keep the bank topped up with a solar cell via a regulator. (Banggood has one) for now though just using an old phone charger
Thinking to occasionally connect using my mobile phone as a WiFi hotspot as I may be using this out of range for WiFi so in the Expert settings tab I set “Network link watch” and “Connectivity watch” to off
NB I would advise not to use your regular email account for notifications but rather set up a new account that you can trash if need be. I Couldn’t set up the email notification via Gmail as Google don’t think it’s secure.