
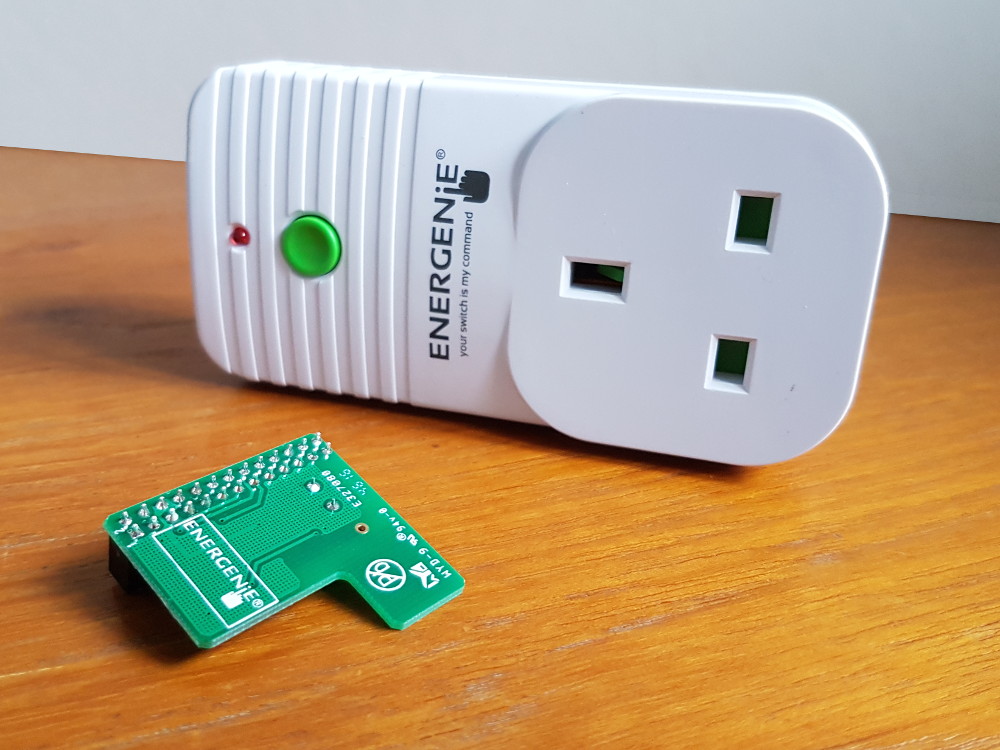
Energenie create a range of remote control power socket products. These include plugin socket adapters that are great for controlling lamps, pumps and any other mains powered devices. To add some intelligence they sell a hub but of more interest to me is the Pi-mote.
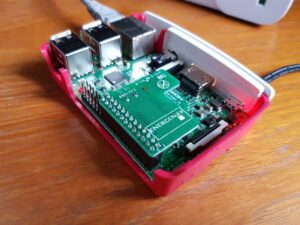
 This is a £10 add-on board for the Raspberry Pi that allows you to use the GPIO pins to control the sockets. Once setup it is really easy to get your own code to switch the sockets on and off. It’s compatible with all models of the Pi and I use a few around the house to control lamps and one in the garden as part of my paddling pool pump control system.
You can buy the sockets separately but you’ll get the best value if you buy a set of sockets with a bundled Pi-mote. I managed to get a set of two sockets and one Pi-mote for £20 but this set is only £22 from the official Energenie shop.
Buying Energenie Devices
Energenie products are available from a number of sources so you may need to shop around to get the best price. You can get better value for money by buying a set of sockets and the Pi-mote at the same time.
Pairing Sockets to Pi-mote
 In order to use the sockets each one must be paired to the Pi-mote and given an ID number in the range 1-4. The Official User Manual contains more technical information but below is the process I used to pair my sockets with a Pi-mote.
- Create a fresh Raspbian SD card
- Plug the Pi-mote onto the GPIO header
- Power up the Pi
- Download my pairing script using :
wget https://bitbucket.org/MattHawkinsUK/rpispy-pool-monitor/raw/master/utils/energenie_pair.py
- Plug in first socket into a mains socket
- If the LED is on press the button to turn the socket off
- Hold down the button for 5 seconds then release when LED starts flashing. The LED on the socket should be flashing once per second
- Run the pair script with the appropriate socket number (1,2,3 or 4)
python3 energenie_pair.py 1
The ID you give the socket will be used to control this socket in your Python scripts. You can only have IDs 1,2,3 and 4 but you use the IDs on multiple sockets.
If you feed the script “5” :
python3 energenie_pair.py 5
it will run a test and activate each of the fours IDs in sequence. This allows you to check that your sockets are activated with the ID you were expecting.
Tip : If you are planning on using lots of sockets then you might want to label them for easier reference later on.
Erase Socket Settings
If you want to erase the paired information in a socket you can do the following :
- Ensure socket is off and red LED is off
- Hold button until LED starts flashing
- Continue to hold button until LED starts flashing faster
- Release button
The socket will return to learning mode and you can either run the pairing script, turn the socket off or unplug it completely.
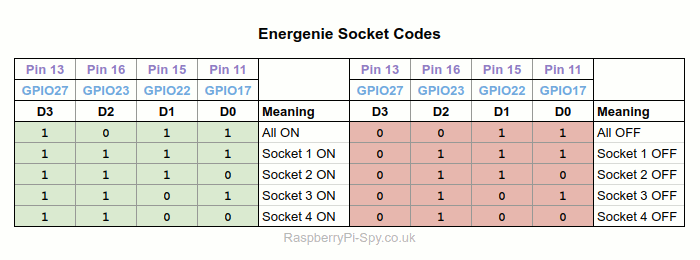
Energenie Socket Codes
For reference here are the codes that are used to control the four potential sockets. When using the Energenie or gpioZero methods detailed below you don’t really need to worry about this level of detail but it’s here for reference.
There are three easy ways to control the sockets.
Method 1 – RPi.GPIO
Using RPi.GPIO requires a bit more Python than the other two methods as you have to configure the GPIO pins manually before sending codes to the Pi-mote. The GPIO pins can be configured at the start of your script using :
import time
import RPi.GPIO as GPIO

# Set the GPIO numbering scheme
GPIO.setmode(GPIO.BCM)

# Select the GPIO pins used for
# the encoder D0-D3 data inputs
GPIO.setup(17,GPIO.OUT,initial=0)
GPIO.setup(22,GPIO.OUT,initial=0)
GPIO.setup(23,GPIO.OUT,initial=0)
GPIO.setup(27,GPIO.OUT,initial=0)

# Select the GPIO pin to enable/disable the modulator
# Default to disabled
GPIO.setup(25, GPIO.OUT,initial=0)

# Select the signal used to select ASK/FSK
# Default to ASK
GPIO.setup(24, GPIO.OUT,initial=0)
and a code can be sent to the Pi-mote using :
# Socket 1 ON
D3=True
D2=True
D1=True
D0=True

# Set D0-D3
GPIO.output (27, D3)
GPIO.output (23, D2)
GPIO.output (22, D1)
GPIO.output (17, D0)

# Let it settle, encoder requires this
time.sleep(0.1)

# Enable the modulator
GPIO.output (25, True)

# Keep enabled for a period
time.sleep(0.25)

# Disable the modulator
GPIO.output (25, False)
In the example above Socket 1 is set to ON by setting all four Pi-mote inputs to True. If you wanted to turn ID 3 OFF you would set
- D3=True
- D2=False
- D1=True
- D0=False
The reference table can be used to determine the values of D0-3 required to control the other socket IDs.
Method 2 – Energenie Library
In order to simplify things Ben Nuttal Amy Mather and Gordon Hollingworth created a Python library to deal with the detail shown in Method 1. It needs to be installed :
sudo apt-get install python-pip python3-pip
sudo pip install energenie
sudo pip3 install energenie
This installs the library for both Python 2 and Python 3.
Turning sockets on and off becomes as easy as :
import energenie as e
import time

# Turn all sockets on and off
e.switch_on()
time.sleep(2)
e.switch_off()
time.sleep(2)

# Turn socket ID 1 on and off
e.switch_on(1)
time.sleep(2)
e.switch_off(1)
This library helps keep your own scripts nice and simple as you only need one line of code to change the state of a socket without needing to configure GPIO pins or worry about the Pi-mote control.
Method 3 – GPIO Zero
The next method you can use is the GPIO Zero package. This includes built in methods for controlling all sorts of Pi addons and accessories including the Energenie Pi-mote. It’s installed by default on the latest version of Raspbian but if you need to install manually you can find the install instructions here.
import time
from gpiozero import Energenie

# Turn socket ID 1 on and off
skt1 = Energenie(1)
skt1.on()
time.sleep(2)
skt1.off()
This is similar in complexity to using the Energenie library in Method 2 but may be a better choice if you can make use of GPIO Zero for other bits of hardware in your project such as LEDs or buzzers. Read more about it on the Official GPIO Zero Documentation page.
Pi-mote Range
The range of the Pi-mote can be increased by soldering a 135mm piece of copper wire to the point marked ANT1 on the PCB. I haven’t tested the range yet but I will update this paragraph if I do in the future.
Final Thoughts
I’ve used all three of these methods and it will be personal preference as to which one is the best choice for you. If you are in any doubt then give GPIO Zero a try as it can also be used to quickly control lots of other hardware as listed in the “API – Boards and Accessories” list.
Once you can control your sockets with Python you can now add all sorts of functionality. Possible applications include :
- Controlling Christmas lights
- Controlling Halloween lights
- Pool pump scheduling
- Controlling house lights while you are away
Light, motion and temperature sensors can be used to create “smart” projects that rival anything you can buy from a store.
3 Comments
Will this work in America
No reason it shouldn’t.
I can confirm that adding a 135mm wire to the ANT1 point has indeed extended the range! Thanks for pointing me in the right direction. For what it’s worth – this is also documented in the official transmitter documentation: https://energenie4u.co.uk/res/pdfs/ENER314%20UM.pdf