Now I’ve got a few MotionEyeOS based cameras around the house I wanted an easier way to know when they were rebooted and also have a link on my phone to make it easier to access the camera feed. I’ve got the excellent Pushover app on my phone so I decided to get MotionEyeOS to send a Pushover notification whenever it restarted. The notification states what the IP address is and provides a handy link to click.
What is a Pushover Notification?
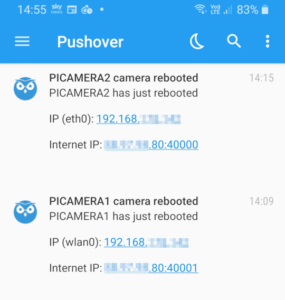
The Pushover notifications look like this :
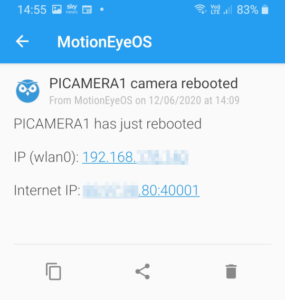
with an individual Pushover notification looking like :
Pushover Service
To use Pushover you need to sign up for an account on Pushover.net and install the mobile app. The app costs money but is a one off cost and one I was happy to pay. Within your user account dashboard you will find a user “token”. New “applications” can be created and each one will have a unique “API token”. I created an application named “MotionEyeOS” and used it’s token for both my cameras.
You can use Pushover for other projects and it’s compatible with any programming language that can call a web URL.
Port Forwarding
The Pushover notification provides the IP address of the network as seen from outside. Router “port forwarding” can be used to direct requests from outside the network to the specific Pi running MotionEyeOS. Your network will only have one external IP address but many devices and using ports allows to communicate with each one.
In the examples in this post I am using port 40001 and my router is re-directing this to the Pi on my network. The router redirects all incoming traffic to port 40001 to the internal IP address of my Pi (e.g. 192.168.0.11) using the port number defined in as the “HTTP Port” in the MotionEyeOS admin “Expert Settings”. Internally I use http://192.168.0.11:80 to access my Garden camera but externally I use http://123.123.123.123:40001.
So the notification includes a link to “http://123.123.123.123:40001”. By setting up multiple rules you can access different MotionEyeOS installations on the same network. Just give them each a different port. A second camera could use 40002 and the router would just redirect to appropriate internal IP address ( e.g. 192.168.0.12) .
If you are unsure how to setup your router Google “port forwarding netgear r8000” but replace “netgear r8000” with the brand and model of your router. Someone, somewhere will have written a guide to explain it.
SSH File Uploads
In order to get the scripts onto your Raspberry Pi you can use an SSH client such as WinSCP, FileZilla or MobaXterm. There are two techniques.
Method 1 – Upload to Pi
Download the two script files described below to your PC. Edit userinit.sh and add your Pushover keys. Then upload to the Raspberry Pi using the SSH client.
Method 2 – Download Direct to Pi
Connect to the Raspberry Pi using SSH or a client that provides a command line interface. Navigate to the appropriate directory and download the script file directly from BitBucket using the curl command. Use nano to edit userinit.sh and add your Pushover keys.
Bash Script – userinit.sh
To get MotionEyeOS to run some custom commands at boot, you will need to place the userinit.sh file into the /data/etc/ directory. This is a built in feature and can be used for lots of other purposes.
user="replace_me_with_your_user_key"
token="replace_me_with_your_api_token"
port="40001"
sleep 15
ip=$(curl -s https://api.ipify.org)
ip="$ip:$port"
python /data/pushover_boot.py $ip $user $token > /var/log/pushover &
There’s no need to add a shebang (i.e. #!/bin/sh) at the beginning of the file and there is no need to make it executable.
You can find a copy of an example userinit.sh in my BitBucket repository.
If you are using a command line you can navigate to the correct directory using :
cd /data/etc
It can then be downloaded directly to your Pi using the “curl” command:
curl https://bitbucket.org/MattHawkinsUK/rpispy-misc/raw/master/motionEyeOS/userinit.sh --output userinit.sh
Make sure this script ends up in the /data/etc directory.
If you are using a command line you can edit the contents to add your Pushover keys using nano :
nano userinit.sh
Use CTRL-X, Y, ENTER to save changes and return to the command line.
Note : It is critical you change the “user” and “token” variables with your own user and api tokens. If you don’t do this it will not work.
Python Script – pushover_boot.py
When the system boots the “userinit.sh” script will wait fifteen seconds, obtain the internet IP address using the ipify.org service and then run the “pushover_boot.py” script. The “pushover_boot.py” script should be placed in the /data/ directory.
This script sends the tokens, title, message and URL to include in the message to Pushover. If successful the notification will be sent to your phone and will appear in the app.
You can find a copy of pushover_boot.py in my BitBucket repository.
If you are using a command line you can navigate to the correct directory using :
cd /data/
It can then be downloaded directly to your Pi using the “curl” command:
curl https://bitbucket.org/MattHawkinsUK/rpispy-misc/raw/master/motionEyeOS/pushover_boot.py --output pushover_boot.py
This script needs to be in the /data/ directory!
Logging
Any “print” statements in the Python script will be directed to the “/var/log/pushover” file. You can view the contents of this file when the system has booted using :
cat /var/log/pushover
At the moment it just prints the notification title but you could enhance the Python script to print more detailed information and maybe a time-stamp.
Troubleshooting
In order for this mechanism to work everything needs to be correctly setup. If you get one step wrong it will probably not work at all. Here are some things to check :
- Your MotionEyeOS system should be up and running and the web interface available on your local network.
- You should have an active Pushover account with the mobile app installed.
- Within Pushover you should have an application created which will give you an “API Token/Key”.
- The script pushover_boot.py should exist in /data/
- pushover_boot.py should match the script in my BitBucket repository exactly.
- The script userinit.sh should exist in /data/etc/
- userinit.sh should match the script in my BitBucket repository exactly but should use your Pushover user key, api key and Port number.
- Your router should map the incoming port number used in userinit.sh to the “HTML Port” defined in MotionEyeOS “Expert Settings”.
2 Comments
Interesting, can also ask where you acquired the camera housing?
It’s an “Evatron IP67 ABS (DE Series) 80x73x53mm junction box”. I talk about it in more detail here :