
The DHT11 is a low-cost temperature and humidity sensor. It isn’t the fastest sensor around but its cheap price makes it useful for experimenting or projects where you don’t require new readings multiple times a second. The device only requires three connections to the Pi. +3.3v, ground and one GPIO pin.
DHT11 Specifications
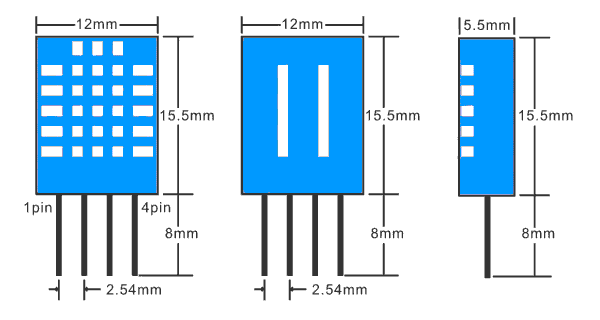
The device itself has four pins but one of these is not used. You can buy the 4-pin device on its own or as part of a 3-pin module.
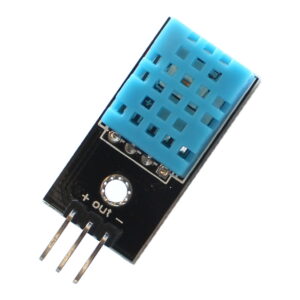
The modules have three pins and are easy to connect directly to the Pi’s GPIO header.
- Humidity : 20-80% (5% accuracy)
- Temperature : 0-50°C (±2°C accuracy)
The manufacturers do not recommended that you read data from this device more than once per 2 seconds. If you do you may get incorrect readings.
Hardware Setup
The 4-pin device will require a resistor (4.7K-10K) to be placed between Pin 1 (3.3V) and Pin 2 (Data).
The 3-pin modules will usually have this resistor included which makes the wiring a bit easier. For this reason I got hold of the module which I could then attach to the Pi with a piece of 3-way Dupont cable.
Different suppliers may wire the module pins differently so check the PCB markings to identify Vcc (+), data and Ground (-).
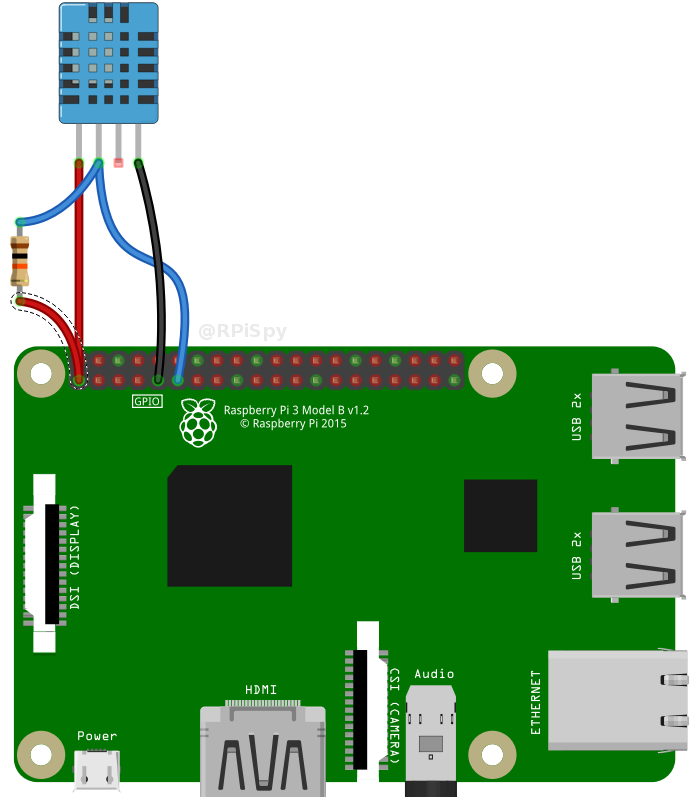
The 3 pins should be connected to the Pi as shown in the table below :
| DHT Pin | Signal | Pi Pin |
| 1 | 3.3V | 1 |
| 2 | Data/Out | 11 (GPIO17) |
| 3 | not used | – |
| 4 | Ground | 6 or 9 |
Your data pin can be attached to any GPIO pin you prefer. In my example I am using physical pin 11 which is GPIO 17. Here is a 4-pin sensor connected to the Pi’s GPIO header. It has a 10K resistor between pin 1 (3.3V) and 2 (Data/Out).
Python Library
The DHT11 requires a specific protocol to be applied to the data pin. In order to save time trying to implement this yourself it’s far easier to use the Adafruit DHT library.
The library deals with the data that needs to be exchanged with the sensor but it is sensitive to timing issues. The Pi’s operating system may get in the way while performing other tasks so to compensate for this the library requests a number of readings from the device until it gets one that is valid.
Software Setup
To start with update your package lists and install a few Python libraries :
sudo apt-get update
sudo apt-get install build-essential python-dev
Then clone the Adafruit library from their repository :
git clone https://github.com/adafruit/Adafruit_Python_DHT.git
cd Adafruit_Python_DHT
Then install the library for Python 2 and Python 3 :
sudo python setup.py install
sudo python3 setup.py install
Hopefully at this point the library is installed and ready to be used within a Python script.
Adafruit Example Python Script
Adafruit provide an example script that you can use to check your sensor is operating correctly.
cd ~
cd Adafruit_Python_DHT
cd examples
Then :
python AdafruitDHT.py 11 17
The example script takes two parameters. The first is the sensor type so is set to “11” to represent the DHT11. The second is the GPIO number so for my example I am using “17” for GPIO17. You can change this if you are using a different GPIO pin for your data/out wire.
You should see an output similar to this :
Temp=22.0* Humidity=68.0%
Using the Library In Other Python Scripts
Once the Adafruit library is installed and you’ve got the example script to work you can use the sensor in your own scripts. Simply import the module, setup a few variables and call the “read_retry” function :
import Adafruit_DHT

# Set sensor type : Options are DHT11,DHT22 or AM2302
sensor=Adafruit_DHT.DHT11

# Set GPIO sensor is connected to
gpio=17

# Use read_retry method. This will retry up to 15 times to
# get a sensor reading (waiting 2 seconds between each retry).
humidity, temperature = Adafruit_DHT.read_retry(sensor, gpio)

# Reading the DHT11 is very sensitive to timings and occasionally
# the Pi might fail to get a valid reading. So check if readings are valid.
if humidity is not None and temperature is not None:
  print('Temp={0:0.1f}*C  Humidity={1:0.1f}%'.format(temperature, humidity))
else:
  print('Failed to get reading. Try again!')
This script can be downloaded directly to your Pi using :
wget https://bitbucket.org/MattHawkinsUK/rpispy-misc/raw/master/python/dht11.py
and run using :
python dht11.py
Buying a DHT11
The DHT11 is available from many electrical component sellers. Here are a selection :
Some may only sell the device itself so you may need to shop around if you would prefer the 3-pin module.
Final Thoughts
The DHT11 is probably best suited for projects where rapid data readings are not required and the environment is not expected to see sudden changes in temperature or humidity. A weather station would be an idea project but a central heating controller may require something different.
For projects that need a faster temperature reading rate (<2 sec) I would probably use a DS18B20 as they respond much faster to changes in temperature. But with both these sensors costing <$5 you can probably afford to buy both and experiment.
9 Comments
Thanks worked perfectly as a Python3 script on Raspberry Pi Zero W running Jessie version 8. Thanks very much. I had used the PigPio library before, but prefer sticking to ordinary GPIO on the CPU starved RPi Zero W.
Nice!!
Some great tutorials here. I got the DHT11 to work OK. Earlier I got an OLED 1306 screen to work (they cost less than £2) I’d love to output the temperature and humidity data to the OLED 1306. What about a tutorial on that – or point me in the right direction. Thanks
nice
A while ago it worked fine. Now I get humidity between 142% and 175%… sigh… Probably means sensor is defect – or am I missing something?
BTW, for folks wondering whether to get the DHT11 or DHT22: The DHT11 is really imprecise (+-3 degree!!!), 22 is a bit better, but not much. For temperature, I did a lot of testing with 5 sensors DS18B20 in parallel, in the same breadboard, under different settings (room temp, fridge, freezer) and they are max 0,5 degree apart – much better accuracy!!
OK, I found the problem: I used a 7m cable to connect to the sensor, and tried again with short cables, and now it works! So the problem was the cable, not the sensor!
Is it important to use a resistor?
I have seen examples like this where one is included, but I have also seen examples where there is no resistor between the sensor and the board.
The pullup resistor may not matter if the sensor is connected to an input that already has some sort of internal pullup. I think this is why you’ll see some diagrams using the resistor and some not. With the Pi you could enable a pullup on the GPIO and the DHT11 would probably work without the external resistor.
Hello, @Michael Behringer, I am planning a 15 m extension, so it seems not a good idea. Any clue about how to do this?
Thanks in advance.