Close Menu
    Facebook X (Twitter) Instagram Pinterest YouTube
    Trending
    • Disable SSH Password Login on Raspberry Pi
    • Elecrow Meteor IPS Touchscreen with RGB LEDs
    • Pi Pico Pinout Display on the Command Line
    • How to Add a Raspberry Pi Pico Reset Button
    • Pi Pico Onboard LED
    • Pi Pico W Pinout and Power Pins
    • CrowPi L Raspberry Pi Laptop and Learning Platform
    • Pi Pico W Launched
    Mastodon YouTube Facebook Instagram Pinterest RSS
    Raspberry Pi SpyRaspberry Pi Spy
    • Home
    • Categories
      • General
      • Hardware
      • Programming
      • Python
      • Software
      • Tutorials & Help
    • BerryClip
      • BerryClip Instructions
      • BerryClip Plus Instructions
      • Videos & Reviews
    • Buy
      • Buy Pi
      • Buy Pi Accessories
      • Buy Books
    • Tools
      • Ultimate Raspberry Pi Alexa Skill
      • Pi Power Estimator App
      • Pi-Lite 14×9 LED Matrix Sprite Editor
      • RPiREF Pin-out Reference App
      • Simple Ohm’s Law Calculator
      • Web Sites & Links
    • Tutorials & Help
        Featured
        November 9, 20200

        Raspberry Pi Temperature Monitoring

        Recent
        February 16, 2024

        Disable SSH Password Login on Raspberry Pi

        December 23, 2022

        How to Add a Raspberry Pi Pico Reset Button

        November 20, 2022

        Pi Pico Onboard LED

      1. Contact Us
      2. Site Map
      Raspberry Pi SpyRaspberry Pi Spy
      You are at:Home»Hardware»Interfaces»I2C»Raspberry Pi 7-Segment LED Display Module using Python
      4-digit 7-segment LED module

      Raspberry Pi 7-Segment LED Display Module using Python

      0
      By Matt on November 5, 2018 I2C, Tutorials & Help

      Seven segment LED displays have been a popular component in electronics projects for decades. Although you can wire them up directly, using an on-board controller chip makes it much easier.

      4 digit modules with a built-in controller chip are cheap and easy to buy. For this guide I used a module with an I2C interface which only requires four wires to be connected to the Raspberry Pi’s GPIO header. A popular chip is the HT16K33.

      This tutorial will explain how to connect up the module, setup up the software and get some example Python scripts running.

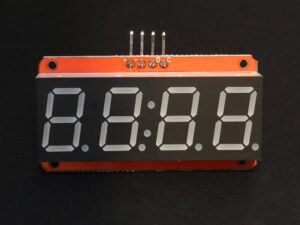
      0.56″ 4-Digit 7-segment LED Display Module

      The size refers to the height of the digits and is often quoted in inches. This 0.56 inch module has digits that are 14mm high. The module itself is 50mm x 27mm x 12mm (2 x 1.1 x 0.5 inch).

      4-digit 7-segment LED module front

      4-digit 7-segment LED module back


      LED Module Hardware Setup

      The module has four pins which can be connected directly to the Pi’s GPIO header.

      4-digit Seven Segment LED Display

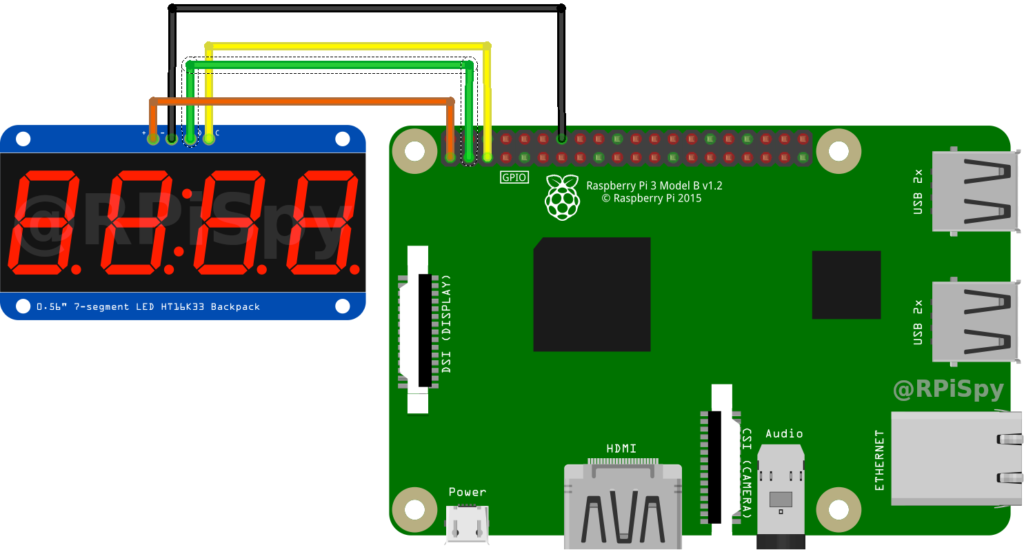
      On my LED display pcb the pins were labelled +, -, D and C. The + and – refer to 3.3V and ground. The D and C refer to the SDA and SCL pins required for the I2C interface.

      Pi Header PinFunctionLED Module
      Pin 13.3V+
      Pin 14Ground–
      Pin 3 (GPIO2)SDAD (DAT)
      Pin 5 (GPIO3)SCLC (CLK)

      There are other 3.3V and Ground pins available on the Pi’ GPIO header so you can use those if you wish. Take a look at the Raspberry Pi GPIO header diagram.

      I2C Address Selection

      The default I2C address of the HT16K33 device is 0x70. Three solder points on the PCB allow 7 other addresses to be defined so multiple modules can be used at the same time. The address range is 0x70 to 0x77.

      Enable Pi I2C Interface

      As with other I2C devices the interface must be enabled and a few Python libraries installed.

      Follow the Enable I2C Interface on the Raspberry Pi tutorial to get this setup.

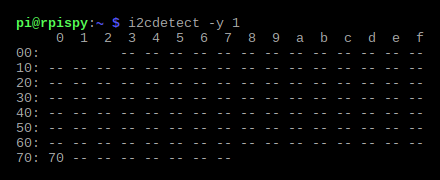
      When you run the following command :

      i2cdetect -y 1

      with the module attached you should see the 0x70 address shown in the grid :

      HT16K33 I2C Address

      Python Software Setup

      The first step is installing some Python libraries. These may already be installed but there is no harm in trying to make sure :

      sudo apt-get install -y build-essential build-essential 
      sudo apt-get install -y python-dev
      sudo apt-get install -y python-smbus

      Next clone the Adafruit library from their Github repository :

      git clone https://github.com/adafruit/Adafruit_Python_LED_Backpack.git

      Browse to the created directory :

      cd Adafruit_Python_LED_Backpack

      and install for Python 2 using the following command :

      sudo python setup.py install

      If you want to use Python 3 then you can install using :

      sudo python3 setup.py install

      I usually do both so I can have the flexibility later on.

      Example Python Scripts

      Adafruit Examples

      Once the library has been installed you can run Adafruit’s two example scripts.

      Browse to the examples directory using :

      cd ~
      cd Adafruit_Python_LED_Backpack
      cd examples

      then run the scripts using :

      python sevensegment_test.py

      or :

      python ex_7segment_clock.py

      The first script will display a sequence of numbers on the LED module. The second will show the time and act as a digital clock.
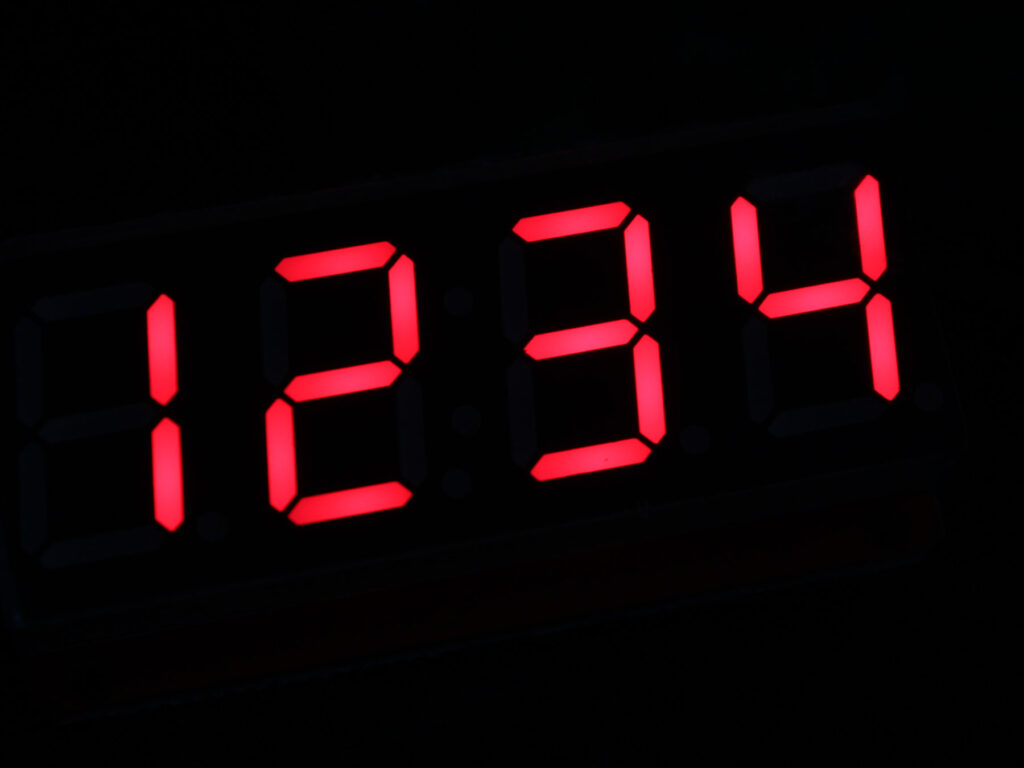
      My Example Script

      I created my own test script which you can download from my BitBucket repository using :

      wget https://bitbucket.org/MattHawkinsUK/rpispy-misc/raw/master/python/7segment_counter.py

      and then run using :

      python 7segment_counter.py

      The counter should look something like this :

      Library Functions

      The library provides a number of functions you can call in your own scripts.

      print_number_str(value, justify_right=True)
      Prints a 4 character long string of numeric values to the display. Characters in the string should be a supported character or a decimal point.

      print_float(value, decimal_digits=2, justify_right=True)
      Prints a numeric value to the display. If value is negative it will be printed with a leading minus sign. Decimal digits is the desired number of digits after the decimal point.

      print_hex(value, justify_right=True)
      Prints a numeric value in hexadecimal. Value should be from 0 to FFFF.

      set_colon(show_colon)
      Turn the colon on with show colon True, or off with show colon False.

      set_decimal(pos, decimal)
      Turn decimal point on or off at provided position. Position should be a value 0 to 3 with 0 being the left most digit on the display. Decimal should be True to turn on the decimal point and False to turn it off.

      set_brightness(value)
      Sets the brightness of the display in 1/16 increments. The value can be an integer from 0 (low brightness) to 15 (full brightness).

      The definition of these functions and what they do under-the-hood can be seen in this file :
      https://github.com/adafruit/Adafruit_Python_LED_Backpack/blob/master/Adafruit_LED_Backpack/SevenSegment.py

      4-digit 7-segment LED module

      Python 2 and Python 3

      The example scripts used in this tutorial can be run using Python 2 or Python 3. Wherever possible you should use Python 3.

      Buy an LED Display Module

      These modules are available from lots of sources.

      • Adafruit
      • The PiHut
      • [easyazon_link keywords=”4 digit 7-segment LED backpack i2c -bike” locale=”US” tag=”rpispy09-20″]Amazon[/easyazon_link]
      • eBay
      Share. Facebook Twitter Pinterest LinkedIn Tumblr Email
      Previous ArticleUsing a Level Shifter With the Raspberry Pi GPIO
      Next Article Introducing the Raspberry Pi 3 Model A+

      Related Posts

      Disable SSH Password Login on Raspberry Pi

      How to Add a Raspberry Pi Pico Reset Button

      Pi Pico Onboard LED

      Leave A Reply Cancel Reply

      This site uses Akismet to reduce spam. Learn how your comment data is processed.

      Recent Posts
      February 16, 2024

      Disable SSH Password Login on Raspberry Pi

      March 13, 2023

      Elecrow Meteor IPS Touchscreen with RGB LEDs

      December 26, 2022

      Pi Pico Pinout Display on the Command Line

      December 23, 2022

      How to Add a Raspberry Pi Pico Reset Button

      November 20, 2022

      Pi Pico Onboard LED

      Categories
      • 1-wire
      • 3D Printing
      • Add-ons
      • BBC Micro:bit
      • BerryClip
      • Books
      • Camera Module
      • Cases
      • Events
      • General
      • Hardware
      • I2C
      • Infographics
      • Interfaces
      • Minecraft
      • Model A+
      • Model B+
      • News
      • Pi Models
      • Pi Pico
      • Pi Zero
      • Power
      • Programming
      • Python
      • Raspberry Pi OS
      • Raspbian
      • RetroGaming
      • Robotics
      • Sensors
      • Software
      • SPI
      • Tutorials & Help
      Tags
      Arduino audio battery berryclip Birthday bluetooth cambridge camera CamJam DigiMakers display games GPIO I2C interface Kickstarter Kodi LCD LED Linux media Minecraft Model A motionEyeOS PCB photography photos Pi-Lite Pi Pico power python Raspberry Jam Raspberry Pi Bootcamp raspbian Retrogaming retroPie screen SD card security sensor SPI SSH temperature ultrasonic video
      Raspberry PI Related
      • Adafruit Blog
      • Average Maker
      • Official RaspBerry Pi Site
      • Raspberry Pi Pod
      • RasPi.tv
      • RaspTut
      • Stuff About Code
      Tech Resources
      • MattsBits – Pi Resources
      • Microbit Spy
      • Technology Spy
      Archives

      Entries RSS | Comments RSS

      This site is not associated with the official Raspberrypi.org site or the Raspberry Pi Foundation. Raspberry Pi is a trademark of the Raspberry Pi Foundation.

      Copyright © 2025 - All Rights Reserved - Matt Hawkins

      About

      Unofficial site devoted to the Raspberry Pi credit card sized computer offering tutorials, guides, resources,scripts and downloads. We hope to help everyone get the most out of their Pi by providing clear, simple articles on configuring, programming and operating it.

      Popular Posts
      September 19, 2014

      Top 5 Reasons The Raspberry Pi Sucks

      July 27, 2012

      16×2 LCD Module Control Using Python

      October 20, 2013

      Analogue Sensors On The Raspberry Pi Using An MCP3008

      Latest Posts
      February 16, 2024

      Disable SSH Password Login on Raspberry Pi

      March 13, 2023

      Elecrow Meteor IPS Touchscreen with RGB LEDs

      December 26, 2022

      Pi Pico Pinout Display on the Command Line

      Mastodon YouTube Instagram Facebook Pinterest RSS

      Entries RSS | Comments RSS

      This site is not associated with the official Raspberrypi.org site or the Raspberry Pi Foundation. Raspberry Pi is a trademark of the Raspberry Pi Foundation.

      Copyright © 2025 - All Rights Reserved - Matt Hawkins

      mastodon.social@RPiSpy

      Type above and press Enter to search. Press Esc to cancel.