

This tutorial explains how to run Flask applications using the NGINX webserver. Flask is a microframework for Python which allows you to create a web based applications on your Raspberry Pi. It includes its own webserver but it recommended by the developers that you should run under a more established web server such as NGINX or Apache. This makes the Flask app more robust as it can deal with more incoming traffic.
I strongly suggest running through this tutorial on a fresh SD image using the examples provided. Once that works then you can consider using the technique to upgrade your own Flask applications. You will need to pay attention to directory and file names as well as references to those locations in the various config files.
Step 1 : Create a Fresh SD Card
To start create a fresh SD card using an official Raspbian image. I used Etcher and the Raspbian Lite image as I didn’t need the graphical interface. When the card was ready I added a pre-prepared wpa_supplicant.conf and a blank ssh file to the boot partition. This allowed my Pi Zero to connect to my WiFi with SSH enabled without me needing to attach anything to the Pi other than power.
For reference you might want to look at the following guides :
- Write SD Card Images Using Etcher
- Setup WiFi on a Pi Manually using wpa_supplicant.conf
- Enable SSH (Secure Shell) on the Raspberry Pi
Step 2 : Power On and Update Pi
Insert the SD card into the Pi and power it up. Either use a keyboard and attached monitor or connect from another machine via SSH.
If you haven’t already change the password from the default.
Update the list of packages using :
sudo apt-get update
You should now have an operational Pi and be ready to install the required software.
Step 3 : Install Required Software
Install NGINX, pip3 and uWSGI using the following commands :
sudo apt-get install nginx
sudo apt-get install python3-pip
sudo pip3 install flask uwsgi
You may have to press Y at the Y/N prompts during the install process.
Step 4 : Create Flask App
Ensure you are in the /home/pi directory using :
cd ~
Create an example Flask app by first creating a folder called “flasktest” :
mkdir flasktest
and setting its group owner to “www-data” :
sudo chown www-data /home/pi/flasktest
Navigate into the directory :
cd flasktest
Then directly download my example Flask App to the Pi using :
sudo wget https://bitbucket.org/MattHawkinsUK/rpispy-misc/raw/master/flask/testSite1.py
Note that this test app has the filename “testSite1.py”.
Step 5 : Test NGINX URL
Find out the IP address of your Pi by using :
ifconfig
I will use the example “192.168.1.99” but you should use what IP address your Pi shows under ifconfig (either against eth0 for wired connections or wlan0 for wireless connections).
On your PC (or other browser equipped device) visit your Pi’s IP address :
http://192.168.1.99
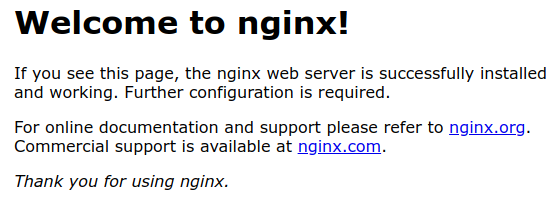
This should show the default NGINX welcome page :
Now test that uwsgi is working properly using :
uwsgi --socket 0.0.0.0:8000 --protocol=http -w testSite1:app
This should allow you to visit the same IP address as before but at port 8000 :
http://192.168.1.99:8000
This should show the Flask app’s default page :
Test site running under Flask
Back in your terminal you can return to the command prompt by using CTRL-C. The main URL will still show you the NGINX default page but because uwsgi isn’t running now the Flask app will no longer be available on port 8000.
Step 6 : Create uWSGI Initialisation File
To provide some additional settings to uWSGI now create an initialisation file :
sudo nano uwsgi.ini
Start the file with :
[uwsgi]
and then add the following underneath :
chdir = /home/pi/flasktest
module = testSite1:app

master = true
processes = 1
threads = 2

uid = www-data
gid = www-data

socket = /tmp/flasktest.sock
chmod-socket = 664
vacuum = true

die-on-term = true
Note that it contains references to the project directory (/home/pi/flasktest) and the Flask python file “testSite1.py”. The “flasktest.sock” file doesn’t exist at the moment but will be created automatically when uWSGI needs it.
Use CTRL-X, Y and ENTER to save and exit the nano editor.
Step 7 : Test uWSGI Initialisation File
Run the following command to launch uwsgi with our initialisation file :
uwsgi --ini uwsgi.ini
Then using a second SSH connection check that the socket file has been created in the tmp directory by using :
ls /tmp
You should see “flasktest.sock” listed as a file. This file only exists while uWSGI is running.
At this point uWSGI isn’t using a standard port number so only the NGINX page will be available in your browser.
Stop uWSGI running by using CTRL-C.
Step 8 : Configure NGINX to Use uWSGI
NGINX can now be configured to pass traffic to uWGI. This is called a “reverse proxy”.
Delete the default site :
sudo rm /etc/nginx/sites-enabled/default
Now create a configuration file called “flasktest_proxy” :
sudo nano /etc/nginx/sites-available/flasktest_proxy
Insert this into the file :
server {
listen 80;
server_name localhost;

location / { try_files $uri @app; }
location @app {
include uwsgi_params;
uwsgi_pass unix:/tmp/flasktest.sock;
}
}
Use CTRL-X, Y and ENTER to save and exit the nano editor.
Finally create a link from this file to the “sites-enabled” directory using :
sudo ln -s /etc/nginx/sites-available/flasktest_proxy /etc/nginx/sites-enabled
Step 9 : Restart NGINX
Restart NGINX using :
sudo systemctl restart nginx
If you visit your IP address in a browser you should get a “502 Bad Gateway” error. This is expected because uWSGI isn’t currently running and NGINX is trying to pass it the browser request.
Step 10 : Run uwsgi When Pi Boots
uWSGI needs to start everytime the Pi reboots. To do this we can use the systemd service.
Navigate to the system directory :
cd /etc/systemd/system
Create a unit file for uWSGI :
sudo nano uwsgi.service
Then insert this :
[Unit]
Description=uWSGI Service
After=network.target

[Service]
User=www-data
Group=www-data
WorkingDirectory=/home/pi/flasktest/
ExecStart=/usr/local/bin/uwsgi --ini /home/pi/flasktest/uwsgi.ini

[Install]
WantedBy=multi-user.target
Use CTRL-X, Y and ENTER to save and exit the nano editor.
Restart the daemon so it picks up this new unit :
sudo systemctl daemon-reload
Now start the service :
sudo systemctl start uwsgi.service
Finally check on the status the service :
sudo systemctl status uwsgi.service
Hopfully you should see something looking like this :
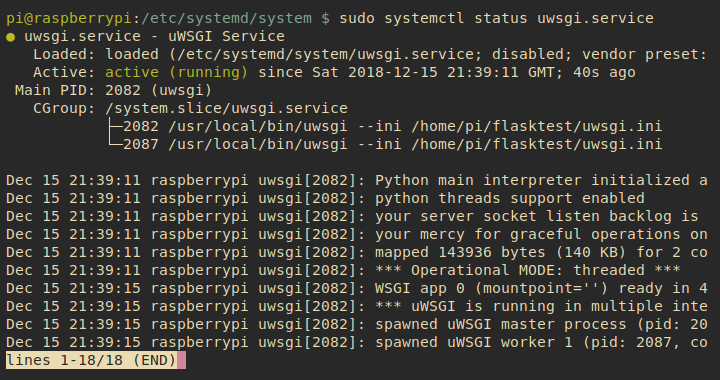
The important bit is the line that shows “active (running)”. This suggests our service is happy. Press CTRL-C to return to the command prompt.
To make it run on every reboot use the command :
sudo systemctl enable uwsgi.service
It should respond with
“Created symlink /etc/systemd/system/multi-user.target.wants/uwsgi.service /etc/systemd/system/uwsgi.service”
Our configuration is complete.
Step 11 : Reboot and Test
Finally we can reboot the Raspberry Pi with :
sudo reboot
Give the Pi a chance to boot.
On your PC visit the Pi’s IP address as you did before.
You should now see the Flask app page shown in the browser.
Congratulations you’ve now got a Flask app served by NGINX.
Step 12 : Touch-reload (optional)
With the current setup changes to the “testSite1.py” file won’t show up even if you refresh the browser. They would require the uWSGI service to be restarted.
You can get uWSGI to auto-load the changes to this file by adding the “touch-reload” directive to the uwsgi.ini file.
Edit the file using :
sudo nano uwsgi.ini
Place the directive on a new line :
touch-reload = /home/pi/flasktest/testSite1.py
Use CTRL-X, Y and ENTER to save and exit the nano editor.
Reboot the Pi for the new setting to be picked up :
sudo reboot
After the Pi has booted any changes to the testSite1.py file will show up in the browser when the page is refreshed.
Credits
Thanks to Pradeep Singh for his article Python Flask Web Application on Raspberry Pi with NGINX and uWSGI which helped me a lot.
Thanks to Ben Croston (@CrostonBen) for helping me maintain my sanity while I worked out a few issues with this whole process.
9 Comments
Just a quick remark: I was getting an error with the uwsgi.ini file, created in Step 6. I needed to insert a newline between [uwsgi] and chdir in order for it to work. Otherwise I would get this error:
WARNING: Can’t find section “uwsgi” in INI configuration file uwsgi.ini
Ah, the formatting on this page just will not keep the line break! I’ve re-styled that section to make it clearer there should be a line break after [uwsgi].
Excellent tutorial!! ?
On step 10, when checking to see if my server is active, it says it’s not because it cant find the file usr/local/bin/uwsgi. Would anyone know why?
I had the same problem. It’s because uwsgi is not always installed there. So you can do $which uwsgi and replace ‘usr/local/bin/uwsgi’ by the what the previous command gives you.
By far the most straightforward tutorial I have found so far. Only improvement I would suggest is a section on how to activate a virtual environment for these type of applications instead of relying installing libraries to the base python.
Yeah, AIDAN is right! It works pretty well with this description, but i couldn’t get it working with an virtual environment. Adding this would be great!
I think the problem with venv and this tutorial is that here we are installing uwsgi at a system level. To use with a venv we should install uwsgi within the venv.
I was able to get this (excellent) tutorial to work with a venv by changing step 3 to:
sudo apt-get install nginx
// install a virtualenv within the folder you have the flask app in
python -m venv myvenv // assuming you have python3+
source path/to/myvenv/bin/activate // activate the virtual env
pip install flask uwsgi … other packages you need for your project
Then in your uwsgi.ini file add the following line:
virtualenv = /fullpath/to/folder/myvenv
And in your uwsgi.service file modify the ExecStart= line to point to the uwsgi file in your venv:
ExecStart=/usr/local/bin/uwsgi –ini /home/pi/flasktest/uwsgi.ini CHANGES TO
ExecStart=/path/to/myvenv/bin/uwsgi –ini /home/pi/flasktest/uwsgi.ini
You’ve created a great tutorial – thank you!