
AliExpress sell a 6 button board PCB for the Raspberry Pi that fits the classic DMG-01 Nintendo Gameboy case. It can form the basis of a DIY Gameboy project using a Raspberry Pi Zero. It’s cheap but is sold with no technical support, information or assembly instructions. Here is some information which you might find useful before deciding to buy one or if you have purchased one already.
6 Button Board Kit Contents
The kit is usually sold with the following components :
- 6 button PCB
- Raspberry Pi header PCB
- 2 x 40-way headers
- 18-way ribbon cable
- 2 x ribbon cable connectors
- Joystick
- 3.5mm audio jack
- Hotkey switch + cap
- 2-pin audio connector and cable with plug
These kits are available for $7-$10.
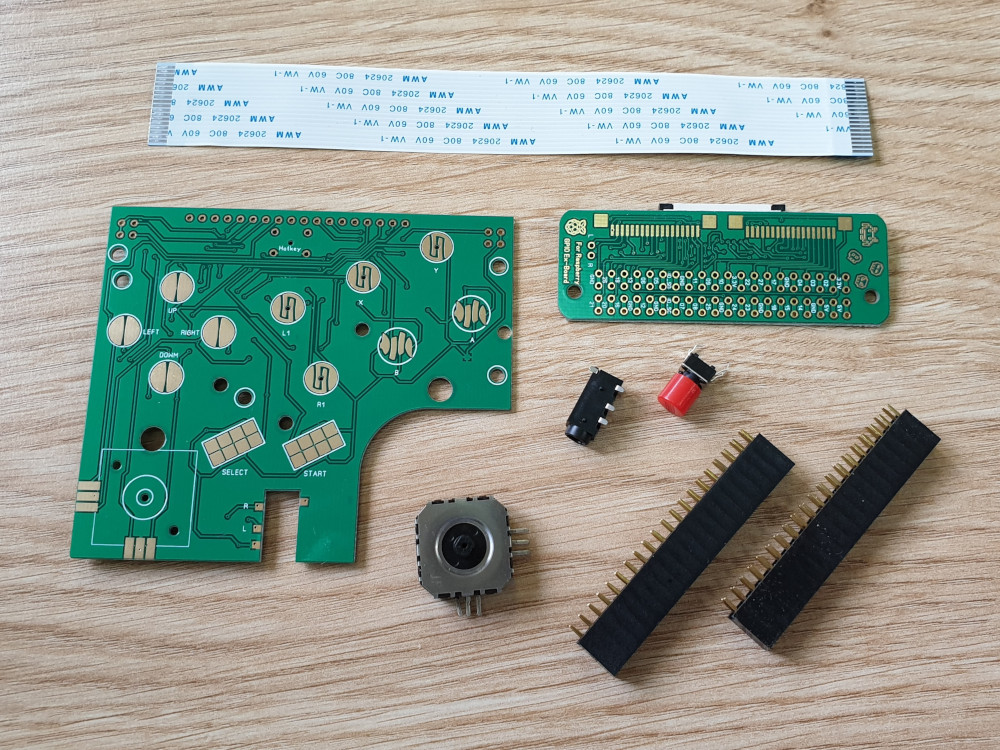
The hotkey switch, joystick and headphone jack are all optional. They don’t need to be fitted to use the D-pad and 2-6 buttons.
Main Board
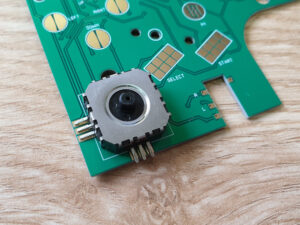
The main board provides the pads for a D-pad and up to six other buttons. The D-pad and two of the buttons are in the standard Gameboy layout. To make use of the other four buttons you need to drill suitable holes in the Gameboy shell.
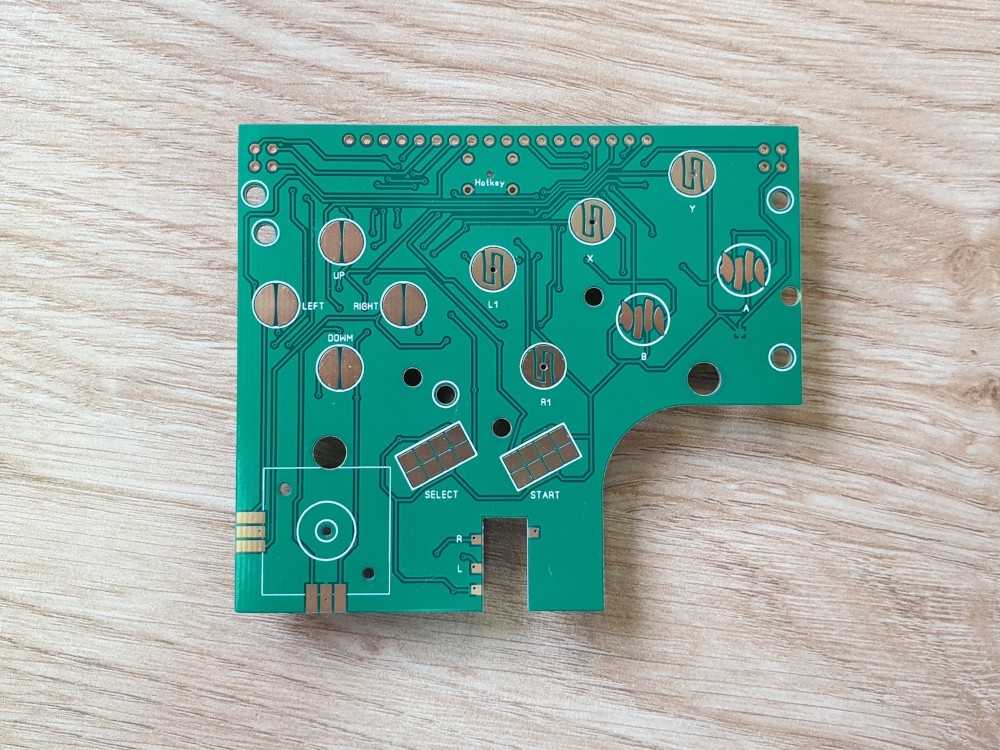
There are also PCB holes to attach two other switches in the left and right corners. These would normally be used to replicate the L1 and R1 shoulder buttons on SNES controllers. Many people position these buttons on the rear of the Gameboy case.
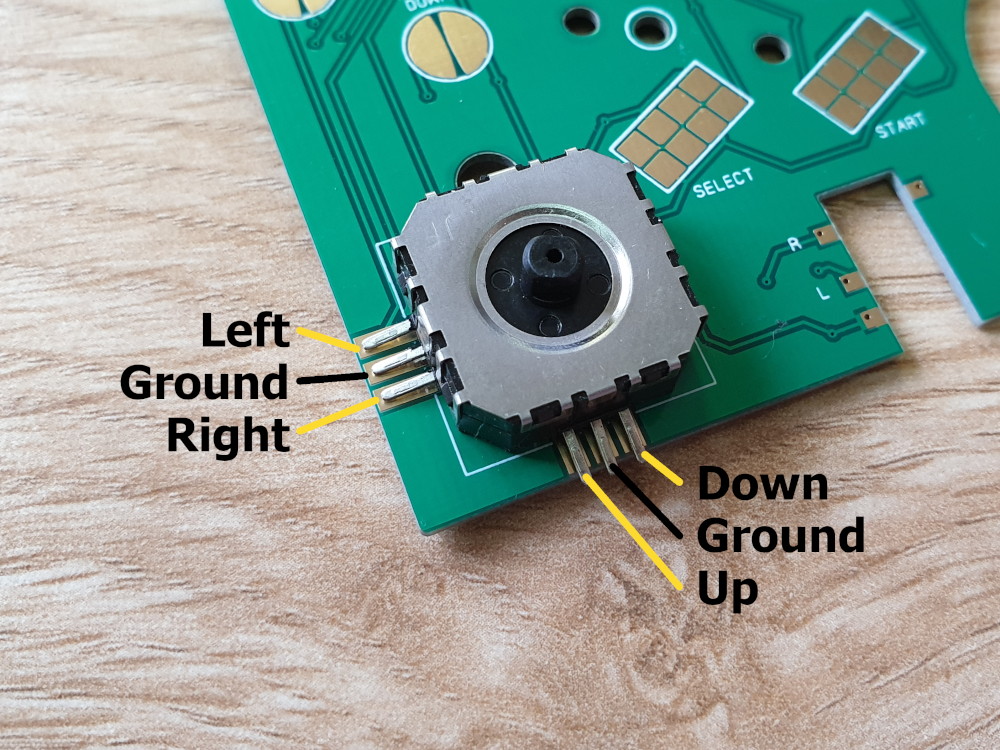
Button Board Pin-out
After soldering on the ribbon cable connectors and joining the two PCBs I was able to determine the GPIO mapping. The smaller board has labels on the 40 pins so working out the mapping was fairly straightforward.
| Function | Physical Pi Pin | Pi Function |
|---|---|---|
| Hotkey | 3 | GPIO2 |
| Ground | 6 | Ground |
| L1 | 15 | GPIO22 |
| L2 | 10 | GPIO15 |
| R1 | 13 | GPIO27 |
| R2 | 5 | GPIO3 |
| X | 29 | GPIO5 |
| Y | 16 | GPIO23 |
| A | 32 | GPIO12 |
| B | 31 | GPIO6 |
| Select | 33 | GPIO13 |
| Start | 36 | GPIO16 |
| Left | 38 | GPIO20 |
| Right | 35 | GPIO19 |
| Up | 40 | GPIO21 |
| Down | 37 | GPIO26 |
The ribbon cable carries these 18 signals in the following order :
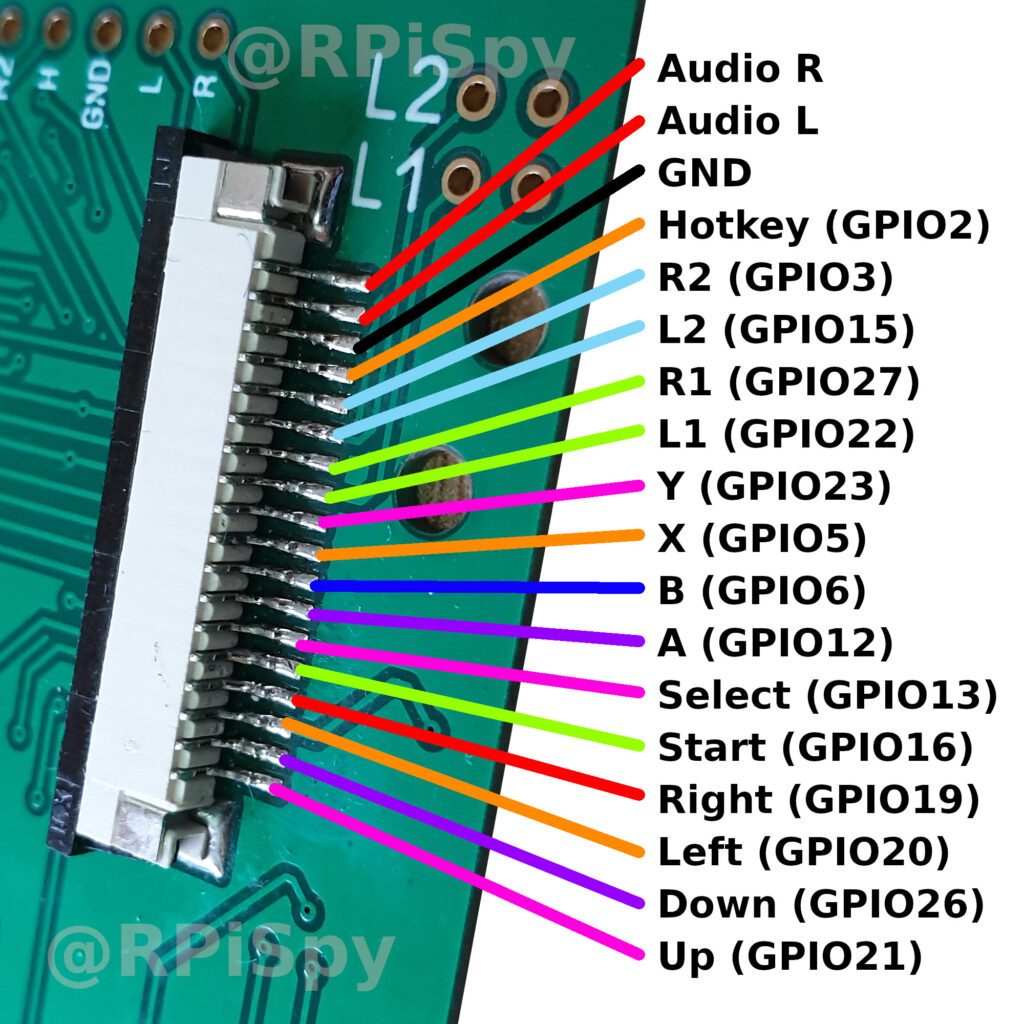
As with all GPIO related projects take care to avoid confusing physical pin numbers (1-40) and GPIO references. Please refer to my Raspberry Pi GPIO Header Diagram to cross reference physical pin numbers and their functional labels.
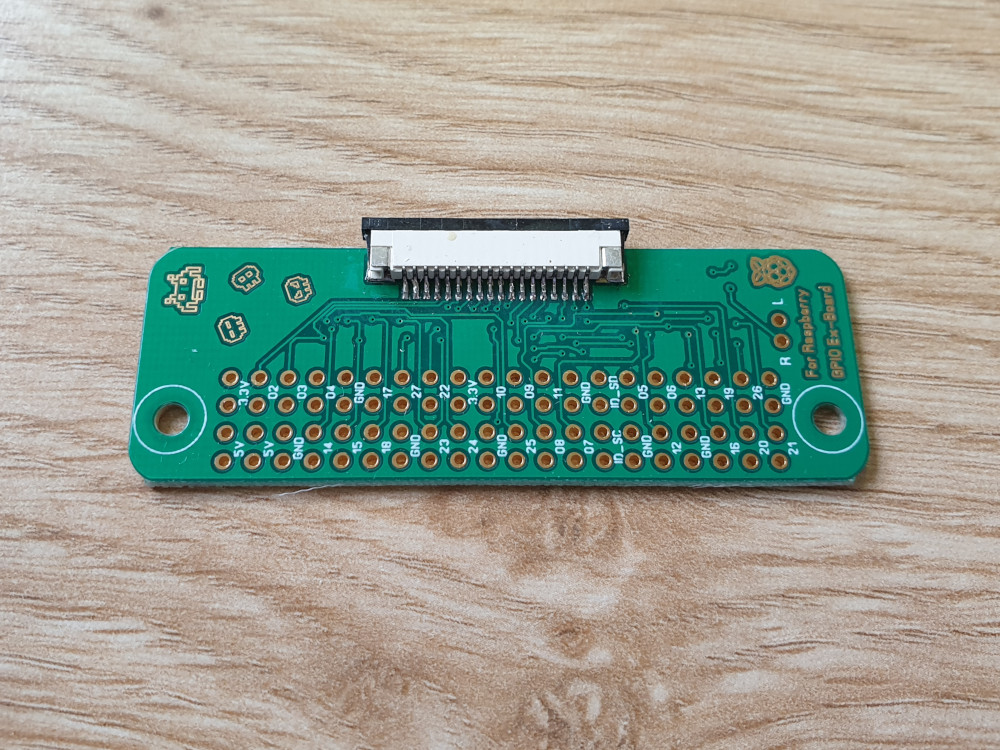
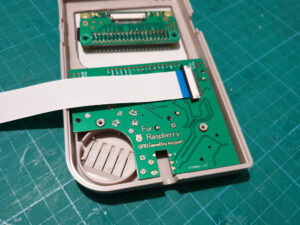
Daughter Board
The smaller board is designed to route the connections from the ribbon cable to the Pi’s GPIO header. You don’t need to use this board if you want to wire the main board directly to the GPIO header. However the convenience of the ribbon cable is the main reason to buy this particular kit.
Headphone Socket and Audio
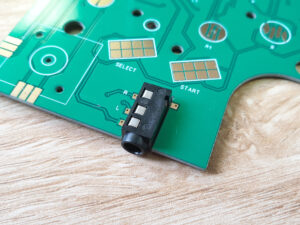
The Left and Right audio pads appear in the slot where you would solder the headphone socket and in the top left corner of the smaller PCB where you can solder the small white 2-pin connector.
The supplied headphone socket is fairly basic. It has connections for Left, Right and Ground. There is no switching arrangement so if you want to automatically cut off the speaker when inserting a headphone plug you will need to make other arrangements or use another style of audio jack.
Assembly
Daughter Board
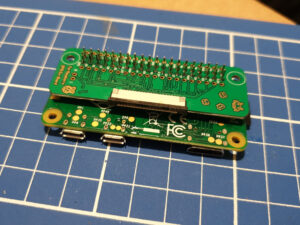
The kit comes with a 40-way header to solder to the smaller daughter board. This allows the board to be plugged onto the Pi’s 40-way GPIO header.
The holes in the PCB line up with the mounting holes of the Pi Zero so can be used for mounting if required.
However, to reduce the overall size I did not solder the 40-way header to my board and instead soldered it directly to the Pi Zero. This reduced the overall height of the combined boards. The USB and power pads on the underside of the Pi Zero were still available so soldering wires onto those wasn’t an issue.
Ribbon Cable Connectors
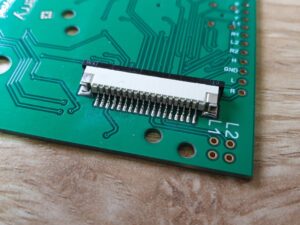
A ribbon cable connector must be soldered to each of the two PCBs. The connections are tiny and I would recommend watching some videos on YouTube to see how people solder SMD connectors to PCBs. For example this video.
The key is to use flux and have a solder sucker or some solder wick available. These are the only SMD connectors I have ever soldered and it turned out better than I expected.
Hotkey Button (optional)
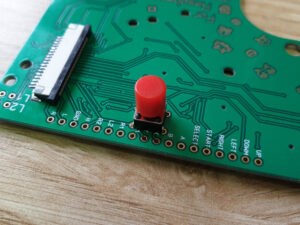
The hotkey switch gives you a bit more flexibility within RetroPie if you want a dedicated button as an alternative to using Select. It is easy to insert into the PCB and solder the four connections. You will need to drill a hole in your case in the correct place.
The reason I didn’t add this button to my project was that the hole would be too close to the “GameBoy” lettering on the front cover. However you could mount the switch wherever you like and wire it back to the points on the PCB.
Joystick (optional)
The joystick duplicates the functionality of the D-pad. It requires 6 connections to be soldered to pads on the main board. Simply hold it in place with tape or hot glue and solder the 6 legs to the PCB. You will need to drill a hole in your case in the correct place.
The supplied joystick needs some sort of thumb-stick or rubber cap to be a practical option but this is not supplied. For my own project I decided not to use the joystick.
Headphone Socket (optional)
The socket requires three tabs to be soldered. This is a fairly easy arrangement but the lack of speaker switching means you may be better using an alternative. The PCB may need some grinding in order fit a different socket.
Mounting Button Board in Case
The board fits into the standard DMG-001 case and you can use 2mm screws to secure it in place. Avoid using screws that are too long otherwise you will damage the plastic on the front face.
The Pi Zero and the daughter board can be mounted wherever you like. The ribbon cable gives you lots of flexibility.
Replacement Gameboy cases are available in loads of different colours. Take a look here : http://s.click.aliexpress.com/e/VL4GhkM
I2C Pins
The standard I2C pins (Pins 3 & 5, GPIO2 & GPIO3) are assigned to the Hotkey and R2 connections. If you want to make use of I2C you should avoid connecting the R2 or Hotkey switches.
Software Setup
There are a number of ways to get these GPIO based controllers working on the Pi. I planned on using RetroPie so needed something compatible with that. I found an excellent software project called GPIOnext created by Mark Holgate. It creates a map of your buttons/GPIO pins and allows Emulation Station to detect it as a “virtual controller”. You can download this software to your Pi using :
git clone https://github.com/mholgatem/GPIOnext.git
then install it using :
cd GPIOnext
./install.sh
At the end of the installation process it asks if you want to run the configuration utility. If your board is connected to your Pi and you are ready then press Y. Don’t worry you can choose not to run the config now and run it some time later using :
gpionext config
The config utility takes you through the process of setting up the D-pad, ABXY buttons and shoulder buttons (if you are using them).
Once setup you can reboot the Pi and when Emulation Station loads it will find your new controller. You then complete that step as you would do with a plug-in USB controller. Easy.
Conclusion
Overall I think this set is worth the money even though it took me some time to work out how to make full use of it.
- Advantages
- Cheap
- Quick way to add D-pad and 6-buttons
- Simplifies wiring for “shoulder” buttons
- Ribbon cable eliminates need to individually wire to GPIO header
- Disadvantages
- Headphone socket has no switching
- Joystick has no rubber cap and only replicates the D-pad
There are other Gameboy button PCBs available with additional features that may suit your project better. In this case the board was perfect for my needs as I really just wanted it to provide an easy way to wire up the buttons and D-pad without excessive wiring.
The board is available from various sellers but here is a link to the item I ordered : DIY 6 Buttons PCB Board Kit For Game Boy Zero DMG-001
4 Comments
The set looks pretty good!
Are there any differences to the “original” from ZeroBOY?
And can you recommend a good matching display?
The ZeroBoy boards have a lot more features as they seem to have various on-board electrical components. They are also a lot more expensive as a result!
I am using this display : http://s.click.aliexpress.com/e/crAh1HNW
This says its 12volt, and the raspberry pi 4 is 5 volt, are they connectable and I am missing something, or do you have to modify that screen?
These type of screens are often 12V. However they usually have a 12V to 5V regulator on them to power the rest of the PCB with 5V. So what you do is just feed 5V directly (via a soldered wire) to the output of the 5V regulator. If you look at the comments against the screen you’ll see people making reference to running them off 5V. Some screens might even accept 5V via the power connector but it depends on the regulator as to whether it will work properlly. I used the first method and just soldered a 5V wire directly to the output of the regulator.