
The Pi Zero has no Ethernet port. If your project requires Ethernet you can add it using either an Ethernet module or a USB to Ethernet adapter.
At this point someone is going to question why you would want to add Ethernet to a Pi Zero. Why not just use a standard Pi which already includes the port? I guess the answer is that there are some projects where using a Pi Zero is desirable due to power consumption or size considerations but you also need the functionality of Ethernet devices. I’ve got a project in mind which I will blog about in the future (if it proves to be successful).
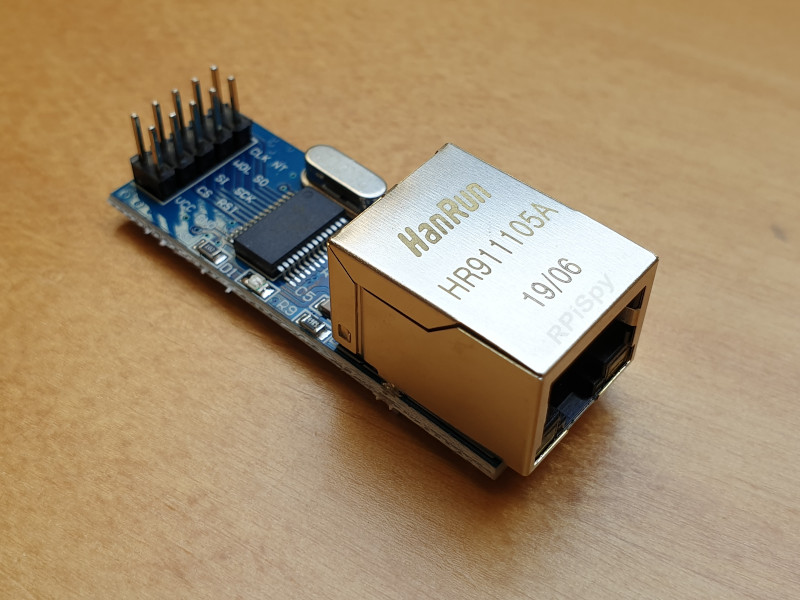
ENC28J60 Ethernet SPI Module
Microchip make the ENC28J60 which is a stand-Alone Ethernet Controller with SPI Interface. It is available as a cheap module which can be connected to the Pi’s SPI interface.
The pin-out can vary but most modules will contain a block of 10 pins carrying the following signals :
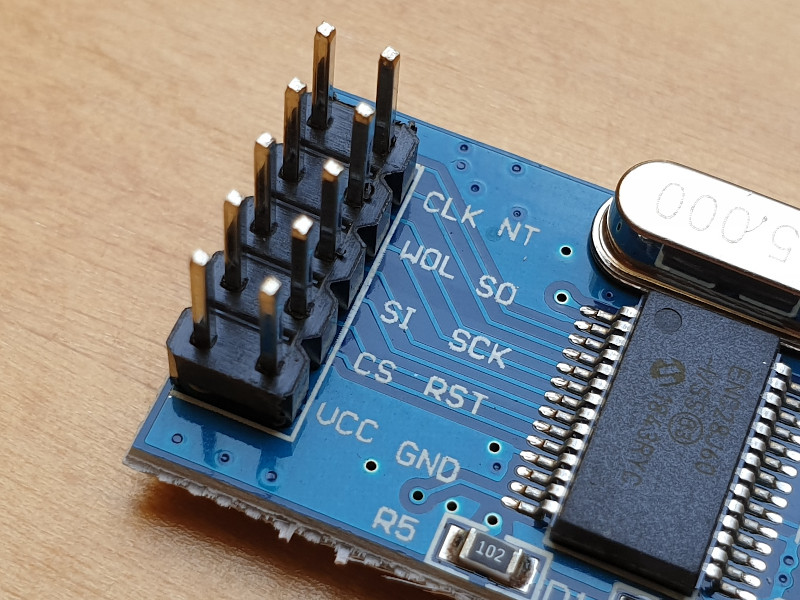
- VCC & Gnd
- CLK
- INT
- WOL
- MISO & MOSI
- SCK
- CS
- RST
Some modules require 5V while others will work with 3.3V. Pay attention to the details when purchasing one so that you can connect it to the correct voltage. My module runs from 3.3V.
Connecting ENC28J60 to the Pi Header
The module can be connected to the Pi’s GPIO header using female-female Dupont style jumper cables.
| Pi Header | Module | Module | Pi Header |
|---|---|---|---|
| – | CLK | INT | Pin 22 (GPIO25) |
| – | WOL | MISO | Pin 21 (GPIO9) |
| Pin 19 (GPIO10) | MOSI | SCK | Pin 23 (GPIO11) |
| Pin 24 (GPIO8) | CS | RST | – |
| Pin 17 (3.3V) Pin 2 (5V) | VCC | GND | Pin 25 (Gnd) |
As only 7 pins need to be connected you can connect the module to the Pi Zero using 7 cables.
Connect the ENC28J60 to your Network
Obviously you should connect the ENC28J60 module to your network using an Ethernet patch cable. I connect mine to a network switch but you could connect directly to a spare port on your router.
Given how light the Pi Zero and module are you may want to tape your cables to a surface to prevent them dragging your setup onto the floor.
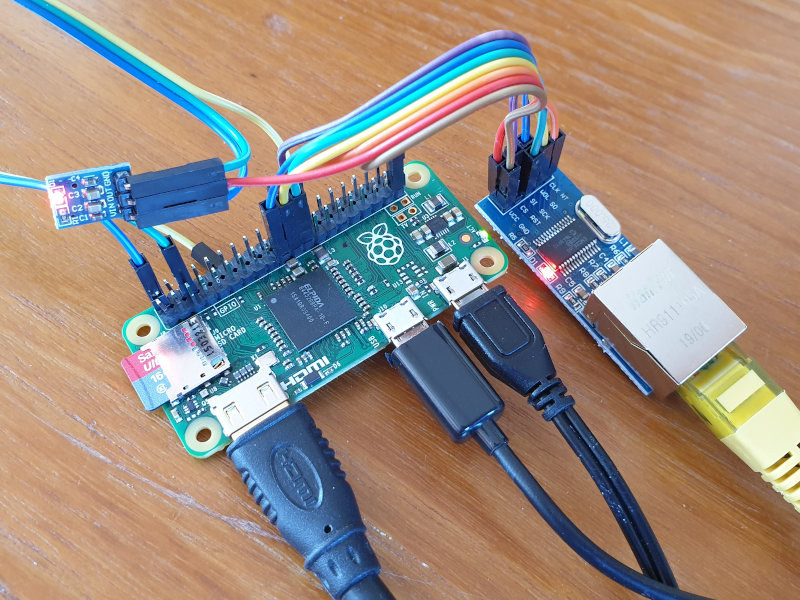
You may notice in this photo that rather than use Pin 25 for Ground I used Pin 39. This was due to a faulty bit of soldering on my Pi Zero header.
Pi Zero Ethernet Software Setup
The software setup is really easy. You only need to edit the config.txt file and make two potential changes. I recommend starting with a freshly imaged SD card using the latest version of Raspbian.
The config.txt file can be edited on any computer that can read the boot partition on the SD card. Or it can be edited directly on the Pi if you have a keyboard and monitor attached.
sudo nano /boot/config.txt
Find the line:
#dtparam=spi=on
and delete the # character to leave :
dtparam=spi=on
Then add the following line :
dtoverlay=enc28j60
You should end up with a section in your config.txt looking like this:

Save and exit using CTRL-X, Y and ENTER.
Power-up or Reboot
If you are working directly on the Pi you can now reboot :
sudo reboot
If you configured the SD card on a PC you can now insert it into the Pi and power-up.
Your Pi should connect to your network automatically.
Set MAC Address
Unlike most other network devices you might have used in the past the ENC28J60 has no preset MAC address. This means it is randomly generated every time the device is started. This may not bother you but could cause your router to keep allocating a different IP address. If you need a consistent MAC address you have to set it in software.
In the following example I use “b8:27:eb:00:00:01”. If you have multiple devices using this technique you should make sure they are all unique and never clash with other devices on your network.
Start by creating the following file:
sudo nano /lib/systemd/system/setmac.service
Add the following contents:
[Unit]
Description=Set MAC address for ENC28J60 module
Wants=network-pre.target
Before=network-pre.target
BindsTo=sys-subsystem-net-devices-eth0.device
After=sys-subsystem-net-devices-eth0.device
[Service]
Type=oneshot
ExecStart=/sbin/ip link set dev eth0 address b8:27:eb:00:00:01
ExecStart=/sbin/ip link set dev eth0 up
[Install]
WantedBy=multi-user.target
Save and exit using CTRL-X, Y and ENTER.
sudo chmod 644 /lib/systemd/system/setmac.service
sudo systemctl daemon-reload
sudo systemctl enable setmac.service
Reboot
With everything configured you can now reboot your Pi using:
sudo reboot
Once you are back at the command line you can check what IP and MAC addresses your Pi is using with :
ifconfig
Which should give you an output looking something like :
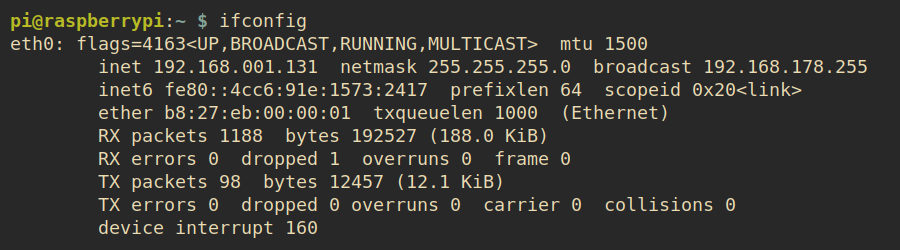
Here we can see the Pi is using the MAC address we set and has been given an IP address of 192.168.001.131 by my router.
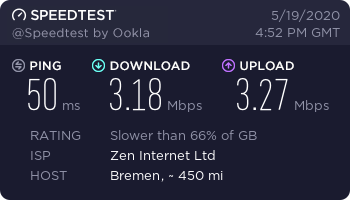
Performance
Using the speedtest-cli utility I measured the speed of the network link to be between 3.15 and 3.7 Mbits/s. Whether this is adequate will depend entirely on the project you are building.
Power & Current Requirements
Lots of people are happy using these devices powered directly from the Pi’s 3.3V pin. However the datasheet for the ENC28J60 states it can require 180mA of current when transmitting which is beyond the 50mA limit of the Pi’s onboard 3.3V regulator.
For this reason I decided to ensure my ENC28J60 was never starved of current and added a small 5V to 3.3V regulator (HK1117). This small 3-pin module is easy to connect and provided the Ethernet device with all the current it might ever need.
| Pi Header | HK1117 | ENC28J60 |
|---|---|---|
| Pin 2 (5V) | Vin | – |
| Pin 6 (Gnd) | Gnd | – |
| – | Vout | Vcc (3.3V) |
Pi Zero Ethernet Troubleshooting
While setting up my module and writing this article I came across a few issues. These were solved by taking note of the following points :
- Double check all your connections
- Check for loose connections
- Be careful not to confuse CLK and SCK
- Be careful not to confuse MISO (SO) and MOSI (SI)
- Consider using a separate 3.3V regulator to provide adequate current
Buy an Ethernet Module
The ENC28J60 is available from lots of retailers including :
My device was described as a “Mini ENC28J60” and cost £4.
10 Comments
Brilliant! The only negative I can see to this is that neither unit has a case to enclose them. Someone who’s into 3D printing should perhaps try to design a case that will hold a Raspberry Pi Zero and a ENC28J60 module side by side or end to end or even one on top of the other, just anything that will keep them from moving around in relation to each other and possibly shorting out!
The project I have in mind will definitely require the components to be secured in an enclosure. The cables weigh more than the Zero and the module so I taped then to my desk to avoid the whole setup getting dragged onto the floor. Once I know exactly what items I need for my project I’ll have to decide what enclosure to use and how best to fit everything inside.
Interesting post — welcome back! I had about given the website up for dead. Quick question for you: on the face of it, this seems like overkill; is there any reason why you couldn’t just use a Ethernet->USB port? These are readily available on the market and work well. It seems to me like this would be a much simpler approach.
I’ve got an Ethernet-USB adaptor and plan to give that a try as well. I think the reason the ENC module might be useful is that you could pack it into a smaller space and it wouldn’t require a USB plug to stick out the side of the Pi. Although the USB plug could be cut off and the wire soldered directly to the back of the Pi PCB. The ENC modules are also marginally cheaper so if you needed a lot of them it might bring the total cost down.
Fair enough…although there are 90-degree USB connectors that could considerably lower the profile of the connection. In my experience, the Eth-USB adaptors are completely plug-and-play — no configuration, nothing to troubleshoot, so that would be a big win in my book.
Looking forward to future posts!
You can get those SPI to Ethernet modules with a 5v regulator included on the module, the couple I have which I got on ebay as well have the AMS1117 3.3 regulator on the bottom of the board and on the header there is one for a 3.3v supply and one for a 5v supply which feeds the regulator which then supplys the module.
Many thanks for the instruction. Worked from first try.
Does this prevent anything else working e.g. the camera? I’d love to try and implement this for CCTV…
Thanks
Creating a CCTV camera was the reason I started playing with these devices. I didn’t get around to tying it but there is no reason it shouldn’t work.
Great instructions, thanks. I hooked up one of these adapters to an old, old Pi Zero and everything worked first time!
One of your first commenters suggested an enclosure. I think they’re right, so that’s on my list of “do one day” projects. If I succeed, the result will be on Printables.