
Overclocking the Raspberry Pi 400 is easy and gives you an extra performance boost for free. The Pi 400 has been designed to be used without any active cooling. This has been achieved with careful PCB design and a massive heat-sink. Not only does this allow the Pi 400 to run at 1.8GHz out the box but it also allows for some easy overclocking.
In a Pi Foundation blog post Simon Martin stated,
We’ve solved the cooling challenge so users don’t have to give this any thought. Raspberry Pi 400 contains a heat spreader that dissipates the heat across the whole unit, front and back, so that no part of it will feel too hot to touch. In fact, there is enough thermal margin to overclock it, if you’re so inclined.
Simon Martin, 3rd Nov 2020,
https://www.raspberrypi.org/blog/designing-raspberry-pi-400/
Although some users have managed to get the Pi 400 to run at 2.2GHz I decided to try a more modest overclock of 2GHz as I believe that this is more in the spirit of what Simon was suggesting.
Disclaimer : Overclocking any computer comes with some risk. Please ensure you are comfortable with that risk before proceeding.
Pi 400 Overclock Settings
Making the changes are fairly easy. If you aren’t already at the command prompt launch a terminal window.
Type:
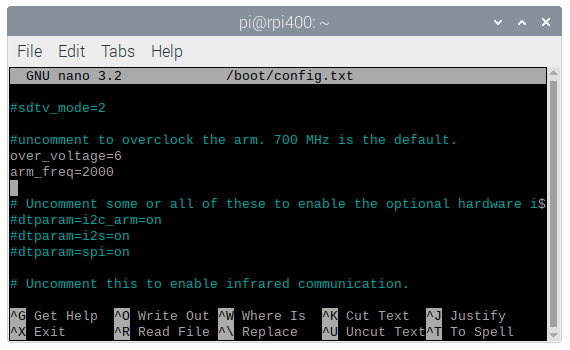
sudo nano /boot/config.txtFind the “arm_freq” line and change it to:
arm_freq=2000If there is a leading # character then remove that.
Above the “arm_freq” line add the following:
over_voltage=6Your config.txt file should now look something like this :
To save the changes use CTRL-X, then Y followed by ENTER.
These overclock parameters are explained in detail on the official Raspberry Pi site.
First Boot
For the changes to take effect reboot the Pi by either:
- Pressing the Pi key and selecting “Shutdown” > “Reboot”
or typing:
- sudo reboot
Your Pi 400 should start as normal but this time it will be able to run at 2GHz rather than 1.8GHz. It won’t always run at these speeds but when the load goes up the speed is ramped up accordingly.
Frequency Monitoring
Obviously you’ll want to check what frequency your Pi is now using. You can do this with:
vcgencmd measure_clock armThis will display the ARM frequency in Hz. You will tend to see 600,000,000 (600MHz) but it will ramp up to 2000,000,000 (2GHz) when the load increases.
You can monitor the frequency every 2 seconds using:
watch -n 2 vcgencmd measure_clock armUse CTRL-C to return to the command prompt.
Temperature Monitoring
It is wise to keep an eye on the temperature of your Pi to check it is staying within the expected range. If the temperature exceeds 80 degrees Celsius the CPU speed will be throttled so it is desirable to keep it below this level.
You can quickly check the temperature using this command in the terminal command prompt:
vcgencmd measure_tempThis should report the temperature in degrees Celsius.
You can monitor the temperature every 2 seconds using:
watch -n 2 vcgencmd measure_tempUse CTRL-C to return to the command prompt.
I haven’t seen my temperature exceed 42 degrees.
Disabling the overclock
If you have any issues with the overclock you can hold down SHIFT during a reboot to use the default settings. To remove the overclock settings you can edit the config.txt file as before but place a # character in front of the “over_voltage” and “arm_freq” parameters. Or you can remove those two lines completely.
Extreme Overclocking
It is possible to overclock the Pi 400 to 2.2GHz. This is explained in detail by Jeff Geerling in The Raspberry Pi 400 can be overclocked to 2.2 GHz. However this would involve settings that may invalidate your warranty so proceed with caution and understand the risks.
2 Comments
I received my 400 today (thanks CanaKit!). All I did was move the micro-SD card over from my overclocked Pi 4 (set to 2 GHz). It boots and runs just fine. I think I’ll leave the higher speeds to the warranty voiders – for now,
If you want to overclock your Raspberry pi 400 using Ubuntu you need to make on chenge. The file config.txt is not in the boot folder. I do not why it is moved to the boot/firmware folder 🙂
So, to modift the config.txt file you have to type:
sudo nano /boot/firmware/config.txt
2GHZ Overclock:
over_voltage=6
arm_freq=2000
2.1GHZ Overclock:
over_voltage=6
arm_freq=2100
2.2Ghz Overclock
force_turbo=1
over_voltage=8
arm_freq=2200
Watch CPU Clock- watch -n 1 vcgencmd measure_clock arm