Close Menu
    Facebook X (Twitter) Instagram Pinterest YouTube
    Trending
    • Disable SSH Password Login on Raspberry Pi
    • Elecrow Meteor IPS Touchscreen with RGB LEDs
    • Pi Pico Pinout Display on the Command Line
    • How to Add a Raspberry Pi Pico Reset Button
    • Pi Pico Onboard LED
    • Pi Pico W Pinout and Power Pins
    • CrowPi L Raspberry Pi Laptop and Learning Platform
    • Pi Pico W Launched
    Mastodon YouTube Facebook Instagram Pinterest RSS
    Raspberry Pi SpyRaspberry Pi Spy
    • Home
    • Categories
      • General
      • Hardware
      • Programming
      • Python
      • Software
      • Tutorials & Help
    • BerryClip
      • BerryClip Instructions
      • BerryClip Plus Instructions
      • Videos & Reviews
    • Buy
      • Buy Pi
      • Buy Pi Accessories
      • Buy Books
    • Tools
      • Ultimate Raspberry Pi Alexa Skill
      • Pi Power Estimator App
      • Pi-Lite 14×9 LED Matrix Sprite Editor
      • RPiREF Pin-out Reference App
      • Simple Ohm’s Law Calculator
      • Web Sites & Links
    • Tutorials & Help
        Featured
        November 9, 20200

        Raspberry Pi Temperature Monitoring

        Recent
        February 16, 2024

        Disable SSH Password Login on Raspberry Pi

        December 23, 2022

        How to Add a Raspberry Pi Pico Reset Button

        November 20, 2022

        Pi Pico Onboard LED

      1. Contact Us
      2. Site Map
      Raspberry Pi SpyRaspberry Pi Spy
      You are at:Home»Hardware»Camera Module»Installing The Raspberry Pi Camera Module

      Installing The Raspberry Pi Camera Module

      14
      By Matt on May 22, 2013 Camera Module

      pi_camera_module_02The Official Raspberry Pi camera module is here at last. The full specification can be found on my Official Raspberry Pi Camera Module page. This page aims to show how to get the camera connected and ready to go. Depending on the current state of your SD card this will take between 2 and 20 minutes.

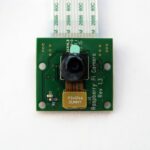
      Step 1 – Connect the camera to the Pi

      The camera ribbon cable connects to the special connector on the Pi next to the ethernet port. The easiest way to see how the cable is connected is to watch this video. It’s fairly easy you just need to be careful you don’t crease the ribbon cable.

      Step 2 – Update the SD card

      In order to use the camera you must be using a recent operating system that knows that the camera exists. The easiest way to do this is to grab the latest Raspbian image from the RaspberryPi.org site and create a fresh SD card.

      Regardless of what version of Raspbian you are using it is highly recommended to update the system using the following commands :

      sudo apt-get update


      sudo apt-get upgrade

      Depending on how up-to-date your SD card is the second process may take a while.

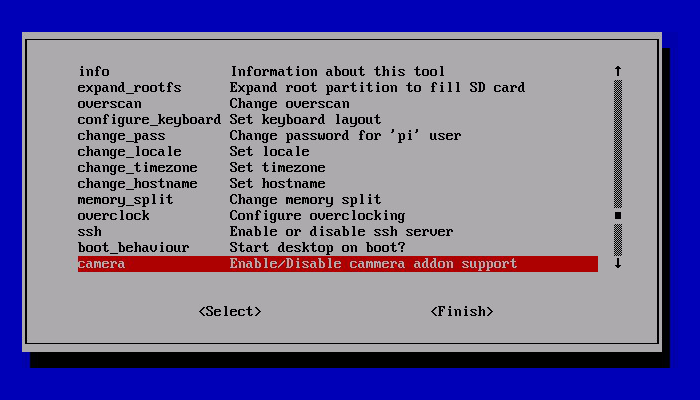
      Step 3 – Enable camera in raspi-config settings

      Reboot. If you are using a fresh image the raspi-config utility should load. If it doesn’t then you can run it manually using :

      sudo raspi-config

      Sekect the “Camera” option and press “Enter”.

      raspi_config_camera_01

      Select “Enable” and press “Enter”.

      raspi_config_camera_02
      Select “Yes” and press “Enter”. Your Pi will reboot.

      raspi_config_camera_03

      Updating your operating and enabling the camera using raspi-config did two things. It told your Pi that there is a camera attached and it added two command line utilities.

      • raspistill
      • raspivid

      These allow you to capture still photos and HD video respectively.

      You are now ready to start having fun!

      Share. Facebook Twitter Pinterest LinkedIn Tumblr Email
      Previous ArticleHow To Disable The Red LED On The Pi Camera Module
      Next Article Taking Hi-Res Photos With The Pi Camera Module

      Related Posts

      Send Pushover Notification when MotionEyeOS Boots

      Monitoring Raspberry Pi GPIO with MotionEyeOS

      Detection Area Masking in motionEyeOS on the Raspberry Pi

      14 Comments

      1. Nazgul on May 27, 2013 1:01 am

        Good day,

        I have the problem that when enabling camera support over raspi-config, that I’m not asked for reboot. In some other Posts I’ve read that the cause might be some power supply problems – though I’m using an 1A 5V Power supply. In my opinion this is enough, maybe I am wrong?

        Kind regards

        Reply
        • Matt on May 27, 2013 8:43 pm

          1A should be fine. Not sure how a power supply could affect the operation of raspi-config. When you reboot do the camera utilities work?

          Reply
          • Michael R Youngblood on July 10, 2013 5:57 am

            When I updated and enabled the camera, I do not get the camera commands. I don’t see the commands in the /usr/bin/ either. Any idea why, what, or where to start trying to debug this issue? Thank you very much in advance.

            Reply
            • antoine9298 on April 30, 2015 6:33 pm

              they are in a very strange location. on an archlinux, at least, they are in
              − /opt/vc/bin/raspistill
              − /opt/vc/bin/raspivid

              Reply
      2. Rhiakath on June 4, 2013 9:42 pm

        Hi there.
        When i use raspivid or raspistill, the camera lights up a red light, but nothing else happens. Neither command exits.

        What should I check?

        Reply
        • Matt on November 3, 2013 10:51 am

          Best thing is to ensure the camera is plugged in properly and re-image your SD card with the latest version of Raspbian from the official downloads page.

          Reply
      3. tom on November 3, 2013 2:34 am

        i have the same problem as Rhiakath

        any idea?

        Reply
      4. prakash on May 4, 2014 2:59 pm

        hi
        Thanks for your info ,my raspi cam is showing some mmal error ,like
        unable to detect camera module

        Reply
      5. shantanu on August 14, 2014 11:14 am

        I’m using Raspbian OS. I’ve updated firmware, etc. But I’m getting error about enabling camera. It’s showing “There was an error running option 5 Enable camera” . How to solve it?

        Reply
        • Matt on August 17, 2014 8:34 pm

          Are you using the latest Raspbian image from the official site? Always worth trying that as that fixes lots of issues.

          Reply
      6. Dylan on April 24, 2015 1:48 am

        I’m having a having problem with viewing b the actual video itself. It takes an image and it can be ed just fine, but if I take a video it won’t open with any program.

        Reply
        • Matt on April 25, 2015 5:14 pm

          You will need to convert the H264 file into something more useful e.g. MP4. Take a look at https://www.raspberrypi-spy.co.uk/2013/05/capturing-hd-video-with-the-pi-camera-module/ for details on converting the video files to MP4.

          Reply
      7. tanuha on May 2, 2015 2:23 pm

        is it possible to have a USB camera connected to RPi and at the same time the camera module is also connected at CSI port? if yes, what is the way to assign which one to use?

        Reply
        • Matt on May 6, 2015 11:50 am

          You can use USB webcams at the same time but the methods of capturing from them are different. The Pi camera command line utilities aren’t designed to work with USB cameras so you will have to use other software (ie Motion).

          Reply
      Leave A Reply Cancel Reply

      This site uses Akismet to reduce spam. Learn how your comment data is processed.

      Recent Posts
      February 16, 2024

      Disable SSH Password Login on Raspberry Pi

      March 13, 2023

      Elecrow Meteor IPS Touchscreen with RGB LEDs

      December 26, 2022

      Pi Pico Pinout Display on the Command Line

      December 23, 2022

      How to Add a Raspberry Pi Pico Reset Button

      November 20, 2022

      Pi Pico Onboard LED

      Categories
      • 1-wire
      • 3D Printing
      • Add-ons
      • BBC Micro:bit
      • BerryClip
      • Books
      • Camera Module
      • Cases
      • Events
      • General
      • Hardware
      • I2C
      • Infographics
      • Interfaces
      • Minecraft
      • Model A+
      • Model B+
      • News
      • Pi Models
      • Pi Pico
      • Pi Zero
      • Power
      • Programming
      • Python
      • Raspberry Pi OS
      • Raspbian
      • RetroGaming
      • Robotics
      • Sensors
      • Software
      • SPI
      • Tutorials & Help
      Tags
      Arduino audio battery berryclip Birthday bluetooth cambridge camera CamJam DigiMakers display games GPIO I2C interface Kickstarter Kodi LCD LED Linux media Minecraft Model A motionEyeOS PCB photography photos Pi-Lite Pi Pico power python Raspberry Jam Raspberry Pi Bootcamp raspbian Retrogaming retroPie screen SD card security sensor SPI SSH temperature ultrasonic video
      Raspberry PI Related
      • Adafruit Blog
      • Average Maker
      • Official RaspBerry Pi Site
      • Raspberry Pi Pod
      • RasPi.tv
      • RaspTut
      • Stuff About Code
      Tech Resources
      • MattsBits – Pi Resources
      • Microbit Spy
      • Technology Spy
      Archives

      Entries RSS | Comments RSS

      This site is not associated with the official Raspberrypi.org site or the Raspberry Pi Foundation. Raspberry Pi is a trademark of the Raspberry Pi Foundation.

      Copyright © 2025 - All Rights Reserved - Matt Hawkins

      About

      Unofficial site devoted to the Raspberry Pi credit card sized computer offering tutorials, guides, resources,scripts and downloads. We hope to help everyone get the most out of their Pi by providing clear, simple articles on configuring, programming and operating it.

      Popular Posts
      September 19, 2014

      Top 5 Reasons The Raspberry Pi Sucks

      July 27, 2012

      16×2 LCD Module Control Using Python

      October 20, 2013

      Analogue Sensors On The Raspberry Pi Using An MCP3008

      Latest Posts
      February 16, 2024

      Disable SSH Password Login on Raspberry Pi

      March 13, 2023

      Elecrow Meteor IPS Touchscreen with RGB LEDs

      December 26, 2022

      Pi Pico Pinout Display on the Command Line

      Mastodon YouTube Instagram Facebook Pinterest RSS

      Entries RSS | Comments RSS

      This site is not associated with the official Raspberrypi.org site or the Raspberry Pi Foundation. Raspberry Pi is a trademark of the Raspberry Pi Foundation.

      Copyright © 2025 - All Rights Reserved - Matt Hawkins

      mastodon.social@RPiSpy

      Type above and press Enter to search. Press Esc to cancel.