Back in the old days I had an Acer N50 Premium PDA. For the youngsters out there it was like a Smart Phone but without the phone bit, the capacitive touch-screen, memory, apps, GPS or battery life. I mainly used it as a TomTom based sat-nav device connected to a Holux GPSlim236 Bluetooth module.
The module had been sat in a drawer for at least five years and I decided to see if I could get it working with the Raspberry Pi. Surprisingly I didn’t need to charge it as five years later it still powered up fine. It uses what at the time was a standard Nokia phone battery.
 This is the hardware I used :
- Holux GPSlim236 Bluetooth GPS Module
- PoundWorld Bluetooth module
- Raspberry Pi Model B (Rev 2)
- Power supply
- Fresh Raspbian SD card
(2013-09-25-wheezy-raspbian)
This was one of those experiments where Google gave me all the answers once I had pieced together fragments from many different blogs and forums.
Although I’m using a specific GPS device I don’t see why it wouldn’t work with any Bluetooth GPS module given they will all be sending serial data in standard NMEA format. Let me know if it works for other units.
Step 1 – Initial Setup
Start with a fresh Raspbian image on your SD card and plug it into the Pi along with the Bluetooth dongle. Power up the Pi with it connected to a network as we will need access to the internet.
As this is a fresh SD card start by running :
sudo raspi-config
and expand the SD card partition to fill the spare card space. Then run :
sudo apt-get update
sudo apt-get upgrade
to ensure everything was up to date. This will take a while (5-10 minutes) so it is a good opportunity to grab a coffee. In order to form the link between the Pi and the device we will need to install a few extra packages :
sudo apt-get -y install bluez-utils gpsd-clients
Answer “Y” when prompted. “bluez-utils” provides some Bluetooth tools and “gpsd-clients” is a collection of tools for processing and displaying data.
As we’ve installed so many new files it is a good idea to reboot :
sudo reboot
Step 3 – Get MAC Address
With the Pi powered up switch on the Holux module and give it 60 seconds to look for satellites. We need to know the MAC address of the module so run :
hcitool scan
After a few seconds you should get a response :
Scanning ...
        00:0B:0D:6F:B5:D4       HOLUX GPSlim236
This will give you the MAC address of your device. In my case it is “00:0B:0D:6F:B5:D4” which I took a note of.
Step 4 – Connect To The GPS Module
Next we need to run the following command to connect the Pi to the remote Bluetooth device :
rfcomm connect 0 00:0B:0D:6F:B5:D4 &
The & at the end tells the command to run in the background and return to the command prompt. Remeber to use your MAC address! When it runs it echoes a process ID to the screen. A few seconds later it will display some text :
Connected /dev/rfcomm0 to 00:0B:0D:6F:B5:D4 on channel 1
Press CTRL-C for hangup
You may need to press the Enter key to return to the command prompt. Do not press “CTRL-C”!
To test the connection we can run :
cat /dev/rfcomm0If the connection is working you should see some GPS data (NMEA format) being streamed from the GPS module. Press CTRL-C to return to the command prompt.
Step 5 – GPSD Daemon
Next is the “gpsd” daemon. This is a process that runs in the background and translates the NMEA messages for use by the clients.
gpsd -b /dev/rfcomm0
The b switch tells it to only read messages and not attempt to send anything back to the GPS receiver.
Step 6 – Terminal Client
At this stage your GPS module should be streaming data to the Pi over Bluetooth. To present this data in a more readable way we can use one of the clients that comes with the gpsd package. Try :
cgps -s
If everything has gone to plan you should see something a bit think this :
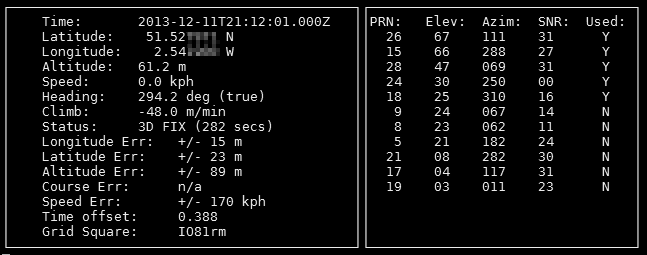
To return to the command prompt you can press CTRL-C.
Step 7 – GUI Client
Once you’ve got cgps working you can try the GUI client xgps. Fire up the GUI by typing :
startx
Open a LXTerminal window by clicking the desktop icon. Then run the client by using :
xgps
You should see something like :
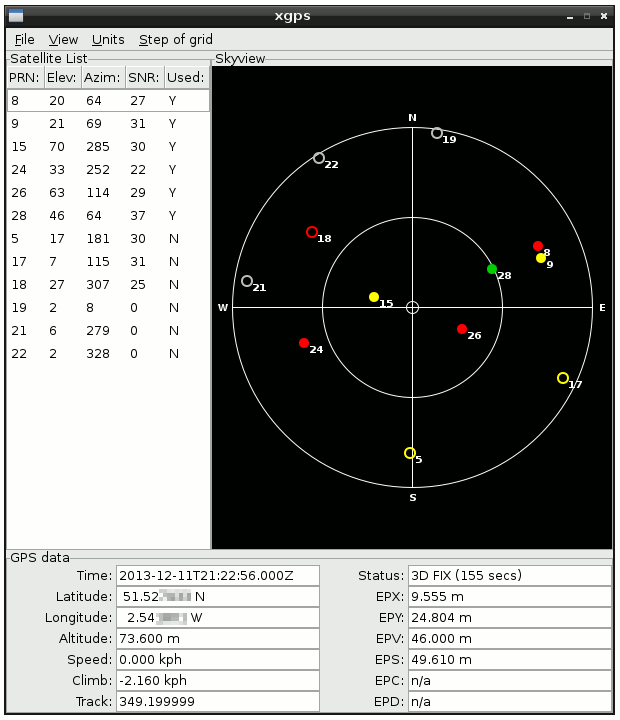
If it’s all working and you are still reading this then congratulations!
Step 8 – Reconnecting After Reboot
When you reboot you will lose the Bluetooth link and will have to repeat the process from Step 4. That’s boring. By editing a system file we can get the Pi to reconnect on start-up.
sudo nano /etc/bluetooth/rfcomm.conf
Remove the # characters in front of the rfcomm0 {} block and edit the settings so you end up with something like this :
rfcomm0 {
        # Automatically bind the device at startup
        bind yes;

        # Bluetooth address of the device
        device YOUR_DEVICE_MAC_ADDRESS;

        # RFCOMM channel for the connection
        channel 1;

        # Description of the connection
        comment "My GPS Module";
}
Remember to set bind to “yes” and replace “YOUR_DEVICE_MAC_ADDRESS” with the MAC address of your device.
Use CTRL-X, Y and then enter to save and exit from the nano text editor. On reboot you will now be able to start at Step 5 (running gpsd).
To take it a step further you can get gpsd to run at boot automatically. To do that run :
sudo dpkg-reconfigure gpsd
This will bring up a wizard which configures gpsd to start automatically. You will need to enter a few details such as the serial port location (/dev/rfcomm0) and the command line switches (-b). I wasn’t interested in USB devices so I told it to ignore those.
When you restart your Pi it should connect to the GPS device and allow you to launch the clients straight away.
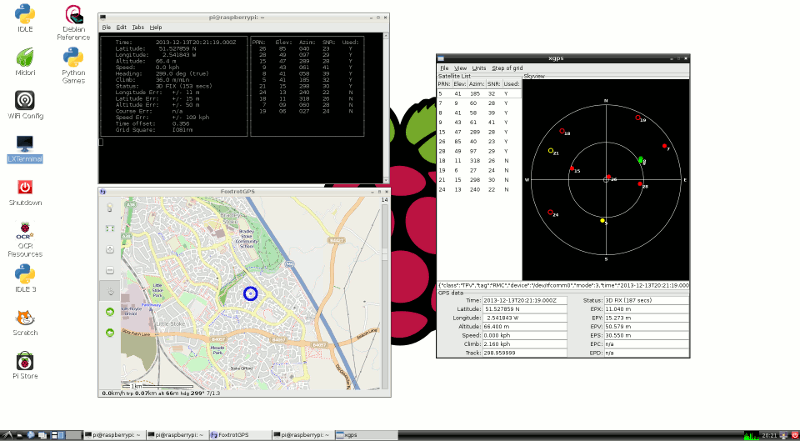
Step 9 – Other Clients
Once you’ve got the basics working you can start exploring all the other applications that are happy to read data from the gpsd process. One application worth trying is FoxtrotGPS. It can be installed using :
sudo apt-get -y install foxtrotgps
and then run using :
foxtrotgps
It loads maps from OpenStreetMap and will show your current position as well as speed and altitude.
Final Thoughts
There are plenty of other GPS clients that will probably run on the Pi. What you do with them is just down to your imagination.
Updates
I have seen messages that the following devices work using this tutorial :
- Dell BT-309 GPS
- Emtac D1598 Bluetooth GPS
- Holux GPSlim236 GPS
- Holux GR-230
- Holux M-241 GPS Data Logger
- Navicore SiRF III Bluetooth GPS
- RoyalTek RBT-2300 GPS
- QStarz BT-Q816 GPS
If you’ve tried it and it works for your device let me know and I will update this list.
29 Comments
Thanks for the tip. Works great with my QStarz BT-Q816.
HI,
Good guide, just noticed that the rfcomm command needs to be run as root or I get a “permission denied” error.
Also tested this with a Dell branded BT-309 GPS for the Axim X50/X51 PDA’s and a Belkin F8T012 Bluetooth adpator and it communicated fine although the GPS couldn’t get a fix on the satellite signal which I put down to LOS problems.
Hallo Ian,
I have the same problem with rfcomm.
What do you mean by root ?
Thanks
Jos
Works like a charm with Holux M-241 GPS Bluetooth Data Logger.
thanks for this one, works great
emtac bluetooth gps
model :D1598
Works with the Plugable 4.0 LE. Thanks!
Everything working just fine with my navicore SiRF III Bluetooth GPS
Hi,
it works also with Holux GR-230.
Good To Do List.
Klaus
Thanks! Works like a charm with Holux GPSlim 240 (SiRF III Bluetooth GPS).
I don’t have access to a GPS receiver running bluetooth so I wondered whether I could use a standard serial GPS receiver (4800 8N1) interfaced via bluetooth (/dev/rfcomm0) instead. For this I needed just two pieces of additional hardware, a LogiLink USB dongle plugged into the Pi (better double check its presence running lsusb) and a HC-06 Bluetooth to serial adapter cheaply bought on ebay. And it worked. Here is a short rundown of the additional steps I had to take. Since the GPS receiver has a fixed speed of 4800 I had to reconfigure the HC-06 Bluetooth to serial adapter to 4800 as well (default is 9600). The command for this was “AT+BAUD3” sent with 9600 8N1. The “hcitool scan” command found the HC-06 and unveiled its MAC-address. To check the USB dongle can indeed talk to the HC-06 I ran “sudo l2ping MAC-address”. The result doesn’t look much different from the usual ping. Since the HC-06 comes with a password (1234) I had to run “sudo bluez-simple-agent hci0 Mac-address” which prompted me to enter that password. Now I was all set to run “sudo rfcomm connect 0 Mac-address &” as described above. BTW. gpsd can be killed running “sudo kill -9 ‘pidof gpsd'”. Thanks for all your fine work!!!
Just followed the guide to configure my TomTom Bluetooth GPS antenna, and it works fine too.
Thanks 🙂
Thanks for the great tutorial, it really helped me get past the last bit (getting the data connection).
Confirmed working on Altina GBT-709 receiver, identifies itself as BT_GPS on the hcitool scan.
Thank you for your tips!! My GNS 2000 also works fine.
HOLUX M1000 also works fine
How to set in km/h and meters. By default apears in ft and mph?
Hi,
I know there’s some time since you replied this but i need to know if everything worked for you or you made some kind of work around?
I have the same gps device, the rfcomm is working properly, but the gpsd isn’t working, he’s not catching the data that are being transmitted on the channel.
Thanks!
Ik heb een GPS lim 236 mis de antenne kabel. Weet iemand wie die nog in voorraad heeft. B.v.b. mijn dank. Jane Bloom
Dual XGPS160 works fine.
Just fired up an ancient iBT-GPS unit with a CSR Bluetooth dongle on the Pi and worked just fine. Most surprising thing is the GPS unit has been in a box for at least 10 years and the battery still had charge!
Many thanks for the tips.
Hi.
How to connect to Bluetooth GPS, if GPS require PIN?
Thx
A.
Worked fine with an old TomTom 9821X. Thanks for the great tutorial.
Hi
Works fine with my GPS Mouse “Route66 Sirf3 ”
Thx for this nice Tutorial !
Thanks for this tutorial. It works with my GSpace GS-R238.
Thanks so much for the tutorial! Works well with Holux M1000. I’ll be looking for other GPS clients just for fun.
Works great when connecting PI to an android phone with ‘gps to bluetooth’ app (tested with several devices)
The app used was btGPS.v2
Thank you for a great tutorial. Works for an old RoyalTek RBT-2100LP too
Works well on my good old Garmin GPS 10x : )
GPT-700 Bluetooth GPS Receiver
Dual XGPS150 works fine.
I tried it with the now obsolete CoPilot Bluetooth GPS Receiver I kept in my shed for the last 10 years – worked a treat!