
I2C is a multi-device bus used to connect low-speed peripherals to computers and embedded systems. The Raspberry Pi supports this interface on its GPIO header and it is a great way to connect sensors and devices. Once configured you can connect more than one device without using up additional pins on the header.
Step 1 – Enable I2C Interface
The default Raspbian image disables I2C by default so before you can use it the interface must be enabled. This can be done using either of two methods. I’ll describe all methods but the first one is probably easier and quicker.
Method 1 – Using “Raspi-config” on Command Line
From the command line or Terminal window start by running the following command :
sudo raspi-config
This will launch the raspi-config utility. Select “Interface Options” :
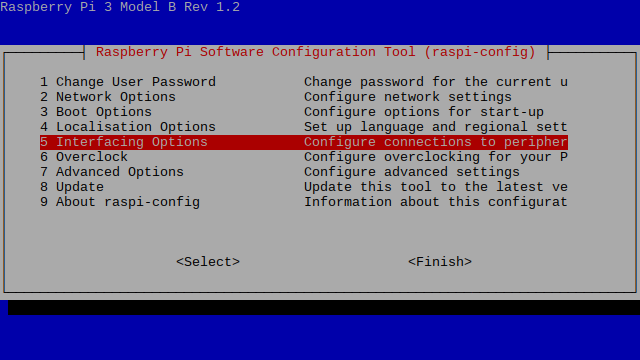
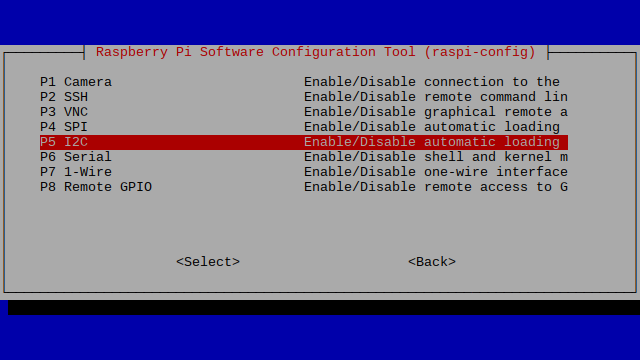
Highlight the “I2C” option and activate “<Select>”.
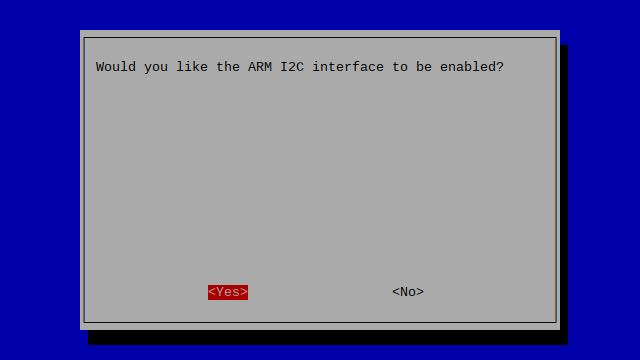
Select and activate “<Yes>” :
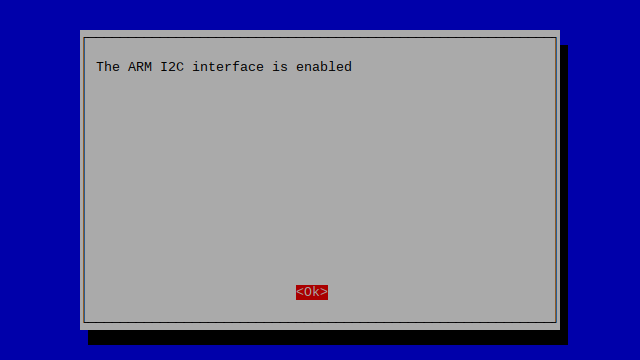
Highlight and activate “<Ok>” :
When prompted to reboot highlight and activate “<Yes>” :

The Raspberry Pi will reboot and the interface will be enabled.
Method 2 – Using “Raspberry Pi Configuration”
If your Pi boots to the desktop you can either open a Terminal window and use Method 1 or use the graphical tool “Raspberry Pi Configuration”. This is found under Menu > Preferences > Raspberry Pi Configuration
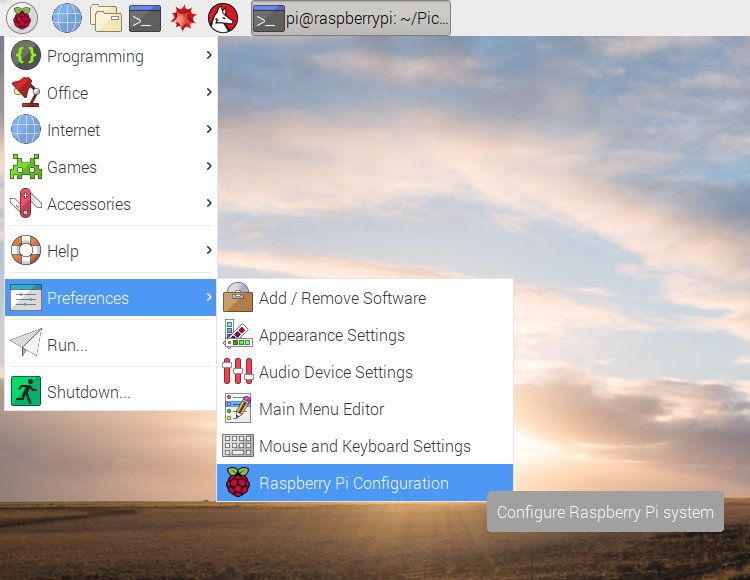
Then you simply need to select the “Interfaces” tab and set I2C to “Enabled” :
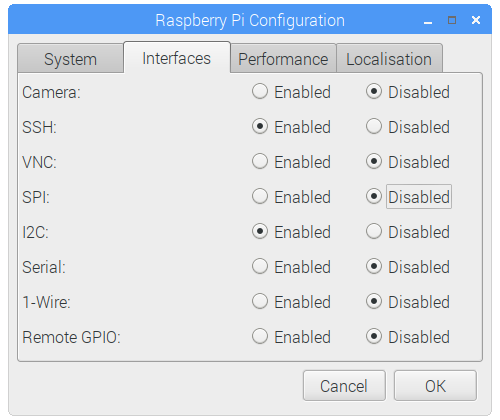
Click the “OK” button. If prompted to reboot select “Yes” so that the changes will take effect.
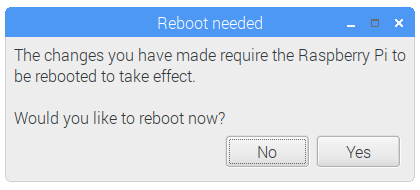
The Raspberry Pi will reboot and the I2C interface will be enabled.
Step 2 – Install Utilities
To help debugging and allow the interface to be used within Python we can install “python-smbus” and “i2c-tools” :
sudo apt-get update
sudo apt-get install -y python3-smbus i2c-tools
Step 3 – Shutdown
Shutdown your Pi using :
sudo halt
Wait ten seconds, disconnect the power to your Pi and you are now ready to connect your I2C hardware.
Checking If I2C Is Enabled (Optional)
When you power up or reboot your Pi you can check the i2c module is running by using the following command :
lsmod | grep i2c_
That will list all the modules starting with “i2c_”. If it lists “i2c_bcm2708” then the module is running correctly.
Testing Hardware (Optional)
Once you’ve connected your hardware double check the wiring. Make sure 3.3V is going to the correct pins and you’ve got not short circuits. Power up the Pi and wait for it to boot.
If you’ve got a Model A, B Rev 2 or B+ Pi then type the following command :
i2cdetect -y 1
If you’ve got an original Model B Rev 1 Pi then type the following command :
i2cdetect -y 0
Why the difference? Between the Rev 1 and Rev 2 versions of the Pi they changed the signals that went to Pin 3 and Pin 5 on the GPIO header. This changed the device number that needs to be used with I2C from 0 to 1.
I used a Pi 2 Model B with a sensor connected and my output looked like this :
pi@raspberrypi ~ $ i2cdetect -y 1
     0  1  2  3  4  5  6  7  8  9  a  b  c  d  e  f
00:          -- -- -- -- -- -- -- -- -- -- -- -- --
10: -- -- -- -- -- -- -- -- -- -- -- -- -- -- -- --
20: 20 -- -- -- -- -- -- -- -- -- -- -- -- -- -- --
30: -- -- -- -- -- -- -- -- -- -- -- -- -- -- -- --
40: -- -- -- -- -- -- -- -- -- -- -- -- -- -- -- --
50: -- -- -- -- -- -- -- -- -- -- -- -- -- -- -- --
60: -- -- -- -- -- -- -- -- -- -- -- -- -- -- -- --
70: -- -- -- -- -- -- -- --
This shows that I’ve got one device connected and its address is 0x20 (32 in decimal).
A full list of tutorials featuring this interface can be found by clicking here.
Finally, there is more technical information about I2C on the Wikipedia page if you are interested.
32 Comments
I try all this and I got this error. I have Rpi B+
Error: Could not open file `/dev/i2c-1′ or `/dev/i2c/1′: No such file or directory
All I can suggest is using the latest Raspbian image and trying again.
Same here with Raspberry Pi 2 with latest Raspbian (kernel 3.18.6-v7+).
Using raspi-config results in absolutely no modifications to the config files.
Modifying the config files manually also gives no good news.
SOLUTION: Searching the web, it appears that with new kernels (3.18) it’s necessary to modify another file. Edit /boot/config.txt and add the line:
dtparam=i2c_arm=on
It seems there’s another line to add, but I got i2c working without this one:
dtparam=i2c1=on
Good i2cing 😉
After a bit of experimenting I’ve got my i2c hardware working. I’ve updated my articles so hopefully they now reflect the changes made in Raspbian.
There is a mistake in your /etc/modules script. You need to change the fallowing for it to work on the new Rpi2 board.
“i2c-bcm2708” -> “i2c-bcm2835”.
2708 is for the original Rpi1 board, but for it to work on the new Rpi2 board. You need to change it to 2835.
i2c-bcm2708 works for both boards. i2c-bcm2835 works for the Pi 2 but stops a B+ booting. So at the moment I can’t see why you wouldn’t use i2c-bcm2708 and have your SD card work in a B+ and Pi 2.
Have followed the procedure as shown above, however, when I type “sudo i2cdetect -y 1 I get an error message “could not open file ‘/dev/i2c-1’ no such file or directory. I am totally new to the Raspberry Pi and it’s operating system so don’t know if the directory has been updated or how to correct it. Any help would be appreciated.
What i2c device are you using and what model Pi?
Thanks – best article I’ve seen on this subject. It’s great to see that you keep it up to date. I have booked marked your site for future reference once I have got my IMU working.
BTW: What does the i2c-bcm2835 module do that the i2c-bcm2708 doesn’t? (I have a PI 2 B board, I gather from your comments that it really doesn’t matter but it would be nice to know).
Here’s a tip: If you get I2C errors make sure that keep the leeds between the IMU and the PI short. I had made a test cable for various Arduino modules, it was quite long so I could move the model around to test it. I was able to successfully run the IMU on the Arduino and it worked fine but when I connected it to the PI, I would get “I2C 113, Unable to read FIFO Counter”, errors and none of the supplied software would work.
I found that my Freetronics 9-DOF IMU (http://www.freetronics.com.au/collections/modules/products/9-dof-imu-accelerometer-gyroscope-magnetometer) has two 4.5K pull-up resistors and these should be disabled with the Pi because it has it’s own pulp resistors, 1.8K, so you really don’t want to add any extra ones into the circuit because they become connected in parallel and reduce the total pull values considerably (1/(1/1.8K+1/4.5K) = 1.285K, yikes!).
I have the new improved Pi2 1gb. I am using Raspbian and I have tried all of the steps to enable i2c. The statement- lsmod | grep i2c_ does return “i2c_bcm2708″ and one other module.
But, sudo i2cdetect -y 1 does not work just the same. “sudo: i2cdetect: command not found” is the result. I am wondering if the problem is the RTC that I have installed. It came without any instructions of it’s own and other people are having trouble using a RTC on the Pi2.
If i2cdetect is not recognised then it sounds like i2c-tools is not installed. Are you using a “Tiny RTC” module?
Yes. Mini RTC or Tiny GPIO device. The real time clock works great now but I sure wish they had provided instructions with it.
It was cheap though. Many thanks for your help.
Well, I just got i2cdetect to work on my Pi2 running Raspbian. My troubles were all due to the fact that I was trying to use a Wi-Fi adapter when installing python-smbus and i2c-tools. I connected a network cable and tried again. This time all is well and I can go on to set up the date and time on my new RTC (real time clock)
Thanks for the info. Your instructions are the best I have found on the Internet.
Heya, I really can’t seem to get this right. the weird thing is, when connecting one device and scanning for i2c devices I get EVERY possible address filled instead of just 0x20. any ideas on what i might be doing wrong?
Are you using the latest version of Raspbian? How long are your wires?
After fallowing all steps I’m getting the error: Error: Could not open file `/dev/i2c-1′ or `/dev/i2c/1′: No such file or directory
I tried every suggestion on this discussion without no luck. Can it be something with the wiring between the pi and the nano? Is there any picture or scheme on this?
Thanks
Are you using the latest version of Raspbian? Does your /boot/config.txt contain the line :
dtparam=i2c_arm=onIf it does not then add it at the end by editing the file using :
sudo nano /boot/config.txtHi
I had followed all the step above. It works fine until the lsmod |grep i2c_. However, when I key in the i2cdetect -y 1, I can’t detect the address of my device. I am using Raspi B+ with ina219. Can anyone help me with it???Thanks!!!
If you run lsmod does it list the i2c modules? Did you reboot after editing the /etc/modules file?
I have followed every step here, I’m using a RaspberryPI 2 B+ 1GB and a DS3231 RTC Module. I am running the latest build version of Raspbian and have installed the i2c tools. When booting, it looks like it sees the module as the verbose booth shows it identifying the i2c controller and a device. However, when I run i2cdetect -y 1, it tells me that it cannot find `/dev/i2c-1′ or `/dev/i2c/1′. I am running on a Read-Only partition with UNIONFS for /etc and /var. I’m at my wits end, how do I get this working?
All I can suggest is follow the process with a clean Raspbian image.
Was trying to install a RTC and was going round in circles trying to connect to the IC2 bus. This guide helped me sort out everything, thanks very much. (there is a lot of very poor stuff out there which is either wrong o is asumming prior knowledge)
I used I2C on an Arduino, and after considerable thrashing I got it to behave. The Pi looks a lot more difficult. Your excellent article is going to save me a great deal of grief trying to get the Newhaven NHD-0216K3Z-FL-GBW LCD to do what I want it to do.
Thank you for this article
my question is
How many devices can i connect by i2c ?
if i want to connect many arduino ? how many arduino can be connected to raspberry pi by i2c
thank you so much
For a 75 year old new starter in “Pi Land” this was very helpful.
Thank You.
Having problems.
When i do i2cdetect -y 1
I dont get any other numbers listed in the chart…. 00 to 70 down left. And 0-9…a-f along top.
Any ideas as to what issue could be? Thanks
Double check your wiring to the I2C module. Ensure the connections aren’t loose. Reboot and check the module is running.
Hi there Happy PiPeople,
Would I be expecting too much for this to work on my RPi ZERO W please?
Hi Ian, the I2C option is now under “Interfacing Options”. I’ve updated this post to reflect the change.
Hi,
I have followed all the instruction given in this page. However, my raspberry pi board still not able to detect the i2c device. Another thing is that the same i2c device is working fine with arduino uno. This shows that used i2c device is ok to use. Kindly, let me know what to do for further check?
Have you definitely followed the I2C post on setting up I2C and installing the correct software?
Enable I2C Interface on the Raspberry Pi