
Setting up SSH keys on a Raspberry Pi is relatively easy and can make connecting to one over a network more convenient. In this tutorial we’ll explain how to create and configure SSH keys so you can connect to a Pi remotely without needing to enter a password.
To help make the process clearer I’ll assume you’ve got two machines. One is the remote machine you want to access. This is the Raspberry Pi and we’ll call this [A]. The other machine is the computer you will use in the future to access the Pi. We’ll call this [B]. Each step includes these markers in the text to indicate what machine you perform that step on.
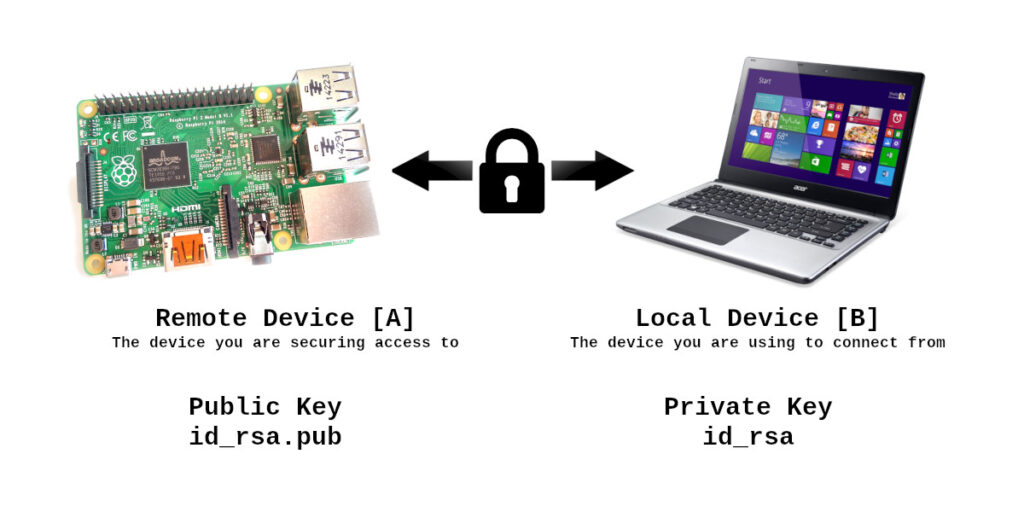
SSH keys are created using “Public-key cryptography”. This is a concept where a public key is stored on the remote device (i.e. a Raspberry Pi) and a private key is used by the owner to prove they own the keys. The public key could be given to everyone but the private key must be kept secret.
In practice the keys are long strings of characters stored in a text file.
To continue with this tutorial you must have either direct access to the Pi with a keyboard and monitor or remote access using SSH or VNC.
Step 1 : Create SSH Directory & authorized_keys File [A]
To start with navigate to the home directory :
cd ~and create a new directory called “.ssh” (note the . character) :
mkdir .sshNavigate into the new directory :
cd .sshand create an empty “authorized_keys” file :
touch authorized_keysStep 2 : Set Permissions [A]
The permissions on the ssh directory need to be modified :
chmod 700 ~/.sshNext change the permissions on the “authorized_keys” file so only the Pi user can read and write :
chmod 600 ~/.ssh/authorized_keysStep 3 : Creating A New Key Pair [A]
If you want to create a fresh key pair then this is easy to do using the ssh-keygen utility.
Navigate to the SSH directory :
cd ~/.sshthen run the ssh-keygen utility :
ssh-keygenYou will be prompted for a location to save the key file. Press ENTER to accept the default.
You will be asked for a passphrase. This is optional. If you use a passphrase you may be asked for it when using the key. It is an extra security step and you will have to decide if you want to make use of it. Either type a passphrase or leave it blank and press ENTER to finish.
If you use a passphrase do not forget it!
This process should create two files for you. A Public key named “id_rsa.pub” and a matching Private key named “id_rsa”.
Add the contents of the Public key to the authorized_keys file using :
cat id_rsa.pub >> authorized_keysSome clients prefer PuTTY style keys. I would recommend creating this format now so you have the choice in the future. The following commands will install puttygen and create a PuTTY version of your new key :
sudo apt-get install putty-toolsthen :
puttygen id_rsa -o id_rsa.ppkStep 4 : Copy Key Files to your local machine
You should now have three files :
- id_rsa
- id_rsa.pub
- id_rsa.ppk
Copy these files from the Pi [A] to a safe location. You could do this using FileZilla on your local machine [B] to copy the files onto your network.
The Private key (id_rsa or id_rsa.ppk) is required by the client [B] you use to connect to the Pi. This might be a PC, laptop or mobile phone. The Public key (id_rsa.pub) is used by the Pi [A] you wish to connect to.
You can use the same Public key on multiple devices as long as you have the Private key to match.So all your Pis could use the same Public key and you would only need the one Private key to access them all.
Once you have safely stored the keys somewhere else they can be deleted from the Pi [A] using the following commands:
rm id_rsa
rm id_rsa.pub
rm id_rsa.ppk
Step 5 : Adding an Existing Key [A]
If you already have a Public/Private key pair you can add the Public key to the “authorized_keys” file. Follow Step 1 and Step 2 to setup the “authorized_keys” file.
You’ve got two methods for putting the public key details into the keys file.
The first method is to edit the keys file directly :
nano authorized_keysand paste the contents of the Public key file (e.g. id_rsa.pub) into the editor. Use CTRL-X, Y and ENTER to save the changes and return to the command line.
The second method is to copy the Public key file (e.g. id_rsa.pub) into the .ssh directory. You could use FileZilla to do this. Then use the following command to add it to the keys file :
cd ~/.ssh
cat id_rsa.pub >> authorized_keys
where “id_rsa.pub” is your Public key file.
Once the authorized_keys file has been updated you can delete the id_rsa.pub file :
rm id_rsa.pubStep 6 : Configure SSH Client [B]
At this point you should be able to use your favourite SSH client to connect to the Pi but rather than specify a password you can point it to the Private key. The exact process for doing this will depend on the client used.
As an example here are the session settings in WinSCP :
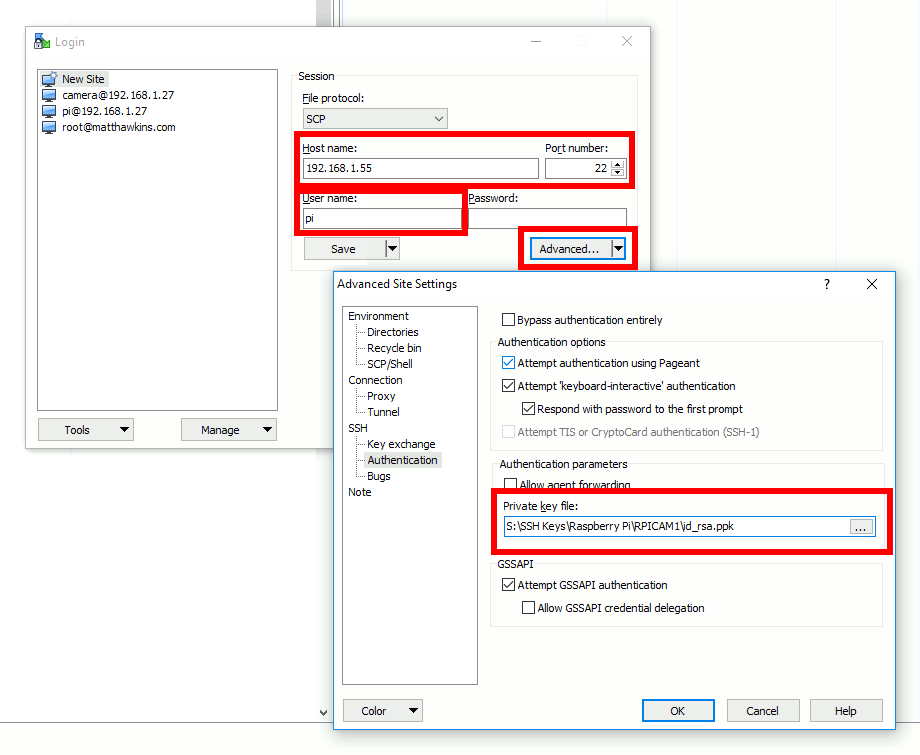
The IP address and username must be specified. Under “Advanced” it allows a Private key file to be selected. WinSCP prefers Putty style keys but will convert an OpenSSH key into a ppk with a single click.
Other SSH clients operate in a similar way.
Step 7 : Connect [B]
If configured correctly connections to the Pi can now be made without having to enter a password.
Although many clients can remember passwords the advantage with SSH keys is that you can use the same key file in all your clients. If you change the key file you won’t have to change the password in all the places you may have it remembered.
You can also store the Private key on a removable drive or within an encrypted container (i.e. Veracrypt). This means if your computer is stolen the connections to your devices won’t work even if someone can open your SSH client and see your saved sessions. No key file no access!
Optional: Convert PPK Files to Private and Public Keys with puttygen
At some point in the future you may need to convert a Putty PPK file to OpenSSH style keys files. Here are the commands you can use to convert a PPK to private and public keys :
puttygen my_key.ppk -O private-openssh -o my_key.private

puttygen my_key.ppk -O public-openssh -o my_key.public
You can perform this step on any machine that has the ppk files available and has puttygen installed.
This guide will allow you to login to your Pi using SSH keys but the standard username/password approach will still work. Make sure you have changed the default Raspberry Pi password to something secure. I tend to use a password that is at least 15 characters long.
It is possible to rely on SSH keys completely and disable the ability to log in with a password. However this is beyond the scope of this guide.
3 Comments
Problems? See this answer and the comments below it:
https://raspberrypi.stackexchange.com/a/4621
I find it very confusing to determine which commands need to be used on the raspberry, and which steps need to be used on my main device (a laptop running win8).
Perhaps using differently colored backgrounds could help clarify? Or just label each code block with “On raspberry” / “on main device” ?
I was unable to use the keys generated by PuttyGen. I had to create the keys on my Pi and copy the private keys to my PC. After that, it works flawlessly.