
This post shows how I added an OLED status screen to my Raspberry Pi based Pi-Hole system.
Pi-Hole is a network wide advert blocker that you can run on a Raspberry Pi. It runs well on all Pi models and is an ideal project for older hardware. You can read more about it on the official Pi-Hole site.
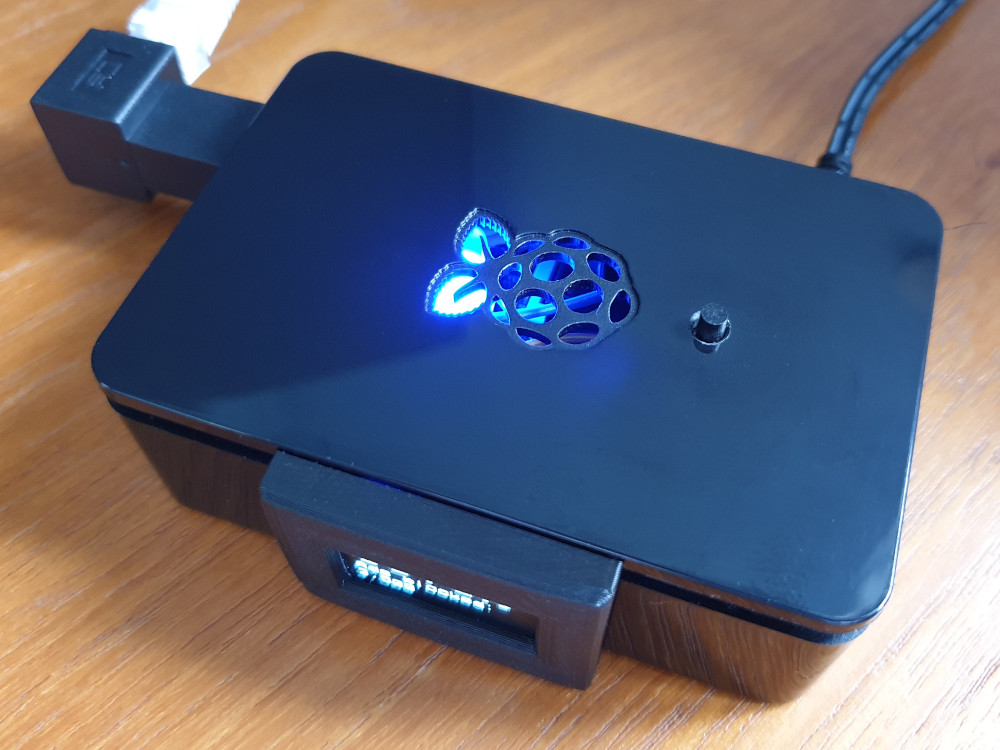
Having setup Pi-Hole on a Raspberry Pi B+ I wanted a way to add a display so I could quickly check it was working. So I added a cheap 0.96″ OLED display and a momentary switch. The switch allows the display to show additional detail as required. The LED is there to add a nice coloured glow to the box but of course this optional.
OLED Status Screen Hardware Setup
The hardware requirements are fairly basic.
- Raspberry Pi (any model but ideally you want an Ethernet port)
- SD card (8GB or larger recommended but 4GB will work)
- Power supply
- Network connection
- Ethernet cable
- or on-board WiFi
- or USB WiFi dongle
- Monitor (optional)
- Keyboard (optional)
- Pi case (optional)
The status screen and switch upgrade require :
- OLED screen with I2C interface [eBay] [AliExpress]
- Momentary switch [eBay] [AliExpress]
- Jumper cables to connect screen to the GPIO header
- LED and resistor (optional)
- Bezel or mount for screen (optional)
Pi-Hole Installation & Setup
Installing Pi-Hole is fairly straightforward. I don’t really want want to replicate the procedure here. Instead I will provide a summary of what I did with appropriate links to additional guides. Depending on your preference you can either use SSH or a keyboard and monitor to perform the setup.
- Create a fresh Raspbian SD card with “Raspbian Lite” image and Etcher [guide]
- Add empty text file named “ssh” to boot partition to enable SSH [guide]
- Power-up Pi with new SD card
- Change the default password to something sensible [guide]
- Run “sudo apt update” followed by “sudo apt upgrade”
- Get IP address of Pi by either :
- running ifconfig on the Pi
- looking in your router settings
- using a network scanner
- (optional) configure your router to always assign the same IP address to your Raspberry Pi
- Follow one of the install procedures described on the Pi-Hole GitHub page. I used the “One-Step Automated Install”
Screen and Switch Wiring
The switch was wired directly to the GPIO header using jumper wires and then stuck onto the lid with two part epoxy glue.

The screen, switch and LED were wired up as shown below :
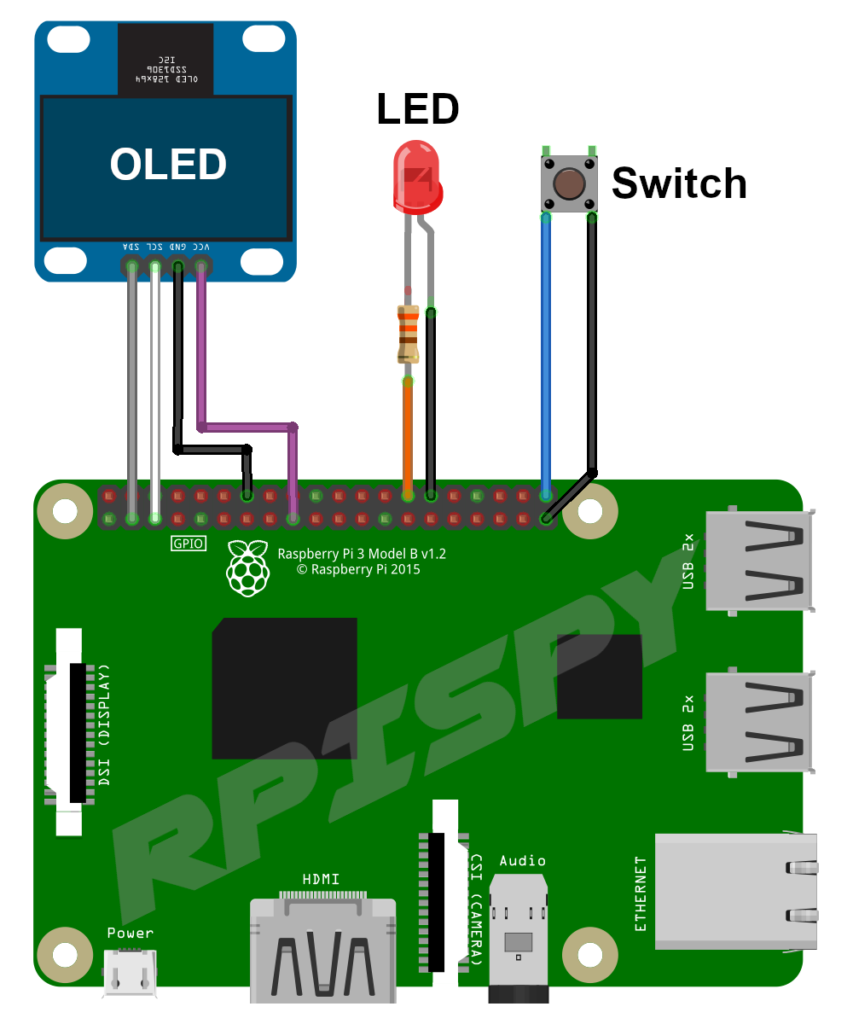
The screen was powered from a 3.3V pin and the LED was powered from a GPIO pin.
OLED Screen Setup
OLED screens using the I2C protocol are fairly easy to hook up as you can use jumper cables to connect directly to the GPIO header. The procedure for adding one to your Pi and getting the libraries installed can be found in my How to use an OLED display module tutorial.
Make sure you can run the example Python scripts and your screen is working.
Switch Hardware
The switch can be connected directly to the GPIO header. I connected it across GPIO21 (Pin 40) and Ground (Pin 39). When the switch is pressed it will pull GPIO21 to ground and activate the “button_pressed” function.
Download Script Files from Github
To get the script files navigate to your home directory:
cd ~and then clone the project repository using:
git clone https://github.com/RPiSpy/pi-hole-screen.gitThis will create a folder named “pi-hole-screen”.
PIP Install
We’ll need to use pip so install using the command below:
sudo apt install python3-pipPython Virtual Environment
To create a Python 3 virtual environment we must first ensure “venv” is installed:
sudo apt install python3-venvTo create an environment in the new folder named “venv” use:
cd pi-hole-screenand then:
python3 -m venv venvThis creates a self-contained Python 3 system. Activate it using:
source venv/bin/activateYou should notice the name of the virtual environment appear in front of your command prompt.
While activated any Python libraries that are installed will be installed in this virtual environment and not interfere in your default Python installation.
Note: We created a Python 3 environment so going forward any use of “Python” will automatically refer to Python 3.
Python Module Installation
The following Python modules can now be installed within our Virtual environment:
python -m pip install requestspython -m pip install luma.oledpython -m pip install gpiozeropython -m pip install lgpioPi-Hole App Password
In order to query the Pi-Hole using the API you need to add your unique App password to the config.py file.
If you haven’t previously generated a password you can generate one from the Pi-Hole Admin Dashboard on the “Web interface / API” tab under “Settings”. You need to click the “Configure App Password” button. Store the password somewhere safe as Pi-Hole will only show it to you once.
Config File
The config-template.py file must be renamed to config.py
mv config-template.py config.pyThen you must edit it and add your Pi-Hole app password:
nano config.pyFind the line:
APIpassword = "YOUR PIHOLE APP PASSWORD HERE"Add your API password between the quotes.
Save and exit using CTRL-X, Y then ENTER.
Test Script
At this point the screen should be ready to go. You can test it using these steps:
cd ~/pi-hole-screensource venv/bin/activatepython oled-screen.pyHopefully your screen is working.
Setup Cron
To get the script to run at startup we can add an entry to cron using crontab:
crontab -eand adding the following line to the end :
@reboot sleep 60 && /home/pi/pi-hole-screen/venv/bin/python /home/pi/pi-hole-screen/oled-screen.py > /home/pi/pi-hole-screen/oled-screen.log 2>&1You cron file will look like this :
# For more information see the manual pages of crontab(5) and cron(8)
#
# m h  dom mon dow   command
@reboot sleep 60 && /home/pi/pi-hole-screen/venv/bin/python /home/pi/pi-hole-screen/oled-screen.py > /home/pi/pi-hole-screen/oled-screen.log 2>&1
Save and exit using CTRL-X, Y then ENTER.
Reboot the Pi and the script should display Pi-Hole data on the screen after approx 60 seconds. This delay gives the Pi time to connect to the network before it tries asking Pi-Hole for data. Pressing the button will scroll an additional set of data onto the screen.
The text output from the script will be directed to “oled-screen.log” which can be useful to pickup any error messages.
OLED Screen Bezel
The black screen bezel was 3D printed to enclose the OLED screen and it’s PCB. Due to variations in OLED module the bezel allows a bit of adjustment. The screen had to be positioned by hand and then glued into position. The bezel was attached to the case using double sided tape.
The STL file is available from my Thingiverse channel.
Here is a basic animation of the 3D printed bezel :
Pi-Hole Status Screen in Action
The available status screens can be seen below :
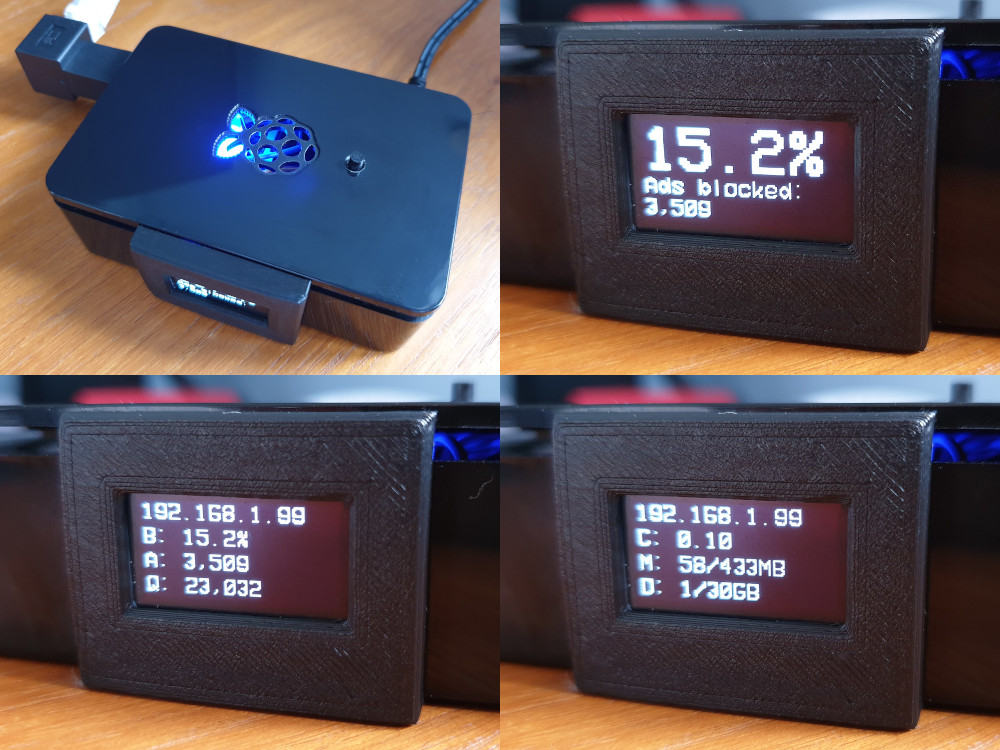
Every 30 seconds the main screen scrolls and refreshes the data. This gives a good indication that the script is still running without needing to check anything else.
- Screen 1 (Main)
- Total blocked percentage
- Total blocked count
- Screen 2 “BAQ”
- IP address
- Blocked percentage
- Total blocked count
- Total number of queries
- Screen 3 “CMD”
- IP address
- CPU utilisation
- Memory in use/Total memory
- Disk space used/Total disk space
- Screen 4 “X”
- Indicates that Pi-Hole has been disabled
The case I’m using is a “DesignSpark black” case from RS Components.
Thoughts on Ad-blocking
I decided to try Pi-Hole because as a parent I needed to be able to demonstrate I was in complete control of my network and my household internet rules were the law. This was generally aimed at ensuring the safety of children using my WiFi rather than spying on the adults.
This was especially true when my son’s friends were bringing internet enabled devices into my house. I didn’t want to deny them the ability to use those devices but I had no control over how they were configured. Parental controls or fancy apps may help your own kids but you can’t impose them on visitors.
Ad-blocking is a controversial topic especially amongst those that rely on adverts to generate an income stream. This is true for this site where advertising helps offset the hosting costs. I’ve always been in two minds as to whether I should encourage others to run a system that will strip the ads from this site and the sites of other content generators. I understand why people want to do it but I also feel on this site, adverts are a tiny price to pay for content that is generally helpful to people.
But the choice is ultimately yours.
10 Comments
Is it hard to add a sleep mode to this?
Where an additional button could be used to wake the screen for a predetermined time, and the first button will scroll as designed.
Love the great tutorials you put out.
Thanks.
there is a bezel here, in case you don’t have a 3D printer [link]
Hi there. Is it possible to do this stuff with an older Raspi? I tried it with your tutorial but the display stays black.
Cheers
Pi-Hole runs fine on older models. I use a B+. I recently updated the tutorial so may be worth retrying.
Does not work for me. Did a clean install of “Lite” on my Pi 2. I followed your guides to I2C displays – All ok. I can see animations, images … with the python3 commands. PiHole installed and working, webinterface and all. The thing is, after rebooting the OLED does not reset. I still have the last image presented from the testscripts and it just sits there like the display is not properly initialized or reset. Your script says (rst=None) in the display section? Changing it to rst=RST did not help. My OLED is at 0x3C, and as I said all else works just as it should. Any ideas?
I’ve just updated the instructions to include the installation of gpiozero which isn’t included by default in Raspbian Lite.
sudo apt install python3-gpiozeroThe gpiozero module is not default installed on a Raspbian LITE image. I ran the script manually and it returned a ModuleNotFound error. Running sudo apt install python3-gpiozero solved the problem. Nice work. Have mine running on a Pi 2 that was collecting dust otherwise.
When it says 15.2% of the queries have been blocked does that mean the remaining 84.8% of queries have resulted in ads coming through? I assume that’s based on your black/whitelists?
If that makes sense?
I think it means the other 84.8% weren’t considered ads so were allowed to pass. So normal requests to allowed domains for all the other stuff being requested on your network webpages, images, kitten videos, Facebook posts etc.
Thanks for putting this together, one thing that I needed to do was after downloading the font copy it to /usr/share/fonts/truetype
and run fc font-cache
If I have the font in the same directory as the stats.py script it does not seem to matter – but running this from a different directory or using the crontab seemed to need to have the font installed.