
![]() This page aims to summarise the steps required to install a webserver with PHP support onto your Raspberry Pi. This will allow the Pi to server HTML and PHP pages to users on the same network. This is a useful mechanism to view images and/or data on the Pi from another device, whether that is a PC, laptop, tablet or mobile phone.
This page aims to summarise the steps required to install a webserver with PHP support onto your Raspberry Pi. This will allow the Pi to server HTML and PHP pages to users on the same network. This is a useful mechanism to view images and/or data on the Pi from another device, whether that is a PC, laptop, tablet or mobile phone.
Note : Before experimenting with network enabled features you should really make sure you have changed your Pi password from the “raspberry” default.
Step 1 – Install Lighttpd
Lighttpd is a lightweight web server application that works well on the Pi. It can be installed using the following commands :
sudo apt-get update
sudo apt-get -y install lighttpd
 Step 2 – Install PHP
Next we need to install PHP. The order in which php5-common, php5-cgi and php5 are installed is important so don’t change their ordering in the line below :
sudo apt-get -y install php5-common php5-cgi php5
Then enable the Fastcgi module which will handle the PHP pages :
sudo lighty-enable-mod fastcgi-php
Once these packages are installed we can restart the Lighttpd service to pick up the changes :
sudo service lighttpd force-reload
Step 3 – Testing
In order to test your new webserver you need to know the IP address your Pi has on your network. To do this run this command :
sudo ip addr show
You will see a block of information similar to this :
1: lo: <LOOPBACK,UP,LOWER_UP> mtu 16436 qdisc noqueue state UNKNOWN
link/loopback 00:00:00:00:00:00 brd 00:00:00:00:00:00
inet 127.0.0.1/8 scope host lo
2: eth0: <BROADCAST,MULTICAST,UP,LOWER_UP> mtu 1500 qdisc pfifo_fast
state UP qlen 1000
link/ether b1:11:ab:42:24:2c brd ff:ff:ff:ff:ff:ff
inet 192.168.0.45/24 brd 192.168.0.255 scope global eth0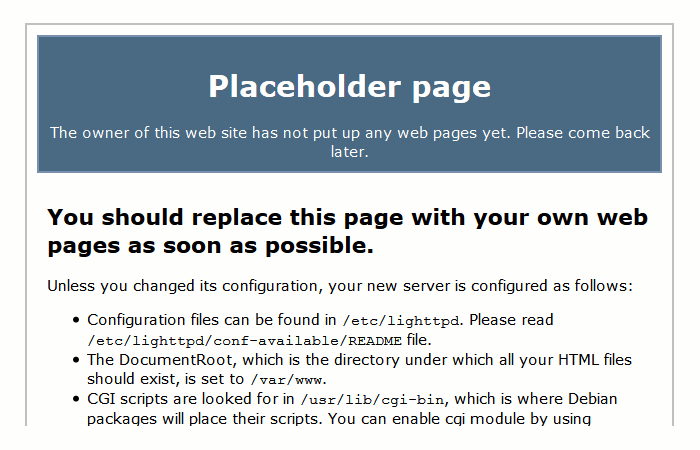 The IP address in this example is 192.168.0.45. Take this IP address and enter it into the address bar of a web browser on another device.
If everything has worked you should see the default Lighttpd “Placeholder” web page. It’s not very exciting but it is easy to replace with your own page.
Step 4 – Tweak Permissions
Now we will adjust some permissions to ensure the “Pi” user account can write files to the location where Lighttpd expects to find web pages. The /var/www directory is currently owned by the “root” user. So let’s make the “www-data” user and group the owner of the /var/www directory.
sudo chown www-data:www-data /var/www
Now we will allow the “www-data” group permission to write to this directory.
sudo chmod 775 /var/www
Finally we can add the “Pi” user to the “www-data” group.
sudo usermod -a -G www-data pi
For these permissions to take effect it is best to reboot your Pi at this point using :
sudo reboot
Step 5 – Replace the placeholder page
Let’s browse to the /var/www/html directory and rename this default page :
cd /var/www/html
sudo mv index.lighttpd.html index.lighttpd.hxxx
Now we can replace it with a new php page :
sudo wget https://www.raspberrypi-spy.co.uk/archive/misc/lighttpd_test.php.txt -O /var/www/html/index.php
The command above grabs a text file from this website, renames it as “index.php” and saves it to the /var/www/html directory. If you want to look at the test page first click here.
Note : The ‘-O’ in the command is a capital letter O (O for Orange) not a zero or lowercase o.
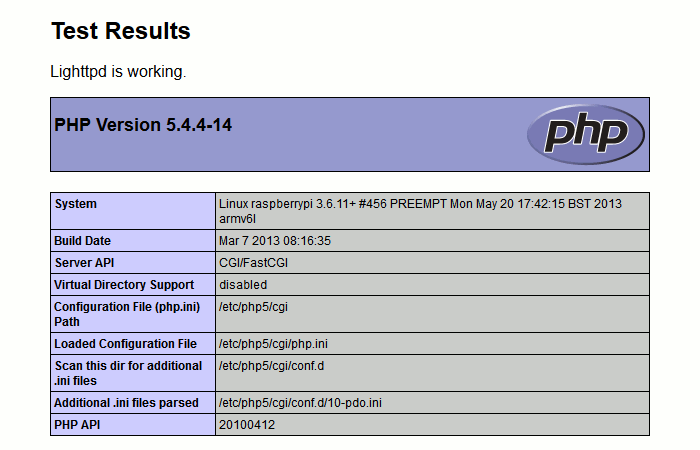 Refresh your browser and you should see the new page. If PHP is working OK you will see a summary of your PHP configuration.
You are now ready to populate /var/www with HTML, CSS, JS, PHP and image files just as you would for a normal website. These files could be created by your own programs which gives your projects and experiments a way to publish their data to other devices.
This is yet another great way for other devices to interact with your Pi.
If you want your Pi web server to be available on the internet (i.e. beyond your own network) you will need to follow some additional steps. I’m not covering them here but they usually involve “port forwarding” on your router to enable pages to be requested from your Pi by an external visitor.
Optional Steps
By default web servers communicate over port 80. If you want to change the port number that Lighttpd uses you can easily change it by editing the lighttpd.conf file :
sudo nano /etc/lighttpd/lighttpd.conf
then change the “server port” line to define your chosen port number :
server.port = 40045
Exit nano using CTRL-X followed by Y. To restart the server and get it to pick up this change use :
sudo /etc/init.d/lighttpd restart
You can now access your web server on another device on your network using :
192.168.0.45:40045
Recommended Book
[easyazon_block add_to_cart=”default” align=”right” asin=”1847192106″ cloaking=”default” layout=”right” localization=”default” locale=”US” nofollow=”default” new_window=”default” tag=”matthawkinson-20″]If you fancy reading a lot more about Lighttpd in a printed book then take a look at [easyazon_link asin=”1847192106″ locale=”US” new_window=”default” nofollow=”default” tag=”matthawkinson-20″ add_to_cart=”default” cloaking=”default” localization=”default” popups=”default”]”Lighttpd” by Andre Bogus[/easyazon_link].
This is also available as a Kindle version as well if you prefer your reference material e-book style.
10 Comments
Hi Matt
thanks for your instructions, I was able to setup my raspberry pi.
Forgot to restart the daemon 😉
Doesn’t get much easier that that. Thank you.
Hi very helpful. I have set my pi up as an access point with apache, mysql and php installed. When I go to http://localhost on the pi itself I can see my amended homepage. When I connect my macbook to my pi’s wifi network http://10.0.0.13 it is going to the localhost on my mac and not that on the pi. Any thoughts? Thanks
I was looking all over the web for a good tutorial! Lighttpd and php runs great. Thanks for the easy use. Maybe add static ip address and vsftpd to the tutorial?
Is there a way to change the file directory that it points to to access the web files? I’d want to point to a hard drive mounted via USB.
Sorry if this is obvious, thanks so much!
Hi Matt,
Thanks for this introdution.
It’s great!
Just one hint:
Your link given to see the test page is wrong:
If you want to look at the test page first .
I think you meant it that way ;-).
Thanks Phil. I’ve corrected the link. No idea why it was so wrong!
Thank you for this, Matt. Should MySQL be in there too? I see it on other similar web server setups for raspberry Pi. I have gone for yours, as I find it easier to follow. Very clear. I have no real idea what MySQL does, apart from it being for data??
Hi,
A very good and interesting tutorial, well written and very clear. I look forward to trying it.
Question: I currently haave a very crude A.P. setup (and I do mean crude) and would like to upgrade it using your tutorial. How might I go about adding a simple “captive portal” to the server? I am not looking for anything bulletproof just something that will keep the user on the same page until they enter a password. In addition, is it possible to “force” the users computer to the captive page as soon as they connect to the AP ?
Thanks for posting the tutorial.
Des.
Des, there is a custom OS called Zavvio made specifically for broadcasting a captive portal. Although this captive portal is very much so aimed at proximity marketing rather than actually presenting a portal page which allows internet access afterwards.
I tried to see if wordpress would work on it, but the dev came up with a compromise and the latest 2.0 release supports a CMS called Habari.
Anyway, if you want to check it out here’s the website.
http://cs0418.wix.com/zavvio
License codes are free at the moment, so I’d hop on it soon if the whole “captive portal but only for locally hosted sites” thing is what you’re looking for